Category Archives: Software

Camtasia

What is it?

Camtasia is  a full-featured education/information video tool, created by TechSmith, that can be bought by a single user for $299.99. Beforehand, a trial period of 30 days is offered for free, which is a great way to try the software without paying $300 first. Moreover, this tool gives the chance to the user to creates videos of what they are doing on their computer instead of using screenshots and modifying them with another program to add texts, arrows, etc.. Program explanation, walkthrough for video games and educational video are only a few videos that can be created using Camtasia.

How to use it?

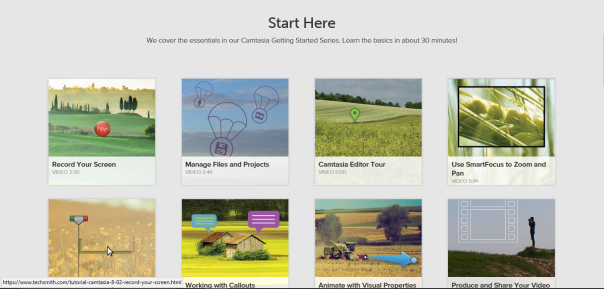
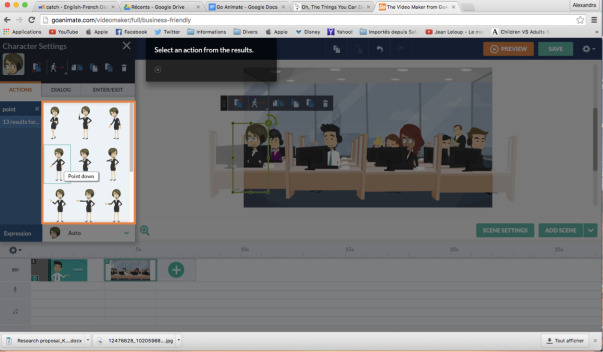
Camtasia is an easy tool to use, especially because of the well explain tutorial that it offers. Indeed, the tutorial explains the some of the basic functions really well. In order to make a new project picture or pre-existent video can be upload, in addition to music.  Once the video/images are uploaded to the lecture bar the user can add notes, cut and delete part among other features. Bubble, music, writing and transition can be added. As seen in the video multiple things can be done using this software. The video can also be shared using YouTube and Google Drive which make it easy to use in a school context. In addition, videos from an older version of Camtasia can be exported and work on with the new version.

camtasia-scrn-cap1-580-100022129-orig

Personal exploration of the application and personal thought

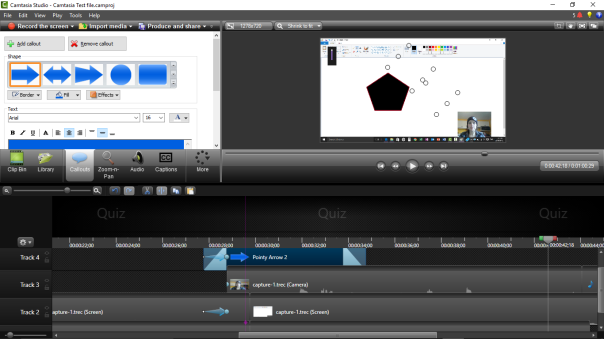
The software is easy to use once you familiarize yourself with it. Indeed, even if the tutorial is well explained, few minutes were needed in order to know how to really do a project using this tool.  As seen in this video, Camtasia offers multiple features but are not all easy to use. Indeed, it offers a quiz options but I was not able to make it work. The different features were sometimes difficult to use and sometimes time was needed in order to figure out how it worked.  The video made was edit in order to shorten the length which was 10 minutes at the beginning and not all features were explored during that time. In fact, voices can be added to make a narration and visual properties can be added, according to the tutorial. The recording can be paused stop and the sound volume can be adjusted. The size of the screen that you want to record can also be modified in order to have only what you want to focus on or the actual thing, like the whole thing.

Teachers’ use

Teachers can use this software in class and students’ projects can easily be evaluated. Indeed, the video can be sent or put on a website easily using YouTube or Google Drive.  In addition, teachers can flip their classroom using Camtasia , which makes it more interactive than other software such as VideoScribe. It also allowed teachers to point out the most important aspects of their lessons or even to replace some class by a video when it is impossible for them to be there. Indeed, a video can be sent to the class so that students are not able to get the theory and information even if the teacher is not there. Same can be done for students that can go to school for some reason (injuries etc.).  Revision documents can also be made using this software, and questions can simply be added by students directly in the video and send back to the teacher  so that the teacher knows exactly where the problems are. The application is also a great tool to use in a school context in order to transform traditional homework and group. Indeed, multiple projects such as power point project, or even digital story  can be made using this tool in order to create, edit the final project and add sound or music to the video.  In fact, digital stories can easily be created using this software and groups can easily work on it and add comments so that they can edit it later on. A similar thing can be done in order to create an interactive storybook for example in which students will read the story while images are passing by.   Furthermore, as mentioned by the  East Carolina University ITC Camtasia can be used to

 Pre-record course lectures, provide supplemental course material, provide step-by-step tutorials, provide a tour of your online course environment and record webcam introductions to weekly course content

which makes it and interesting tool with endless possibilities.

Final thought

Camtasia is a great tool to use in an educational setting not only for students but also for teachers who can benefit a lot from this tool. Indeed, it can help teachers explain a new project and give to the students a reminder to what needs to be done in a more interactive way. Moreover,  the possibility of projects are limitless and the only things that can stop teachers from using  it is their lack of creativity. Furthermore, the fact that quiz can be made using this tool add value to this software. On the other hand, this software is pricey, but with the multiple features that it offers the software is worth the price especially if the teacher is creative enough to know what to do with it.

Vanessa Crete

Snagit: Easy to Use Screen Capture Tool

What is Snagit?

Snagit is a screen capture software created by TechSmith. The software enables you to take pictures or videos of your screen and to do basic editing on your screen captures .

According to Kirsten Buck, “Snagit is the best screen capture software on the market because it combines some of the best capturing and editing features in an easy-to-use program.”

How does Snagit work?

snagit capturing
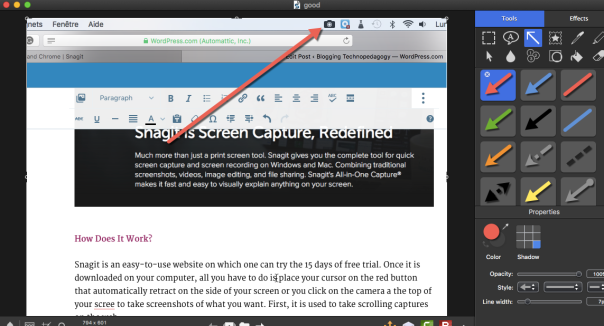
Snagit needs to be downloaded on your computer. You can either create an account or connect with your Google account, which is great to save you some time. As soon as the program is installed, you have a tool bar that opens on top of your computer screen which lets you get started with screen captures. Snagit is also linked to your Print Screen button which facilitates things for you since you only have to click on Print Screen to then select what you want to capture on your screen. If your press on Print Screen using Snagit, the software allows you to select the part of the screen you want to capture either with a photo or a video. Then, once your capture is done, the Snagit Editor opens for you and let you modify your screen capture and save it or share it. Here are some examples of what you can do with this software:

snagit capture

Snagit in the ESL classroom

Snagit is an awesome tool when it comes to teaching in general, but in ESL teaching as well. It can be used for many different purposes. A great way to incorporate the software in ESL teaching would be with flipped classrooms. Through the screen captures, the teacher could make simple videos with narration explaining different grammar points to his or her students for example. The students would get in touch with the new grammar outside of class, and would do exercises to understand and practice the same grammar point in class. This  way, the teacher would be there to help answer their questions. Another way to use Snagit in the classroom would be to help students with particular struggle areas they might encounter. For example, if a “weaker” students do not understand a notion that was seen in class, he or she could write an e-mail to the teacher, who could then send a video that explains the notion or a particular assignment better to the student. A third way to incorporate Snagit in the ESL classroom would be for students to do video reviews. They could try to find a video of interest to them, then decide on what they want to comment, and finally do a screen capture of the video with themselves narrating their comments and everything. This could be an interesting way to evaluate oral production since students should not feel anxiety as much if they are talking alone in front of their computer and have the possibility of starting over again if ever they need to compared to the typical oral presentation in front of the entire class..

My opinion

Snagit is really easy to use. I first downloaded the software and started to look at its feature without watching a tutorial before doing so. As soon as you start using Snagit, you have different tips and explanations of the different features as you try to use them. I think that there is no real need of watching a tutorial of how it works since there are mini tutorials integrated in the software to help you in the beginning.

One thing that disappointed me is that I was unable to record what was happening on my screen without the audio. Even when the video is done, there are few editing options and you simply don’t have the option of removing or replacing the audio. The only thing you can actually do to edit in your screen capture video is trimming parts of it.

Ian Harac mentionned that “If image or video capturing is something you do more than once a week, Snagit 12 is essential.”

In conclusion, I think that Snagit is a great tool to incorporate in an ESL class, if ever your budget allows you to do so. Even if Snagit offers a discount for education, it still costs 29.95$ for a single user. There are no annual fees for the software, but this still means that you would have to invest 30$ for each of your students if, for instance, you want them to use it for video reviews. However, in the long run, I think that every teacher should be able to invest a 30$ in order to have access to Snagit at least for himself or herself. Snagit is definitely a great way to incorporate technology inside or outside the classroom.

Christine Poulin, future ESL teacher

Screencast-O-Matic: Filming and editing for every context

Teaching in a classroom is not what it used to be 15-20 years ago. Programs change, of course, but new teaching methods are put forth as new technologies are developed. The “flipped classroom” is an approach that is gaining some popularity in schools with teachers that are technologically up-to-date. Fortunately for such teachers, many tools are available on the web for those looking to create lasting activities and education material. Screencast-O-Matic is one of these tools.

What is it?

As the host and creators of Screencast-O-Matic put it, the software offers

“Fast, free screen recording [for] educators, businesses, gamers, anyone needing a fast recording app to create a video file, share on YouTube, or even uploading to a custom branded site hosted by us!”

While educators can definitely have a use for this software, Screencast-O-Matic appears to be very versatile video creator and editor that could be used for about any purpose.

How does it work?

In short, Screencast-O-Matic can create videos of what is displayed on your computer screen. In order to try it out, the user must go on www.screencast-o-matic.com. Once on the website’s main page, a big blue button in the middle of the screen allows you to start recording instantly via the free version of the application. This button is only to be considered as a test for the software, though, because the user may want to use Screencast-O-Matic without having to open the  website. If the software seems appealing and useful enough, it is possible to download it directly on the hard disk of your computer. This way, you will be able to use the app even if you don’t have an internet connection. All you need to do is register an e-mail address.

logo_dark_large

There are two versions of the software: the free version of Screencast-O-Matic, and the Pro Recorder version. The free version allows the recording of three types of video with audio narration: “Screen” will record everything that happens on the screen of your computer, “Webcam” only records what is shown on the webcam, and “Both” will record what is shown on the screen while a little window in the bottom right corner displays the webcam. The Pro Recorder has the same features, but also expands the time limit of 15 minutes of the free version to unlimited time, unlocks more editing and publishing features, and allows the integration of computer audio in the videos. the cost of this version is 15$ a year or 29$ for three years, which is not that expensive. The results of a free version film can be edited and saved on the computer or uploaded directly on Youtube or the Screencast-O-Matic server.

Opinion as an ESL teacher and potential for education

At first, I personally thought that Screencast-O-Matic was an easy tool to use. I tried it out without even taking a look at the tutorials and it turned out pretty fine. Here‘s the link to the first video I created using the application. It took some time to add it to this blog post though. I recorded my first try and saved it as a “.mp4” file, but couldn’t upload it anywhere else afterwards. It also appears that it isn’t possible to modify or edit the video once it is saved, unless it has been uploaded on the Screencast-O-Matic server first. Now, I think that the software still has a good potential for any use. Filming is easy and quite straightforward. New users that are not necessarily at ease with technology may have a hard time with it without referring to tutorials and help guides found on the web, though.

Reviews and critics about Screencast-O-Matic are generally favorable, even if opinions about the simplicity of the application vary. A first review by “TeachersFirst.com” describes the ease of use of the software this way:

“Users will need to know how to use whatever computer software, website, or skill they are demonstrating. Following basic directions and managing browser windows or tabs are a must, as well as the managing settings of the computer being used.”

Just like it was previously mentioned, it might take a little time to adapt to the software, its features, and its details, depending on the level of computer expertise of the user, of course. Fortunately, the website offers dozens of short tutorial clips (an average of 1 minute and a half long). These videos are straight to the point, clear, and don’t get into technicalities that could be hard to understand for beginners.

A second review, by Paula Miller from Digital Rhetoric Collaborative this time, briefly describes her experience with the free version of Screencast-O-Matic:

“While the bells and whistles in the subscription version are nice, the free version works just fine for most applications”

I agree with her on this point. The free version of the software offers a lot of interesting features that are enough for classroom use. The maximum length of 15 minutes for the free version is more than needed for school activities, since videos exceeding this length may  lose the students’ attention after a while. Also, there is always the possibility of dividing the instructions and theory to bite-sized capsules for students. It would be better for everyone this way. Therefore, the Pro Recorder version would be better suited for commercial use than  for educational use.
A third review gets a little more in the teaching perspectives of the tool. Jason Tomaszewski of Education World writes:
“SOM’s classroom uses are limited only by teacher imagination. Enhancing lessons, providing instruction for absent students and making a class video are only a few of things Screencast-O-Matic can accomplish.”

Creating videos by using Screencast-O-Matic or any other video filming and editing tool has many upsides, especially for younger teachers. Videos generally get the students interest because it may break the usual rhythm of the class. Also, if the video is available for students to view outside of the classroom, they will be able to pause and rewind whenever some instructions or explanations were not clear. Finally, videos can be used as many times as wanted, which is great for new teachers that need to create a portfolio of tools and activities that suits different grades.

Frédéric Masson


Camtasia: Worth the Exploration

camtasia-dl-image

Camtasia is a program created by TechSmith that allows you to record what’s on your computer screen. It can be used to give tutorials and lessons on various subjects, or to explain different things to which you have access on your computer. The tool lets you edit your recording and add sound, music, videos, quizzes and various animations to it. The possibilities are numerous!


How it works:

First, you must purchase ($299, 30-day free trial) and download the software onto your computer, either on a Mac or a PC. The first step, once your program is installed, is to record your screen and whatever it is you want your video to explain, for example, how to create PowerPoint presentation. If you are satisfied with what you have recorded and want keep this video, you simply save it and it will open in the editing program (see picture below), where you will be able to begin working on your video. There are various recording and editing options, which make this program very complete and the final result looking very professional.

Screenshot (9)
Editing

Camtasia gives you total control over your video, but it can take awhile to get accustomed to all the tools this program has to offer. You must take the time to explore and familiarize yourself with the program to know how to use it to its maximal capacity.

Here are a few examples of different that things Camtasia allows you to do:

  • Import different media from your computer to add to your project (pictures, music, videos) or use media from the library already included in the program. The Camtasia library holds tons of images, special effects, animations and different media that can be used in your video.
  • Create illimited tracks for your video;
  • Zoom into your editing bar in order to get more precise editing;
  • Incorporate a webcam video;
  • Insert quizzes to your video and keep track of your students’ progress.

Though the software can seem a little overwhelming at first, because of all these options, it isn’t too long before you start to familiarize yourself with it. Furthermore, the Camtasia webpage offers many complete tutorials on the various functions of the software.

Screenshot (7).png

Once you are done…

Export your video projects in a variety of file formats (MP4, WMV, MOV, AVI, etc.) with Camtasia’s custom production settings. Share your recordings on your organization’s LMS or add them to Microsoft PowerPoint presentations, so everyone can see it at once. Or send your recordings straight to accounts you already use like YouTube, Vimeo, Google Drive, and more. – TechSmith.com

My Experience With Camtasia

At first, I found the program to be a quite overwhelming, since I had never used (over even seen) a video editing tool before and there were so many different functions to assimilate. Furthermore, I didn’t have as much time as I would have liked to explore the program.

I did create a short video and played around with the different functions. It wasn’t too difficult to create a short basic video, but there were still many features that I didn’t quite understand in order to make my video more “adequate” and look more professional. For example, I tried inserting a quiz in my video, but never succeeded in having it appear at the right moment, despite following the tutorial.

I definitely recommend trying out the software before purchasing it, since it is quite expensive. There is a free 30-day trial that allows you to experiment with the program and make sure that it suits you before buying it. I personally would not purchase Camtasia because there are many other free alternatives for video editing and screencasting, and I do not need a program with so many options. I would rather use a simpler program with less fuctions.

Pedagogigal purpose

Once I had Camtasia Studio, I started recording individualized mini-tutorials. Within 15 minutes or less, a student could access a quick video tutorial I made for them and watch it on Screencast.com. The students were always amazed, thankful, and best of all the videos usually helped them grasp the concept they were struggling with. The students would often comment that it was like having their own personal tutor. – Eric Marcos, Math teacher

As mentioned by Eric Marcos, Camtasia is a great way for teachers to offer students a different type of educational support. Teachers can use the software to record lessons and tutorials that the students will have constant access to at home or in school. If there is a concept that they did not grasp when first explained in class by the teacher, they have the possibility of rewatching the video and taking the time to understand the lesson.

[Screencasting] engages the students and allows them to take an active part in their own learning. Such methods of teaching and integration of technology not only increase content retention, but also make the learning process fun for students. – Dianne Talarico, superintendent

Screencasting allows teachers to give clear explanations and examples to the students, therefore, like mentioned by Dianne Talarico, increasing the students’ content retention. Modeling or having students see  how a task should be carried-out directly from the computer screen is always beneficial to their learning and comprehension.

Also, Camtasia facilitates the explanation of “technological” projects. If a teacher wishes to have the students work with a specific website, or with a particular software, screencasting can be used to show a concrete example of how to go about using the different resources.

Camtasia for ESL Teaching

Camtasia can be particularly beneficial in ESL classes because it allows students to be exposed to the target language and to take their time to clearly understand what is being said in English. If there is a word that they do not understand, or if the explanations quickly given in class were unclear to them, they can watch the video as many times as they wish. This allows them to assimilate new English vocabulary and focus on aspects with which they might have more difficulty.

Different ESL projects can also be carried-out by the students using Camtasia.

One idea would be to have students work on an animal and find information relating to it on different websites. They would also look for pictures, videos, maps, etc. to insert in their video (this can all be saved in a file on the computer, in order to keep all the sources together). When they have gathered all their internet sources, they can begin working on their video. They would record their voice and explain different facts about the animal, such as where it lives, what it eats, what is its life span, and so forth. This project would have them practice their English speaking, their use of technological tools, and their researching skills. Once all the videos are completed, they would be presented to the classroom.

Another project I found to be very interesting is having the students create “personal narratives”:

They can be about students themselves or a character or historical person. [Have students] record video clips from many different facets of the subject’s life. Add a voiceover to tell the story and music to set the mood. – Matt Miller, teacher

This type of project can be very motivating for the students, because they get to play around with technological tools (which they normally enjoy!) and talk about themselves or someone they admire. They would explore different websites about the person they are working on, and if they are working on themselves, they could include different videos and pictures of things in which they are interested or of important events in their lives. The final product would be presented  class.

Overall, Camtasia is a great tool to produce professional looking screencasts. It can be used by the teacher to present different lessons, or by the students to create various projects. However, if I were to use screencasting in my classroom, I would work with a different, simpler program than Camtasia.

Jing: A Free and Easy Tool

Jing is an application that allows users to take screen captures of images and videos on their computers. Jing was developed by TechSmith, a company founded in 1987 which provides business and academic software products to foster communication and collaboration among people. Indeed, With the tool, users can share captures they take with others via email, Facebook, Twitter and even YouTube. Moreover, users can share the images and the videos on Screencast.com, a website where they can upload content easily and privately. On one hand, Snagit, a supplementary tool for the application, is very useful for users who want to edit their pictures. On the other hand, Camtasia Studio is another supplementary application that allows users to edit their videos. Jing is a great software for current and future ESL teachers because it lets them take screen captures that they can edit and then share privately with their students and because it allows them to record videos which they can edit and upload on the Internet.

First, Jing users can take screen captures and send them by mail or share them on their Facebook or Twitter page. This feature is interesting for ESL teachers because they could take pictures of their lessons and share them to their students. According to EdTechReview, “This is a great feature for teachers who want to add notes on top of images or text, or want to indicate something to their students.” Indeed, if a teacher takes a picture of a good feature article, he or she can edit the picture to highlight the important elements that help structure the text such as the lead or the quotes. Moreover, if students want to share an image, they can use a website which is called Screencast.com. This website is 100% safe because its users can upload the content in specific private folders. In order to access to the image, users must send the link to the content via email or on Facebook or Twitter. Naturally, students can easily share private images to their peers to compare their work as in the example of the feature article.

Second, Jing allows its users to capture videos from the Internet, edit them with Camtasia studio and upload them on Screencast.com or share them via email, Facebook or Twitter. This feature is very useful for current and future ESL teachers because they can make comments on video lessons or demonstrations of other teachers and share them with their students or even with other teachers. Therefore, students benefit from the content of the lessons, which can also serve as an example to current or future ESL teachers. Teachers can select the information they think is relevant for their own lessons and thus develop an entire course by relying of the information presented in the online lessons. However, according to TechAdvisor, videos cannot be embedded somewhere as just a video. Users have to share a link for the video in order to get access to it. Therefore, videos cannot be embedded on public platforms such as class forums. Unfortunately, teachers who would want to create a public forum where students could see a video of a lesson would not be able to embed the video directly on the page. It would be time consuming for teachers and students to have to click on the link and to wait for the video to open on a new page. As a result, students would lose precious working and learning time at home as well as in class.

In conclusion, Jing is a free, safe and easy to use and application that allows its users to share links to images and videos by email, Facebook or Twitter. This tool is particularly helpful for current and future ESL teachers who can edit and share pictures and videos on Screencast.com with their students. However, videos cannot be embedded on a website and a link must be shared in order for users to have access them. Subsequently, teachers and students lose important learning time and their improvement is hindered.

Camtastic Camtasia!

Camtasia Studio and Camtasia Recorder are softwares created by TechSmith to make your own tutorials or presentations via screencast and audio recording. The Camtasia Recorder simply records your screen and gives you some liberties to pause, stop or restart a recording. The Camtasia Studio is an editing software with tons of features to edit and improve the recording to make them great. Initially, Camtasia started as a screen capture program but evolved to include editing tools targeted at making educational or informational presentations.

To test this application, I recorded a few minutes of Minecraft and then played with every feature of the editing program. Here is the result:

I wasn’t very impressed while recording my screen because the program made the game lag. A lot. It’s still possible to see it in the video, but I edited some of it out. Also, I had both screens on, and the Recorder only captured one of them. If I had had to use both screens, this would have been an obstacle.

However, Camtasia Studio satisfied my expectations. I decided not to watch any tutorials to see how easy it would be to use the program on my own. Since I had used Windows Movie Maker back in my day, I found it to be similar and easy to use. My main problem with the software was that the editing features were not all at the same place. The special effects (scene transitions, callouts, etc.) were all in a scroll down menu, but I wasted three very long minutes looking for a way to accelerate a long part of the video. I finally figured out you had to right click on a clip and select “frame speed”.  Now this changes the speed of the whole clip, which means to accelerate only a section of my capture, I had to split the video into smaller sections. Also, playing with the audio was somewhat confusing because it is also in a separate hidden menu.

After testing the software for an hour though, I had gone through most of the features and seen what I could do. As you can see by my test, I also figured out how to add a song because my voice annoyed me. The software lets you add images, zoom in to parts of the screen, change the color (I don’t recommend that feature because the image became really weird really fast),  and lots of other great things. One of my favourite features was the addition of captions, which means your videos can reach a greater amount of people.

Now one of the great flaws of this software is that it offers to publish the video directly to your Youtube (or other accounts) but when you try, error messages appear from Youtube because the video wasn’t converted to an acceptable file. I had to publish it as an MP4 on my computer before being able to publish it to Youtube. I don’t understand why Camtasia offers to publish it directly if it can’t. Also, the watermark is quite annoying, but a necessary part of Free Trials.

So basically, I’m satisfied with the softwares, now what can I do with it in the ESL classroom?

The most obvious way to use this fantastic software, since it is used most often for tutorials, would be for teachers to record lessons in a flipped classroom. Or better yet, classes offered online could use this to create their classes. Most of the reviews online, including one by Bill Albrecht, a Learning and Performance Profesional, note that

“[When compared to Camtasia] Adobe Captivate is the better choice when going for something that is more interactive”. 

(https://billgalbrecht.wordpress.com/2013/04/04/captivate-vs-camtasia-whats-the-difference/)

It is true that while other programs, such as Adobe Captivate have more interactive features, Camtasia can take full-motion video simulations, is easier to share and is a lot less expensive (USD$299 compared to USD$349 for the teacher or student price).

However, I’m thinking bigger. In the ESL classroom, instead of presenting an oral presentation, students could be asked to make tutorials. These do not need to be interactive like teacher tutorials should. Since the software allows for users to record their voices, it develops their competency 3. Also, using ICTs (information and communication technologies) is a great way to get students involved. Students could choose simple programs, like Microsoft Word or Skype, or more complex programs, like Photoshop or Camtasia, and explain how they work. Some students may also chose to explain how to play one of their favourite video games, which will increase their interest in the subject.

Michael Keathley suggests letting students use it to review and study.

“With screen capture software […]you can take snapshots of relevant information you may want to review later or even re-record parts of videos shared in the class so you can edit them down to the pieces of information you need to review most. You can then share a link to your video with yourself or even a classmate”.

(http://blogs.techsmith.com/for-educators/screen-capture-helps-online-students/)

In ESL flipped classrooms or regular classrooms, using this software to create revision videos and sharing it with classmates is also an opportunity to develop collaboration and team spirit, two factors important to maximize the use of English in the ESL classroom.

Michael Keathley also suggests using this technology with projects

“especially group work which requires collaboration with classmates. For example, if your team is writing an academic paper or creating a slide presentation, you could record and share images or a video of the draft stages. You could provide peer feedback by copying, highlighting, editing, and adding notes as needed. You could also record yourself explaining what you see as a strength in the project and where, perhaps, you have some additional suggestions to improve it.

By using a digital camera, your group members could also conduct and record short interviews or other types of primary research that could be uploaded and added to the presentation. Overall, the use of screen capture software is only limited by the creativity of you and your classmates”.

(http://blogs.techsmith.com/for-educators/screen-capture-helps-online-students/)

Hmm.. conducting short interviews? Sounds like a research project to me! Or better yet, for less advanced students, scripting an interview or even a short presentation like a weather forecast and executing it as a team using Camtasia could be great. The editing software would allow students to add special effects to an otherwise boring video.

In conclusion, Camtasia captured my heart just as it captured my screen.

I strongly agree with The Instructional Technology Team at the Morehouse School of Medicine that say that

“Camtasia Relay has shown its capability in transforming the lecture-based, content-heavy portion of medical learning to a more interactive, thought-provoking learning process”.

(http://blogs.techsmith.com/for-educators/morehouse-flipped-with-relay/)

I recommend this software to ESL teachers teaching at a high school level or higher. Even though the technology is relatively easy to use, I do not believe it would be interesting for children in elementary school. This tool can be used for creating presentations, studying and even group projects.

Also, teachers at any level would benefit from using this technology in a flipped classroom or to create tutorials or short educational videos to share with the class.


Screencast-O-Matic

What is Screencast-O-Matic?

Screencast-O-Matic is a video and audio screen capture software that was released in May 2015. It can be used on browser or downloaded. It is compatible with any computer, whether it is a PC or Mac. It has a straightforward interface that is easy for anyone to use.  Here is a short introduction video about Screencast-O-Matic.

What does it offer?

Screencast-O-Matic offers two different options, including a free option and a single-user Pro recorder. The free plan gives access to recording sessions of a maximum of 15 minutes, screen and webcam recording, and capture, Youtube publishing and exporting the file as a video.  The single-user Pro Recorder is offered for $15 a year. For instance, it includes unlimited recording sessions, the ability to record computer audio (only for Windows), edit tools, scripted recordings, a drawing and zoom tools, a screenshot option; the file can be saved directly on Google Drive, Vimeo Pro, or Dropbox.

My experience

To begin, I went to the Screencast-O-Matic website13009864_802724076537696_1710836295_o

As you can see, the interface is really simple. You only have to click on “Start Recording” and it lead me to another page where I could download the screen recorder to be able to record any screen capture. Once downloaded, I simply needed to refresh the webpage and it was ready to record, as can be seen below.13016878_802724133204357_1390379323_o

As you can see, a black and white rectangle appeared with a small box with options. The rectangle captures anything that is inside of it. It was interesting because once you record, you cannot see the curser as it is really in your video; however, it is better in the video recording, since it is like a yellow pointer. I found Screencast-O-Matic useful for several reasons, for which I will certainly use it in my ESL teaching.

Application in ESL Teaching

Screencast-O-Matic can be used in ESL teaching for many uses. For example, I would use this software to explain the corrections of my students’ papers. First, I would underline all mistakes throughout the text and then use Screencast-O-Matic to skim over the text while explaining the corrections. Moreover, students like to have feedback and explanations about their mistakes on their papers. Therefore, with Screencast-O-Matic, it is possible to include a recording to any kind of paperwork; students will be happy and will not have to book an appointment with the teacher for clarification. However, if some students wish to receive more feedback, it will always be possible to meet.  Here is a demonstration of how I would use the tool. 

Furthermore, even students in ESL classes could use Screencast-O-Matic for a project presentation. For instance, students could be asked to create a project presenting a useful resource for them that helps them learn English, such as Duolingo or any other useful resources. Afterwards, students could be asked to share their project via a virtual presentation video accompanied by audio descriptions. That is when Screencast-O-Matic could be helpful because it is easily accessible for students, since it can be done for free and online. Students could then post their short video on the class blog or platform, for other students to view their project.

Nevertheless, Screencast-O-Matic could also be used as other pedagogical applications. For example, Ms. Deb Goetjen uses Screencast-O-Matic in another way.

”I use Screencast-O-Matic to support my flipped learning instruction in information literacy and research skills by creating video clips that demonstrate research skills, such as searching data bases, creating citations/Works Cited pages using Noodle Tools, evaluating web pages, etc. It is easy to use and to upload created mp4 files to any video storage site. Created videos can be viewed in most browsers without difficulties.”

This is another great use of the software because students receive information for flipped learning. Nowadays, more teachers uses flipped learning because it saves a lot of class time and there is more time in class to practice. I believe this could be useful because a teacher can demonstrate anything while giving the explanation at the same time. Thus, as an ESL teacher, I would probably pay for the Pro Recorder because it offers other interesting tools for a classroom, such as subtitles of your recordings, which can be useful for second language learners. More ideas to use Screencast-O-Matic can be found on this webpage.

Jason Matthews  is an author and self-publishing expert. He uses Screencast-O-Matic to make tutorials video for Udemy. On this webpage, you can look at several videos that Jason Matthews created for classes that he gives. I believe this can also be used for ESL teachers; for example, teachers can create tutorial videos to give extra information on the lesson or to help students who need it.

I would recommend Screencast-O-Matic because it is very easy to use and its interface is simple to follow. However, I would suggest this software more to high school students than elementary students because it can require a higher knowledge. In addition, the free option is quite complete, although, as an ESL teacher, I would see the need to pay $15 for extra tools. I can definitely see a use in ESL teaching because Screencast-O-Matic, as stated previously, it is useful to give all students feedback on their assignments.

-Jessica Kempf, TESL student

Screencast-O-Matic: Step by Step Teaching

Capture d’écran 2016-04-14 à 23.36.23

The principle of screencasting is simple: it enables you to record what is happening on your computer screen. Some additional features are also often added, such as recorded voices over the video file and a small window showing the speaker as he/she explains what he/she is doing. The file can then be saved, shared and even be posted on Youtube. It is a recent technology that not only serves businesses and gamers, but also educators. The main purpose of screencasting is to create short tutorials about almost anything.

Screencast-O-Matic (SOM) is, as its name explicitly mentions, a screencast software that offers basic functions for free. Indeed, classroom teacher Chris C. from Concordia International School Shanghai stated that “Overview Screencast-O-Matic is a screen-capture service that has a highly functional free version” (https://www.graphite.org). Recordings can be as long as 15 minutes and users are free to chose how much of their screen they want to include in the video. The whole screen can be captured, or either only a portion of it. If one however wants to add special visual effects to their screencasts, such as fast-forwarding and blurring, a yearly cost of 15$ is required to get access to the pro version. Andrew Douch, an independent education technology consultant who tested over 15 screencasting softwares, stated that “The free version is better than any other free tool i’ve found and it’s even better than most of the paid tools (https://andrewdouch.wordpress.com). This software can be used on PC and Mac, thus reaching out to as many potential users as possible. This Youtube video presents this tool and its main functions.

Capture d’écran 2016-04-14 à 23.36.37.png

Flipped Classrooms

SOM is an effective way to build a flipped classroom. The options are simple and easy to use for beginners, as classroom teacher Shari M. said: “[it’s] so simple to use (https://www.graphite.org). The results obtained with such a tool are however impressive. A little amount of time invested in the creation of your explanatory videos can lead to good quality class material and tutorials. Students can hear and see what is explained, as well as how to carry out a task in some instances. Students can pause the video to complete the task explained on step at a time, at their own speed, and then press play again to continue. Giving grammar classes can also be easier, since teachers can record themselves explaining the material and writing the different rules and examples on their computer before highlighting the most important information. A teacher can also watch the video to be sure it is clear and complete for students to fully understand the lesson; if it is not the teacher can simply record it again until he is satisfied, “as they are able to see and listen to their own lesson, therefore critiquing for clarity and quality” supports Shari M. (https://www.graphite.org). In addition, this software enables its users to upload their videos directly on Youtube. A teacher flipping his class for the first time can thus do so with less effort by simply creating a Youtube account and a playlist for each of his grades/groups and upload his screencasts from SOM. This exempts teachers from having to create both a website for their new flipped classrooms while having to record all the material during the first year. It is thus a good tool to use when flipping for the first time or since a few years only, and I will surely keep this tool in mind if trying flipped classroom crosses my mind throughout my educator career.

Traditional Classrooms

SOM is also a tool that would benefit teachers in their daily tasks. How often do teacher receive messages and is asked questions in class about an assignment explained in a previous one? Throughout my first practicum, I observed my cooperating teacher repeat instructions for the same project over and over to her classes, especially as the due date was getting closer. SOM would have been of a great use to this particular teacher; she could have screencasted the instructions of the project and how to do specific parts requiring the use of Internet, and sent it to her classes as a reminder. As classroom teacher Shari M. shared from her personal experience, “[she’s] never had a  student ask [her] to repeat the directions and because [she] save[s] the videos, [she] can email them to students who have been absent” (https://www.graphite.org). Screencasts made with SOM cans also be used in class as a visual support for students, or as brief information capsules about web tools and how to use them for an assignment. I personally think that integrating information capsules once in a while in my English classes would be great to make students aware of all the great tools they have access to and of how to use them. It would also be a subject of interest to students, hence they would pay attention during the presentation of those short videos and learn new vocabulary words without even knowing. During my Cegep years, I had to teach my classmates how to use Google Drive in a communication class. SOM was of a great help because it helped me create a short tutorial about how to create an account, what are the tools of this software and how it works. It was simple to do and everybody understood the purpose and the functions of Google Drive in no time.

Task for Students

Indeed, an interesting activity for high school students to be done using SOM would be to create those information capsules mentioned previously. Throughout the year, students would have to prepare a brief screencast about an application or a web software chosen from a list provided by the instructor beforehand. Students would not only become experts with a useful tool, they would also learn how to use SOM as well as to discover other interesting tools through their classmates’ presentations. This kind of project is also a great alternative to oral presentation and C1 evaluation since students would have to record their voice to provide explanations in their video and present it to the class, without the stress and anxiety building up from having to speak in their second language in front of peers. In addition, the teacher could give as an example of what the project should look like by presenting a screencast on how to use SOM. This kind of project is very pleasant to do and allows students to chose a topic closely linked to their interests. In fact, I had to teach my classmates how to use Google Drive in a communication class during my last Cegep semester and did so using SOM. This software was of a great help because it allowed me create a short tutorial about how to create an account, what are SOM’s basic tools and how it works. My presentation was easily done because of SOM and everybody understood the purpose and the functions of Google Drive in no time.

Agathe Poirier

Future ESL teacher

Jing

WHAT IS JING?

What do you do, if you want to take a picture of your computer screen? You probably smash the “Print Screen” to the point of breaking, since, let’s face it, it does not work half the time and some computers do not even possess such a function. So, what do you do now? Yeah, you can digitally take a picture of your screen, upload it to your computer, and then send it to a friend. However, ain’t nobody got time for that! What if I told you, there was a software that allowed users to quickly take high quality screenshots of their computers, and that was completely free? I know, I know, you are probably calling me an idealist by now, I understand, I too was once a non-believer. But that was before Jing. That was before I discovered that one no longer needs to spam the “Print Screen” function, or hold down four buttons on the keyboard in an uncomfortable position to screenshot a computer. Jing is an online tool that one may freely download on the Internet. It allows users to screenshot their computers, all while saving the images and allowing to share, something not possible with the “Print Screen” function. Moreover, Jing is stationed on top of the computer screen, so one does not even need to open the application when he wants to use it! Simply click on the yellow light, press capture, and voila! You have a a high quality screen shot that is saved directly to your desktop. Another awesome capture tool that Jing offers is the video option. One may even take videos of what he is doing on his screen. Hence, this allows Jing to be used in the flipped model classroom, for tutorials, and so on. The video option will be explained more in depth later on.

jon_snow_jing

This is a screenshot used with Jing. The picture is high quality, easily saved and uploaded. I can take pictures of practically anything and send it to my friends: Look! Jon Snow is back!

WHAT DOES IT OFFER

Jing offers two basic tools- screenshots and videos- which both have similar and distinct features. The screenshot option is great because it allows you take a picture of your screen and saves it directly to the Jing files. Conversely to the “Print Screen” button which does not save the image in a file, Jing also users to modify their images. If one is unsatisfied, he can resize, add text, and so on. Once the image is customized to one’s liking, he or she can easily share it to the web or message it to a friend. Screen shoots are now a very quick and effortless procedure that once made me want to pull my hair out.

The video capture, even though it sounds a great deal more complicated, is in fact very innovative and user-friendly. Even though before Jing there was a way, although very difficult, to take pictures of a computer screen, there never was a way record what you were a doing on the computer. Hence, explaining instructions could be very complicated if the two people were not in the same room. However, Jing allows you to capture on video what your are doing and send it to friends, students, and so on. It is perfect for tutorials. I also have an anecdote on video capture and Jing. In college, my teacher sent us a list of instructions on how to complete a very complicated procedure on the computer. None of us really understood and could not do the homework. Therefore, he made a Jing video, recorded himself doing the procedure on his computer, and sent us the video! It was so easy once we had a visual support.

As touched on earlier, Jing offers tons of sharing options that make sending pictures or videos to friends easier than ever. Once a picture has been taken or a video recorded, all one has to do is find the file in the gallery, click on it, and press the share button.

Converse to the opposite tools used this semester, Jing does not have a YouTube channel dedicated to tutorials. This situation is unfortunate, as beginners would greatly profit from it. This is not to say that Jing is complicated to use, or that they are not other tutorial videos out there. In fact, thousands of tutorials of how to use Jing are available, but since some of them are outdated or wrong, I think an official channel from Jing which would post updated monthly videos of their new product and teach users how new features work would benefit everyone.

HOW DOES IT WORK AND MY EXPERIENCE

As I mentioned before, Jing is very, very easy to use. First, to access this tool, one must download it on their website (free). The software is relatively small, about 6,4 MB, signifying that just about any computer could install the program. With a decent Internet connection, Jing takes maybe a minute to download. The entire process is extremely quick and allows users to get into the action as quickly as possible.

Once Jing has been downloaded and installed, a half yellow circle should appear on the top on the computer screen. To take screenshots or video captures, you simply have to click on the left cross that is entitled “capture”. Then, simply select the region you want captured. 3 options will then appear, “Capture Image”- which will take a screenshot of the computer screen, “Capture video”- which will start recording the screen, and finally, “Redo selection” if one is unsatisfied with the format of the image.

Once the item has been captured or recorded, users now have the option to either share it, or modify it by adding text, color and so on. For videos, the audio can also be modified, and I have found this feature particularly well developed, as the sound is great, but adding additional voices or soundtracks can quickly get cacophonous.

Here is an example I made for my Grandma who did not know how to go on YouTube. Instead of telling her on the phone to click on Google Chrome and then type YouTube, I simply made her a video and sent it to her via email. If one will kindly click on the link below, he will be redirected to the actual video.

*If the link does not work for some reason, simply copy and paste the URL and it should work fine afterwards.

 ESL CONTEXT AND OVERALL IMPRESSIONS

As Nathan Davidson, Director of Instructional Technology for the MSD of Lawrence Township in Indianapolis explains, some students in ESL contexts simply cannot keep up during traditional lectures. This causes them to drift away, not pay attention, and ultimately give up. He stated that, with Jing and other online recording tools, teachers were able to post their lecture materials online so students could review notions they did not understand in class later. This is very helpful, because if a pupil does not grasp a concept in class, he does not need to panic and think that all is lost, as he can review it later on at home. Davidson adds that, even though video capturing tools have greatly helped ESL students,  he also believed that the most effective way of teaching was the hybrid method (online and traditional).  I  also believe that employing technology to a certain degree while maintaining a certain balance with teachers is key for classroom success. Finding an equilibrium will benefit all students, since some already succeed with the traditional method while others struggled.

For schools thinking about adopting the flipped classroom model, Jing is perfect. First of all, it is accessible for poorer schools, given that it is free, and the high picture and audio quality is perfect for transferring information. TechSmith, the creators of Jing, have developed a PDF exclusively dedicated to how their product can be used in the flipped classroom model. Teachers can visually capture what they are doing while giving instructions, and then send it to students to view the night before class. A downside to Jing is that the maximum video length is 5 minutes. However, since once can make just about unlimited videos, this should not be a big problem.

As the two previous paragraphs were mainly for the teachers’ use of Jing,  ESL students can also use the tool for projects or activities. Since ESL students are usually shy and lack confidence in their language skills, presentation activities are perfect ice breakers. As the page Teacher Challenges offers, students can use Jing to make an interactive Prezi presentation, with their voice already pre-recorded. Hence, students can practice their English at home and present themselves to the class-thus making them more at ease and more willing to speak! It is a win-win situation for everyone.

Overall, I would have to say that Jing is an absolutely fantastic tool. As a student-teacher still contemplating whether using the flipped classroom model is a good idea, I think Jing may have convinced me to use it in my future career. All in all, if I could rewrite history, all of my life up to this point would be called BJ- Before Jing.

Snagit: Reinventing The ScreenShot

In the teaching profession, it can be sometimes helpful to have access to certain tools that can simplify the work. As a future English language teacher (ESL), I truly believe that software like Snagit can help classroom management. It can also take the creative aspects of the class to a whole new level.

What Is It? 

“Snagit is Screen Capture, Redefined” https://www.techsmith.com/snagit.html

As presented below, Snagit can be used to capture the whole screen or only what is needed on the screen. After taking a screenshot, one can add features to explain the caption more in details. Snagit can be used for finance, education, web design, training and even advertising. Indeed, it can also be used at school, at work, and at home.

Capture d’écran 2016-04-11 à 12.58.21

How Does It Work?

First, Snagit is used to take scrolling captures on the web. It is an easy-to-use website on which one can try the 15 days of free trial. In fact, it costs 66,38$ to download it on your computer as a personal or professional user. For teachers and students, it costs  39,80$. Once it is downloaded on your computer, all you have to do is place your cursor on the red button on the dragging tab bar on the right side of your screen. You can also click on the camera at the top of your screen to take screenshots and videos of what you want. One can add stamps, blurbs, crop outs, and other features to personalize the screenshot. 

Capture d’écran 2016-04-11 à 13.40.36

Second, Snagit is compatible with mobile devices. The user can install the app on an IPhone or an Android. He or she can download pictures directly from his or her cellphone to Snagit. It can be very helpful if the user finds a picture on the web and wants to save it for later. 

Third, Snagit for education can be very helpful for both teachers and students. As presented below, it can be useful for grading assignments, giving oral feedback, correcting homework or even giving a flipped class.

“It gives the teacher an easy way to create one-take video lessons, grade assignments, narrate feedback, and build engaging handouts” https://www.techsmith.com/snagit-education.html

My Opinion

As shown below, I signed up for the 15 days of free trial to get a hint of what Snagit provided. At first, I had to download the software for my Mac because it is adjusted to the need of my computer. One can also download it for a PC, but I do not know if the features change that much. It took approximately 3 minutes and the software was completely installed on my computer. Capture d’écran 2016-04-10 à 15.18.25


I personally tried Snagit to know how it could work in a language class. From my point of view, I believe that it is a very easy tool and that one cannot get lost using Snagit. The only thing I thought was difficult to do was saving the picture because there is no precise button. When I listened to the online tutorial, the saving button was clearly demonstrated but did not seem to appear on my computer. After a while, I found it and I also discovered that the screenshots were automatically saved in my computer files. 

Capture d’écran 2016-04-11 à 14.56.01

In my opinion, one of the drawbacks of Snagit would be that it is not free. For a student, it can be expensive and for a teacher, I believe that the money is worth the software. Andrew Douch, an ICT and education blogger think that it is too much:

“But this time it’s not free. It costs $30.  It’s reasonably good but expensive for what you get.  It punches below it’s weight.” https://andrewdouch.wordpress.com/2014/02/13/the-best-screencasting-software-for-teachers/

Also, Snagit is only offered in English or in German. If the website could be installed in many languages, I believe that it would have been a lot more interesting for other languages teachers. They could have used stamps in the targeted language to give feedback on an assignment, for example.

ESL Teacher Point of View

“Snagit is a great little tool. I can record whatever’s on my screen, including my webcam. I think it gives it that human element, where you can see the person talking to you and not just hear the voice.”

Rob Z., middle school teacher https://www.techsmith.com/snagit-education.html

Indeed, I agree with Rob Z. Using a webcam to personalize a subject matter can grab the students’ attention in an efficient way.  In fact, Snagit can record whatever is on a screen. The teacher can comment it and add arrows or stamps to the video capture. Unfortunately, with Snagit, the teacher cannot add crop outs to add comments on a video.

Tutorials are provided on the Snagit website to help the students and the teachers that use it. Many videos and written steps can explain how the website works and where to go. Snagit provides a grading tool that can help teachers grading the students’ evaluations. On the previous link, there is also a tutorial that shows how to narrate the feedback for the students. Plus, stamps exist, such as smileys, mathematical clipart, music stamps and even Christmas images to help the teachers grade or mark homework in an innovative manner. On an overall aspect, Nathan the Paul believes that Snagit is very simple to use:

“This in itself is pretty simple. The default option is “region” capture: you click the big red button, and a big yellow crosshairs appears on your screen. You drag it across the image you want to capture–release–and voilá!” https://nathanthepaul.com/2014/02/24/snagit/

With Snagit, I would probably do a flipped classroom. The previous link provides all the steps to do “your first flip”. It is an innovative way to teach subjects such as English. I would probably start by giving a small lesson on a certain verb tense in a flipped class. I would do a caption on a grammar rule about the verb tense and I would record my voice to explain some specific points with Snagit. Also, the software provides the teachers more time to his or her students in class to explain other subjects or to answer questions. 

Capture d’écran 2016-04-11 à 14.48.33

https://www.techsmith.com/education.html

In conclusion, Snagit can be a very helpful tool for students and teachers. As a future ESL teacher, I believe that Snagit can be used for flipped classroom and it is a great way to be creative. Plus, I think that the students would certainly enjoy having innovative feedback on an assignment.

Blurb’s BookWright: Publish Your Own Book!

Blurb’s BookWright is a self-publishing platform used for creating books, magazines, ebooks and photo books. It is accessible to all levels, no matter your experience (or lack of) with such tools, and it allows users to print their book or save it as a PDF file once it is completed. Furthermore, using the platform is free of charge – fees only apply once you are done and wish to print your book. BookWright can be used offline and as an app.

How It Works:

First, you must go onto the Blurb website, create an account on BookWright and download the software onto your computer. Once you have opened the software, you have the option of clicking on “create” to start a new blank book or of building-on one of the templates already integrated in the platform.

create book
Welcome to BookWright!

Next, you must choose your desired page format (size).

book format
Selecting a page format.

You can then begin working on your book! Choose the layouts you want for each page and insert pictures and text as you wish. If you are online, pictures can be imported from Facebook or Instagram. They can also be uploaded directly from your computer.

With this same file, when you are done working on your layouts, have finalized your corrections and are satisfied with the final resul, you will have the possibility of printing the book (hard or soft cover), of creating a PDF file (which you can then print out by your own means) or of creating an ebook.

Layouts
Creating a Photo Book.

You simply upload the book and it will automatically be saved in your Blurb account. You will be redirected to blurb.ca, where you will have the possibility of buying and selling your book in the chosen format.

My experience with BookWright:

I enjoyed my experience with BookWright. I found the platform very simple to use and when I needed help for the creation of my book, a lot of support was available (e.g. online tutorials, forums, instructions, user guides, etc). I have started creating a photo book for one of my past trips and I have no difficulty working with the different layouts and integrating text and pictures to my pages.

Blurb doesn’t provide the editorial services you’ll find at other publishing platforms, but it offers unmatched layout tools and support. – Denise Olsen

Like Denise Olsen mentions, Blurb does not offer editorial services like other self-publishing platforms such as lulu.com for example. If you choose to work with BookWright, make sure to pay close attention to spelling mistakes and to proofread your text several times before getting the final copy printed out. On the other hand, I found BookWrighter to be a lot more user-friendly than other platforms like lulu.com.

I cannot say what the final result will look like, but from the comments I have read, the quality of the pictures and of the final product are rather good.

I’m pretty impressed with the quality of the printing, I had shots from a variety of sources, that all came out OK, with some being better than expected and some a bit worse, but the full double page spreads […] looked great, so I know that it’s up to the task if the image starts out at a good resolution. – Ben Pascoe, Professional photographer

BookWright and ESL Teaching:

With a little money to spare, many interesting ESL projects can be built using BookWright.

One idea is to create a book with a collection of short stories written in English by the students. This would be a great idea for a writing activity. Each student would write a short fiction story and read it to the class in order to get some feedback. Next, they would correct and proofread their own texts and their classmates’. Once all the correcting is done, they could draw or find some pictures to go along with their stories. Depending on the grade level, and with the teacher’s help and clear instructions, each student could be reponsible for putting together their story on the platform and intergrating their text and pictures to the book. Once all the stories are put together, the book could be published and presented in the school library for example. This project could be carried-out with different classes and grade levels all at once and when all the books are published, a school activity could be organized in order to present each book to the other classes. After that, there could even be reading activities related to the students’ books.

A second idea for an ESL activity could be to have students do a research on a certain subject, in English, and create a magazine with all their articles. For example, the theme of the magazine could be “Cultures Around the World” and each student could find information and write an article about a specific culture. Just like in the previous activity, before the magazine is published, there would be a lot of auto-correction, peer review and proofreading.

There are many ways in which BookWright can be interesting for ESL teaching, particularly for writing activities, but also for reading. Of course the activities have to be planned in the school budget, because, though not very expensiv, there is a cost for all publications made with Blurb. The prices vary depending on the selected format and the quality of the paper, but they start at around 15$, which is affordable for a class project. Also, the students could order a copy for themseles if they wish to do so.

I would definitely consider using BookWright with my ESL classes because these types of projects would without a doubt arouse the students’ interest and motivation to participate. It would be a great way to get them to practice their reading, researching and writing skills.


StoryJumper

What Is It? 

Being an ESL teacher can sometimes be challenging when it comes to creating new classes. A teacher always has to innovate and find out new ways of presenting different subjects. Fortunately, software tools like StoryJumper exist to help the teachers with their classes. Indeed, it can make them more interesting and more adapted to students’ interests and needs. StoryJumper is a site on which kids can create, illustrate and read books and stories. 

Capture d’écran 2016-03-29 à 14.47.11

How Does It Work?

When I first signed up to StoryJumper, I was asked to sign up either as a normal user or as a teacher. I chose to sign up as a teacher to see what advantages it provided. Then, I had to create a password for my students to sign up for my virtual class.Capture d’écran 2016-03-25 à 16.08.47 

First, when you arrive on the website, you can create a book without being involved in a classroom. On this easy-to-use site, you can add text boxes in which you can write the title of your work. Whenever you write in StoryJumper, you can change the font, the sizing and the color of your text. Also, in the research button, you can write “characters” or “photos” and add creative tools to your story. You can create your own character by choosing a body, a head, a face and other fun accessories. When you add a picture, you can either download one directly from the browser or from your personal uploads. Plus, you can size and shape the pictures the way you desire. One can add a fun and colorful background pages to the book. At the bottom, when you are creating a book, there is always a bar on which each page are. Indeed, you can drag and drop or copy and paste items from one page to another.

Second, the teachers can give handouts to their students to provide directions. This handout shows them how to work with StoryJumper at school and at home. For this reason, the teachers do not have to explain in details the process to create a storybook. They can save time as well. If the teachers want their learners to use StoryJumper at home, the parents have to sign a consent form that can be sent at home by e-mail. 

Finally, you can always save your work in your own online library. You can share it with people on other social media platforms and you can even print out your book. With StoryJumper, you can allow the others to remix your work by clicking on the “allow” button. By doing so, anybody on the StoryJumper community can have access to your book and they can modify it as they want. If you want to print your book, you can print a plain small version of it for free. For 1,95$, you can do the same but with high-quality colors. Also, for 12,95$ and 24,95$, you can have a paperback or a hardcover book. 

My Opinion

I believe that StoryJumper is a very easy-to-use and well-organized website. I would not be afraid to use it with grades 6 of elementary schools and with high-school students because of its simplicity.Capture d’écran 2016-04-02 à 16.00.53 On this website, I like that, as teachers, we are not obligated to only create books with our students. We can also use StoryJumper to read pedagogical books that fit right in an ESL classroom context. As you can see on the picture, when StoryJumper is used in a classroom context, it does not provide  violence images, it provides a good use of language and its even avoids certain subjects, such as drugs and alcohol. 

I think that one of the drawbacks of StoryJumper would be that every tool is not free. It would make it more accessible to work in class if everything was free. Also, there is no app for this site. It would make it much easier for classes that work with IPads, for example.

ESL Teacher Point of View

“My students wrote children’s books for our composition class. Each student was asked to write a book with a “life lesson” that was important for younger generations to learn. […] Night, where students presented digital copies of their books to parents and community members. […]  StoryJumper was perfect for my alternative education students. It was easy to use and students liked the option of uploading their own pictures. We absolutely love the quality of the books.” https://www.storyjumper.com/library/my

This is indeed a good example of activity that can be done in class with StoryJumper. This teacher could have made the students create this story with a moral at the end. The learners could have explained a certain issue and told why it was important for them as a conclusion. Plus, they could have created characters that were related to this conclusion. These characters could either be happy or sad.

Another example would be to make the students “Create A Conclusion” using StoryJumper. I would give them the beginning of a story about a certain topic, and with the help of this website they could have to create the conclusion. The learners would have  new words to include in their conclusion and they would have to be as creative as possible. The pupils would learn new vocabulary as well.

With StoryJumper, the students can work on their language skills. Indeed, they can perfect their writing and their reading. When the learners have to create a new story, it makes them work their creativity and critical thinking. They have to add matching pictures to their text. Plus, there is a  help center to answer any kinds of questions that on might have. 

Pedagogical Tool

The tool “StoryStarter – Tell a story in 7 steps” is very helpful for the teachers and the students. The teachers can base their correction grid upon it and the students can download the worksheet , learn the basics of storytelling and follow the simple guidelines. To complete a small story, the students have to be proficient and creative. Plus, this website can help the learners to master two of the three competencies of the MELS curriculum: Reinvest understanding of texts and writing texts. ESL teachers can use StoryJumper to develop and evaluate students’ English writing competency by asking the students to create stories on a regular basis. The teachers would have the possibility to evaluate and observe their students’ writing skills development through time. TeachersFirst website’s review thought that Storyjumper could be very helpful for ESL students and that it is also very easy to use:

“ESL and ELL students will be able to use the site easily, and will learn appropriate sentence structure and add to their vocabulary by selecting new items to put into the graphic. Older students can also create “little buddy” books for younger students to read and share.” http://www.teachersfirst.com/single.cfm?id=10885

The teachers could notice syntax , vocabulary, and other grammatical errors. Moreover, ESL teachers can evaluate and develop students’ English reading skills by asking students to read other students’ books. They could also read those that are published in the website’s library. Furthermore, the teachers can use StoryJumper to present new subjects, topics and even the course plan in an innovative and creative way. Polly Conway is a teacher and a journalist and she believed that this website could be used with everybody:

“StoryJumper works for a wide age range; little kids will love just playing around with the graphics, and older kids can construct a more advanced story using the advice provided in the StoryStarter section of the site.” https://www.graphite.org/website/storyjumper#more

One of the drawbacks of StoryJumper is that the website does not allow the students to use their oral English. The website could add a voice recorder where the learners could record themselves reading some passages to improve their English oral competency. In my opinion, it would make the website more complete. Also, the website is only presented in this English. It would be interesting for other second language (L2) teachers to have access to other languages, such a French and Spanish.

In conclusion, as a future ESL teacher, I would definitely use StoryJumper with my students. I would make them read online stories and create their own. Overall, I recommend this application for other ESL teachers because it encourages students to develop their English reading and writing skills.

PowToon: Bring Awesomeness Into the Classroom

BP3_powtoon

“Most of my classes responded with clapping and a “That was awesome!”. To say the least, they were really impressed!”

Elizabeth Frank, teacher

In Employons le français en français de base!, Miles Turnbull recommends several strategies to maximize the use of the Target Language (TL) in the classroom, which leads to an improvement in students’ language learning process. One of these strategies include strategies for teachers’ to make themselves understood by their pupils, such as using visuals, paraphrasing and writing key words on the board. Powtoon, a video-creating website, allows teachers to use almost all of the strategies mentioned by Turnbull. This tool provides students with a dynamic visual support that will definitely catch their attention.

What is it?

PowToon is a fantastic way to share ideas and story.  Communication is a vital skill.  The ability to express ideas and story in a succinct, clear manner is crucial.  Today, students have another facet of communication to learn… visual communication.

Powtoon is a presentation software which allows users to either create slideshows or short animated videos. One can decide to use one of the many templates offered or to start from scratch. Powtoon’s goal, as it is often used on the website, is to bring awesomeness to your presentations, and for students it hits right on the mark. The bubbly funny presentations will unquestionably leave your students speechless as it greatly differs from the traditional PowerPoint.

If you are looking for an innovative way to create presentations that engage your students, PowToon is for you!

Shayla McGhee

On the free version of the website, you can access some of the content to create five-minute videos and share them on Youtube and Vimeo, giving the creator the possibility to embed the video on a website. By getting a license, teachers can also create a sort of “classroom” in which students can submit assignment.

As said on Green Light Learning Tool, “the free version of PowToon lets you build an animated video using a number of backgrounds, images, effects, and sounds. A paid subscription gives you additional choices as well as the option to publish your creation without the PowToon watermark.”

As explained on Powtoon’s blog, “when students create PowToons and save them under your group name, you will see the names of the students and a new submissions notice highlighted in yellow. By simply clicking on the new submission section, a new window will open which will allow you to view each PowToon individually.”

How does it work?

This slideshow requires JavaScript.

When you first go on the website, you simply need to click the big blue button to start. Before creating your first slideshow or video, you will have to sign up and you can do so by connecting Powtoon to your Google and Facebook account. If you have a professional account for wither of those two, it can come in handy. When that is done, you can choose to either start from scratch or a “ready-made” Powtoon. I decided to use one of their templates to see what it looks like. You have plenty of templates to choose from, and they are categorized by theme. Once you have chosen the desired template, you are ready to be creative!

Powtoon offers you the possibility to go “Simple Mode” or “Customized Mode”. I started on the first one, but soon changed to the latter because it allows for much more room to personalize the template (and I personally preferred the display). To change a picture, you simply have to click on it and then hit the “Swap” button to choose another pictogram from the library. The process is similar for the text, simply click on it once if you only want to change its colour, its font or its size; if you want to change the text you have to double click and it allows you to change the animation applied to the text. I especially appreciated the fact that I could see what the effects looked like. Powtoon also offers the possibility to Voice Over the video/slideshow or simply to add a song. When you are satisfied with the result, you can export your video to the desired website following the instructions provided. 

Although it looks quite simple, editing a template is quite consuming. I am at ease with such tools, and it took me about half an hour to modify the template I chose (and I did not change much). Therefore, if you are looking for something quickly done or if you not quite at ease with using such a tool, I would not recommend Powtoon.

Here is what mine looks like!

http://www.powtoon.com/embed/cjomKdkqxs5/

Powtoon as a Pedagogical Tool in an ESL Class

“A major factor in creativity is education: not whether you had a ‘good’or ‘expensive’or ‘public’ education, but whether you were encouraged to develop your creativity starting at an early age and continuing throughout your school years.”

– Adobe.Inc

The mind blowing fact is that developing creativity is the number one determining factor in the overall success of your students! Even if you teach in the most affluent school, with the most high end gadgets – your students are still only as good as the instructions given to them. They are only as good as the lesson you present and the creativity you encourage.

Powtoon’s blog

As mentioned in Harry K. Wong’s There Is Only One Way to Improve Student Achievement, skillful teachers are the only reason for students’ academic improvement. By combining skillfully trained teachers with activities that foster creativity, it would doubly enhance students’ learning process. This is supported by Turnbull’s research as one other type of strategies he mentions are strategies to maxime students’ use of the TL. Such strategies include allowing students to personalize the content and choosing activities that interest students. By using dynamic presentation software as Powtoon, students would certainly engage more actively in language classes who tend to be seen as boring and repetitive.

One recent practice in classroom which also lead to students’ engagement is ‘flipping‘ the classroom. In the flipped classroom, students do all the learning at home where they can pause, rewind and review if they need to, and they do ‘homework’ in class. In an ESL classroom that leaves a great deal of time for students to interact, practice grammar rules and ask questions when they most need it. In fact, the most interesting aspect of flipping the classroom is that it allows for more effective differentiation. Students who have difficulties can be helped, and those who are more advanced can move forward. With its fun and short videos, Powtoon is definitely a great tool to integrate the flipped classroom to students.


“Finally, a presentation tool that incorporates an intuitive user interface, super cool comic graphics, is 200% less frustrating than Prezi, and offers a zillion more options than the free version of GoAnimate. I know we just met, PowToon, but I think I am in love.”

Amy Gibson, High School teacher

Powtoon can also have various other uses in a traditional classroom. For instance, the Mission Impossible template, teachers can present assignment in a fun way一instead of the boring Word document, students are showed as a spy would, a mission which includes all requirements and evaluation criteria. Moreover, the software is an enjoyable way to present a new topic to students when starting a new unit while presenting them the unit’s vocabulary (eg. the Five Facts template). The presentation tool also an easy to follow Book Report template who could help be used with more advanced students who read novels. This way, students also get to choose a novel they are interested in as suggested by Turnbull and they get to do the same assignment. Advanced students could also be challenged to share ideas or beliefs using the tool in which they would have to prove their point or the challenge could simply be to use the tool for groups who are not as advanced. Videos can also help a substitute teacher! 

Finally, gone are the days where you had to reteach all the grammar rules students have forgotten over the summer! Powtoon is a great way to pack a lot of content into a few minutes of classroom time as said on Green Light Learning Tools (Students could even watch them at home!).

“There is a bit of a learning curve involved when using PowToon at first, but overall, we’ve found that the results are well worth the time and effort.”

Green Light Learning Tools

Whether it is to flip your classroom, to present a project or to teach some vocabulary and grammar, Powtoon is a great lively tool that will catch students’ attention and get them to be more engaged.

Laurence Leclerc, first year BEALS students at Université Laval

GoAnimate: Making Videos Has Never Been That Easy

Sometimes, the teaching profession can be a challenge. As a future ESL teacher, I know that we always have to be creative and resourceful when it comes to building and planning classes. I recently discovered GoAnimate, a video making cloud platform, that could animate and embellish certain classes in creative ways.

What Is It?

In 2007, Alvin Hung started GoAnimate, a video making site on which one needs to create an account:

“Make Professional Animated Videos. Easy learning curve. Low budget. Simple do-it-yourself tools.” www.goanimate.com

At first, this website used more by individuals on their own and it quickly started to become more popular among communities. Nowadays, GoAnimate has developed tools, themes, logos, business features and templates to be really accessible for everybody. Students, teachers, business people and even your grandmother can use sophisticated video tools to create their own little videos.  In 2011, the creator of the website also created a school animated video creation platform for teachers and students called GoAnimate for School. 

Capture d’écran 2016-03-24 à 12.18.56

GoAnimate for school is more restricted than GoAnimate. It has content moderation, such as no drugs, no alcohol and no weapons in the video making process. Also, the privacy and the security is reinforced.

Since then, thousands of schools on six continents have subscribed. http://goanimate.com/about

How Does It Work?

When you create your first video, the site guides you around. It is a kind of tutorial within your first video-making experience. You can either start your video from scratch or start with a base. At first, you can choose an environment template. Then, you can choose the characters, the narration, and so on. Indeed, you can personalize all these features the way you want them. You can choose the background color, the font and the size of your writing and even the accent of your characters. The person can either speak with a British accent, with an American accent or whatsoever. You can choose the emotion of your character: He or she can be happy, sad, amused, etc. Also, you can add a background music to a certain scene. When that is done, you just create a new scene. You can add as many scenes as you want. Without noticing it, you slowly build your video. Finally, you can either save it as a draft, save it private or save it to the public. With this website, you can share your videos with the whole community of GoAnimate.

My Point of View

From my point of view, one of the drawbacks of GoAnimate would be that you have to pay a monthly charge to access the site. Indeed, that is why I signed up to use the 14 days of free trial. On the site, you can choose to have the GoPublish, for 39$ per month, the GoPremium, for 79$ per month and finally the GoTeam, for 159$ per month. I found that creating videos could be quite a challenge at first. Luckily, on the website, there is a Help Center on which there are multiple tutorial videos. Giving the fact that I am not the most talented person for creating videos, it only took me 10 minutes to create a little video about Easter, as you can see below. I shall assume that it is not the best video I have ever seen, but I am still very proud of myself. 

For a school context, I also believe that GoAnimate for school can be an efficient tool because of its polyvalence:

Whether you’re teaching, training, advertising, or expressing yourself as an artist, a well-made video can accomplish so much in so little time. […] Until recently, the tools to create professional-looking videos were out of the hands of most regular folks. But those days are over. […] And now, here’s GoAnimate, another animation website that provides you with awesome tools to create videos that go even further.” http://www.cultofpedagogy.com/goanimate/

ESL Teachers’ Point of View

Sadly, I could not log in and try GoAnimate for schools because it required a special URL that I did not have. Perhaps, GoAnimate for schools gives the opportunity to the teachers to prohibit offensive and disrespectful language and pictures. This platform has a class homepage on which the students can post their creations. Also, the teachers are allowed to look at their students’ work before they even publish it on the classroom’s homepage.

On one hand, I would not recommend using this website with elementary students. It would be too complicated for them to work with it. On the other hand, a teacher could make his or her own videos and show it to his or her elementary students. They would probably enjoy having something different like that in class.

Capture d’écran 2016-03-23 à 10.48.14

Pedagogical Tool

With this platform, you can make your avatars talk with different English accents, which is very interesting. It can be fun to show the difference between an American and a British accent to an ESL class. Plus, the teachers can create whiteboard animations, which can be really attractive for a classroom environment. For instance, Michelle S., an English Language Arts teacher claimed that she truly liked working with this website also, and that she made the students use it to create new characters: 

“My favorite way to use it is to have students use GoAnimate to create projects that demonstrate their learning. The possibilities are endless with GoAnimate. Students can create a scene between to characters in a piece of fiction or two historical figures.” https://www.graphite.org/website/goanimate-for-schools-teacher-review/4039716

Also, this platform can help the learners to master all three competencies of the MELS curriculum: They can write and read small texts and they can even record their voice to use it in the videos. It can improve the students’ creativity and critical thinking, therefore, Chomsky would probably like the usefulness of this website too. As Mary Beth Hertz claimed, GoAnimate could be a useful platform for flipped classrooms. Instructive videos could be sent to the school portal and  watched at home and the students could do some exercises and activities in class: 

“This has the potential to support the “flipped classroom” model where students often learn through video outside of the classroom. Teachers can create their own instructional video animations for class on topics varying from classroom expectations to explaining a concept students are learning in class.” https://www.graphite.org/website/goanimate-for-schools#more

In conclusion, GoAnimate can be a useful tool for teachers. This platform makes L2 learning a lot more interesting for the students because of its different tools and templates. As a future teacher, I would probably use this platform to increase the students’ learning skills, listening skills and creativity. I believe that creating and listening to animated videos can motivate the students. Finally, it is an overall easy-to-use website.

PowToon: More power to you!

In many schools, teachers often ask students to produce visual support for their projects- whether it is PowerPoint presentations, information posters, t-charts, etc. This is explained by the fact that many people are visually-oriented, meaning that they enjoy having a vulgarized and simple visual reminder of a concept or an idea. The problem is that not everyone is skilled at doing these kind of tasks . Some of us (like myself) are at great disadvantage when it comes to creating visually-appealing content. As a future ESL teacher, I want all of my students to be on equal grounds, and I have found the solution to this problem; it is called PowToon.

powtoondeco

The basics

With PowToon, creating videos and presentations is simple. TechLearning does a great job of summarizing its purpose:

PowToon is a Web-based animation software that allows you to quickly and easily create animated presentations with your students by manipulating pre-created objects, imported images, provided music and user created voice-overs.

To put it simply, PowToon is an extremely accessible tool for many different purposes (but in the case of this blog article, it will be discussed as a teaching device). Teachers can use it to make lessons and exercises more memorable and more appealing, while students have access to endless possibilities when it comes to creating content for both inside and outside the classroom.

I discovered this great application a few week ago when I created my first Webquest  project.  To give students an example of what I expected as the final product of their project, I created a small video on PowToon

I was impressed by how simple it was. When I first looked at some of the demos the site provides ( Youtube), I thought they looked great, although I was not sure if I could reproduce something like that.

What I find particularly interesting is that even the menus on the website are visually-oriented. There is not a lot of text on the website, everything was designed so that even a six years old could use the application easily. For example, if you want to put a specific shape into your video, you simply have to click on the icon with the shapes, and boom, all the shapes appear into the sub-menu. Then, you simply have to click and drag everything you need into the screen.

I think what I like the most about PowToon is how it uses a timeline to simplify the process.You can decide what will appear when, how and for how long using the timeline. It is a very intuitive tool, especially for kids.

Uses for an ESL teacher

As a future ESL teacher, I can see many applications for PowToon. The most obvious one is to ask students to research a topic, and then to have them use this website to present the results of the project. Other applications such as PowerPoint and Prezi are perhaps a bit too complicated for some, so PowToon can be used with primary students. Furthermore, it has colorful and fun options that children will most certainly love! Another way to use this application would be to create videos to summarize grammar points or lessons, and then view them with the class. Then, you could export the videos to Youtube, so students could use the videos to review before exams anytime they feel like it.

Personally, I would use PowToon as a way to present myself to my new classes. At the beginning of the school year, I would have all of my classes view the video, so they could get to know me, but also to state how I function as a teacher (class rules, functional language, grading system, reward system , etc). I think it would be a fun and practical way to introduce myself without wasting too much time and energy. Most students find long teacher-centered talks boring, so Powtoon could also be a great way to introduce new content in an original and fun way.

M62 perfectly summarizes my opinion on the application

PowToon actually takes a good step in the right direction in encouraging more engaging, animated video content, and certainly helps the user to step away from bullet points. The key thing to remember about PowToon is that it produces video, and isn’t really a presentation solution at all – but if it stops users treating PowerPoint as a means to produce ‘slideuments’, it’s certainly not going to receive any complaints from our end.


However, PowToon is not perfect.I have one major complaint, and it is the lack of an “undo” button. As simple as it may seem, to be able to take back one of your actions with the simple press of a button is such an important features of software such as Microsoft Word or PowerPoint. Imagine for a second that a student clicked on a button by accident and that he can’t remember which one. This kind of problem would be simple to solve with an “undo” button. Also, If there is one thing that I think PowToon could add, it would be the possibility of having multiple users working on the same project at the same time, just like on Google Drive. It would definitely be a game-changer, imagine how much students would love using it!

Also, PowToon’s simplicity does come at a certain price. I wouldn’t say that the available options are limited, but rather that they are not as complete as they could have been. For example, if an older students who is experienced with PowerPoint were to switch to PowToon, he or she might be disappointed by the fact that you can only import a single audio-file by presentation. Also, the graphics are a bit childish, it might not be appropriate for high-school students.

Consumer’s Advocate sums up my thoughts pretty well:

Powtoon is ideal for creating simple presentations on the go or for those with little or no experience with presentation software.  However, seasoned presenters should consider using more robust presentation software (…)

Conclusion

Overall, PowToon shines by its simplicity and how accessible it is for children. While it does not have as many options as one wish it had, it still does a great job of fulfilling its purpose. As an ESL teacher, I can say that it is a useful application for many purposes, and it can be even more useful if we look at it from a student’s perspective. For example, a  student could use the application for a project proposal where one needs to be creative, and the class could also use this kind of context to get ideas from other students to improve their own projects. I recommend PowToon to every ESL teacher.

Michael Gagnon

Student in BEALS at Laval University.


GoAnimate

What is GoAnimate?

GoAnimate was launched in 2007 by Alvin Hung. It was first designed for business people to create animated videos easily. In 2011, GoAnimate for schools was founded with security and privacy settings agoanimate.com mentioned:

So we went back to our roots and started banging out product adaptations to serve a much wider range of users. In 2011, GoAnimate for Schools was publicly launched in a “Back to School” campaign, featuring dedicated privacy, security, content moderation, and group management features. Since then, thousands of schools on six continents have subscribed.

Briefly, GoAnimate is an online platform that allows you to create professional-looking and entertaining presentations. It is offered at a reasonable cost. In fact, you can benefit from a free trial for 14 days, after which you need to start paying. It costs fifty-nine dollars yearly for a teacher and ninety-nine dollars for a whole classroom.

How does it work?

GoAnimate is rather easy to use. It is an online software that offers you endless possibilities to create videos. The platform comprises of 2D and whiteboard animations. This video software generates the animation for you. You only have to drag and drop the characters, backgrounds, music and the props you want, as shown in the picture below:(This picture was taken from my first video, I really enjoyed trying to create one!!)

num1.png

GoAnimate is a ‘’Fill-in-the-blank’’ type software, so everyone can get accustomed to GoAnimate quickly. The first time you log in as a user, there is a tutorial video that guides you in using different features of the platform as you can see on the picture below:

num2.png

In your video, you can add templates, characters, props, texts, widgets and sounds. You can even record your own voice and assign it to a character. If you are too shy to do so, you can also take sounds that GoAnimate provides you, such as a campfire ambiance and chicken peeps. There is also a wide range of characters’ settings that you can change, such as  emotions, actions and dialogs. You can either import your own background or you can choose from the built-in libraries, which include endless features.

As for GoAnimate for schools, when you sign up as a teacher, you can create a class library that only the teacher and his/her students can have access to. The  instructional videos created by the teacher will be posted in this library and students can refer to them whenever they want to. Given that it is a school-safe version of GoAnimate, parents should not fear this interface. No one can see the students’ videos unless the teacher makes them public.

Spice up your ESL classrooms

GoAnimate can greatly innovate ESL classrooms. Indeed, teachers can easily integrate the platform to either their evaluations or their lessons. For example, teachers can evaluate their students’ pronunciation by having them record their own voices and assigning them to a character. Another great thing about GoAnimate is that teachers can moderate and comment their students’ videos.

Teachers can also evaluate their students’ writing abilities with GoAnimate. Using this interface might enhance students’ motivation when it comes to complete a writing task. Indeed, given that students see their story coming to life with different animations and characters, it might encourage them to be more enthusiastic when doing a written task. ESL teachers can give a specific subject to his/her students and have them create a video related to this subject. For example, if a teacher is having a unit on restaurants and seeing food vocabulary with his/her students, he/she could ask the students to produce a video related to this unit. I sincerely think that students would prefer working with GoAnimate then doing a powerpoint or a typical research paper. As Mary Beth Hertz , an English Language Arts teacher, pointed out, GoAnimate can also be useful in terms of evaluating children with writing disorders:

English language learners can demonstrate their mastery of English by recording a scene in English with their own voice. This can also be a way for kids with disabilities, who may not be able to type, to still successfully show what they know to an audience. 

I completely agree with the fact that students who have writing disorders could benefit from GoAnimate, as mentioned by Miss Mary Beth Hertz. ESL teachers could, for example, have these students create a video with their own voice. Given that students with writing disabilities are struggling when it comes to doing writing tasks, they would have the option of recording their own voice. This way, every student would have a chance to equally success in the class.

Mary Beth Hertz also mentioned that teachers can use GoAnimate to teach with “the flipped classroom” model :

GoAnimate for Schools has a Lesson Gallery for teachers who are using animations to create informational videos for their classes. Students in their class can view these videos, which can also be embedded in a website. This has the potential to support the “flipped classroom” model where students often learn through video outside of the classroom. 

Again, I think that the idea of miss Mary Beth Hertz is really good. ESL teachers could use the  “flipped classroom” model to make their classes less passive and more interactive. By doing this, students could go through some content at home. It would also make learning less boring for them.

Using the interface enables students to explore their creativity, develop their critical thinking and enhance their communicative skills. A teacher could ask his/her students to predict the end of a novel or a movie by creating scenes on GoAnimate. By doing so, students demonstrate their understanding of the novel or the movie and practice their writing and speaking skills. Students would be keen doing so because it involves technology.

Jennifer Gonzalez, a language arts teacher, identified creative ways that ESL teachers can include GoAnimate in their classrooms:

And most importantly, STUDENTS can create GoAnimate videos to demonstrate or extend learning. Instead of a written book report, a PowerPoint on the Civil War, or a science research paper, students can create an animated video. Student organizations can use the videos to promote and advertise their activities or accomplishments. Video projects can be used as independent work to differentiate for student ability or interests. High school juniors and seniors can use GoAnimate videos as part of college applications. English language learners can compose dialogues or experiment with different accents. The possibilities really are endless.

I think that the possibilities mentioned by Miss Gonzalez are ingenious and I also believe that students would really enjoy these ideas.Students are used to make powerpoints or write a research paper, it is getting old and boring for them. GoAnimate would bring something new. I think that by having them creating animated videos, it would catch the students’ attention and that they would be really motivated. In other words, GoAnimate would make learning much funnier for students.

To get some ideas on how to use GoAnimate in your classroom, you can visit this website: http://blog.goanimate4schools.com/category/press-and-mentions/

A FAQ is also available on https://goanimate4schools.com/public_faq . It is really useful for teachers who are trying to learn how to use this wonderful tool.

My experience

When I first logged in on the interface, I quickly grasped how the website worked. In my opinion, GoAnimate is a great and easy-to-use tool to create animated videos.  It is a tool that students would be enthusiastic to discover since it is not traditional. 

As a teacher, I would definitely use GoAnimate for story-telling and digital creation for students of all ages. Indeed, teachers from the primary level could use GoAnimate for story-telling because, as we all know, kids love to hear stories! I was a little bit mixed up when I created my first video. I was really happy that there was an integrated tutorial to guide me through my exploration of the platform. For this reason, I think that it would be a little bit complicated for younger students to create videos using GoAnimate because there are a lot of features and they might get lost…In my opinion, students over grade four would quickly understand the functioning of the platform. As for teachers of high school level, they could have their students create interactive videos. I am sure that they would enjoy doing so! (Personally, I loved it!) 

Unfortunately, there is one problem that I came across as I was navigated through the platform… When I tried to log in on GoAnimate for Schools, I was not able to because I needed a private school login URL. Because of this, I could not fully explore the platform at its finest. Another concern that I have is the price, but again… It is free to try! If you like using the platform, it is affordable;  it amounts to less than two dollars per week. As a teacher, I think I would afford this cost for the sake of students’ enthusiasm toward projects.

All in all, I think that GoAnimate for school is a great presentation tool that offers its users endless possibilities to spice up their lessons or your evaluations. I would definitely use this platform as a teacher.
Alexandra Jacques – TESL student at Laval University

How to Make Pictures Come to Life

What is ChatterPix?

ChatterPix is a fun and kid-friendly application that can make pictures come to life. Indeed, it allows you to upload or take a picture, add a mouth, and make it talk by recording your voice. The application was invented by the company Duck Duck Moose. This company specializes in creating educational apps for children all over the world. With more than 20 applications,  Duck Duck Moose strives at making fun apps that encourage creativity, learning, and imagination. As the company duckduckmoose.com states, it was founded in 2008 by three parents who wished to help shape children’s learning in positive ways. Duck Duck Moose’s group of designers, illustrators, engineers, and product people work with educators in schools who make sure that their products and apps are suitable for children of all ages. Perhaps this is why Duck Duck Moose was given the awards of the Parent’s Choice Foundation, the Children’s Technology Review, and the Best Children’s App. ChatterPix is a free and easy to use application that can easily be downloaded and used by practically any child that wishes to make his or her pictures come to life.

What can ChatterPix do?

ChatterPix is a tool that lets children and adults create fun interactive videos. The first step after opening the application involves choosing whether you want create a new ChatterPix or go visit your gallery. The gallery is where all of your saved videos can be found, edited, and replayed.

IMG_1254.PNG

Then, if you choose to create a new ChatterPix, the second step involves deciding if you want to take a new picture or use one you already have on your tablet or cell phone.

IMG_1253.PNG

After your picture has been chosen, the third step involves drawing a mouth with the help of your finger and recording what you want your picture to say. The mouth will show up as a dotted line in the picture, which you can redo as many times as you want. In addition,  literaryfusions.com explains that it is important to go left to right, otherwise the mouth will talk upside down. Although this step might sound a bit more difficult, all these steps, including this one, are extremely easy.

Screen Shot 2016-03-20 at 16.23.04.png

Next, the fourth step is where you can add filters, stickers, frames, and even text to your pictures. There are 22 stickers, 12 frames, and 11 photo filters to add to your video. This step is where children and adults can use all of their creativity and silly ideas. When finished, it is possible to play your video and make changes if you please.

Screen Shot 2016-03-20 at 16.23.32.png

Lastly, the fifth step is where you can share your new video with all of your family and friends. Indeed, you can share your video on Facebook, upload it on Youtube, send it by email, and save it on your cell phone or tablet. However, as edshelf.com states, it is possible to restrict these sharing options by downloading “ChatterPix Kids.” This version of ChatterPix is aimed at kids 13 and under.

Screen Shot 2016-03-20 at 16.23.48.png


What are my experiences with ChatterPix?

Personally, I have greatly enjoyed using ChatterPix. I find that it is a simple, fun, and cute app. The first thing that I noticed was its easy to use concept. There aren’t too many complicated features, which makes it perfect for adults as well as children. Indeed, sometimes less is often more! Another thing that I enjoyed and noticed about this app was the fact that it is used for entertainment. This application is captivating and fun for people of all ages. In addition, I have noticed that there are unlimited possibilities when using ChatterPix. Indeed, I could spend hours and hours playing on ChatterPix and I could also create hundreds of different videos without getting bored. I believe this is why so many people enjoy and cherish this fun little application. As the website parents-choice.org agrees, “the creations made with it are limited only by the imagination.”


Why can ChatterPix be useful in ESL classrooms?

ChatterPix can be useful in English second language classrooms for many different reasons. First, this app can be beneficial because it can be used in multiple activities. For example, you can use ChatterPix to have students respond to a question as a character in a book, to have them read a short text or poem to practice their fluency, and so much more. You can also make older students write drafts on a piece of paper before recording their videos. This will not only help them speak but also write in the second language. Second, ChatterPix could also be used as a reward. Indeed, children who work hard or improve in English can choose to use ChatterPix as their privilege. The children will enjoy themselves and their reward while they are learning. Third, ChatterPix could be used for shy children or children who are having trouble communicating in English since they may feel more comfortable talking via an animated image. They might not feel as pressured or judged to speak in the new language. These reasons are only a few reasons why ChatterPix can be useful in ESL classrooms. This free and easy access tool could be a fun way to make English second language learners communicate!

VideoScribe : Technology for Education

videoscribeWhile presenting, whether it is in a school, in a company or in any other place, getting the viewers’ attention is a tricky thing. That’s why VideoScribe was created.  This video animation software program, created in 2012 by Sparkol, can be used on both Mac and PC, and can even be used as an application on phones and tablets. Moreover, VideoScribe is very well rated and is used by influencial agencies, companies, graphic design artists and marketers. Furthermore, VideoScribe can also be used in education and in business presentations. The whiteboard animations will surely spark the viewers’ interest, which is a very important aspect in education. Interacting with students using visuals, such as this software, motivates them to learn.

However, VideoScribe is not a free tool. It costs $22 per month, $144 per year or $480 One-Off Payment. For education, there are different prices for the whole school or for only one classroom. The prices are available on the official website and the tool can be easily purchased. Before buying the software, it is possible to obtain a 7-Day Free Trial to try it and see if it really fits with what you want to do. Once you have obtained VideoScribe, you are ready to start creating an animated video, which is quite simple. When you open the application, the desktop will pop on your screen. From there, you can click on the button on the top left of the screen to create a new scribe.  A white page will automatically open and you will find the tools above the page. You can either save your draft by clicking on the save option, you can add an image, add a text, add music from the library, open voice-over recording, add a background or simply select the hand icone to move objects around. On the right, you have two possible options. You can play the animations from the start and you can publish your scribe on YouTube or Facebook. You can also import your video on your computer. Under your draft, you have the animation timeline where you can modify the order and adjust the video.

videoscribe canvas 2

Now that all the functionalities are understood, you can start by adding an image or a text to your VideoScribe. Then, you can access the properties of the element and animate it using different tools. You can modify the duration of the animation, the transition and the pause after it is played. Afterwards, when all the modifications are done on the elements, you can use the camera option at the bottom right of your screen if you want to zoom on an object. It is mostly used to put emphasis on a message or an image during your presentation. Finally, you can mix images, music, voice and many more using the different options.

Personally,  I think that VideoScribe is a very helpful software. Creating an animated video is simple and the options are clear. Importing images, music or your own voice is not complicated. Moreover, the creation options are endless and gives very satisfying results. Also, the application is free and can be accessed everywhere from a phone or a tablet, even though the functionalities are limited. In ESL teaching, VideoScribe could definitely be used. If an electronical tablet is available at your school, you can use the application with the learners. It would be perfect for animating the class and teaching subjects that are normaly less interesting for students. Furthermore, VideoScribe could be useful to create an animation project with the students. Students will also learn more effectively if they are captivated by what you teach. Thus, you might have to do less classroom management, since disruptive students will be motivated to participate and listen. However, since the software is not free, you need a budget. Depending on the budget you have from the school you teach in, it might not be possible for you to use this application. You also need a projector in your classroom, if you can not use the application on a portable device.

Finally, I installed the software with the 7-Day-Trial fairly easily and tried to create an activity that could be used in an ESL classroom. I created an animation video related to grammar with images and texts and it was quite simple. I would recommend using VideoScribe in the classroom, if however it is possible to buy it, since it is not free forever.

Noémy Lacasse
BEALS student at Ulaval

VideoScribe


videoscribe_2x

What is VideoScribe?

VideoScribe is an animation software created in  2012 by Sparkol. The company, based in the UK,  created one of the most popular methods of animated marketing and claimed to be the first program on the web to enable the process of video making. In addition, this software can be installed not only on an Android but also on a computer.  The only downside in this is that the computer version is only available for a 7-day trial period whereas  the Android application is free, but offers limited features.  In order to have the full computer version,  one payment of $665 needs to be made. They also offer another method of payment which is a monthly payment of $29. Those prices are the price for personal use.  As for schools use, the price depends on the number of students present in the school. Indeed, for small schools that have less than 1 400 students will have to pay £840  per year. The price range varies from £840 per year for small site-wide yearly (1 400 students) to £3 800 for largely distinguished school (2 400 students). All those prices include the same benefits which are: logins for every student, teachers and other staff members, a school and home access, logins reassigned for each new cohort and free support in case of need. Smaller licenses are also available for £350 per year for 30 computers, which is a good alternative for teachers who only  wants to try it with a class. In addition as mentionned by Sparkol employe:

VideoScribe offers a  range of special discounted packages for educational establishments as we are passionate about the use of Sparkol products as learning tools.  We also offer a discount on the individual licenses for students and educational staff (when registering from an educational email address). If you go to videoscribe.co/buy and tick the Registered charity box just below the pricing options you will see the discounted prices.

In other words, even if VideoScribe is not free, its easiness to use and the fact that Sparkol is passionate by the education side of this tool makes it a good software for teachers.

What does it offer?

aaeaaqaaaaaaaakzaaaajda2zmnimmvmltninwitngywos04ota0lwqwzwnlm2zkztq3nw
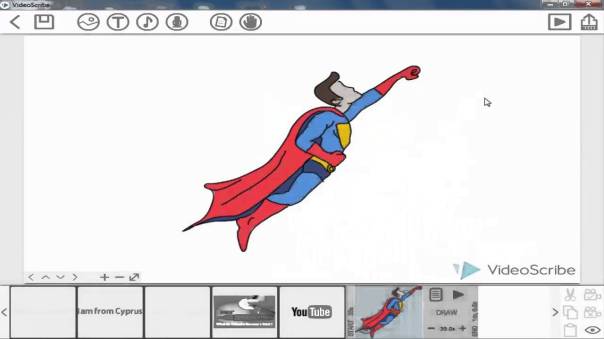
VideoScribe offers the possibility for teachers, students and marketing people to easily create videos in which they can explain what they want.  Teachers can also “flip their class” using VideoScribe like Stacey Roshan, from Maryland, did.

How to use it?

This  software is easy to use and offers multiple online tutorials made by Sparkol in order to help the user getting acquainted with this software. The application though does sparkol-videoscribe-2-1-0-pro-full-versionnot offer the same tutorial as the computer version and does not really explain how it
works when compared to the computer version.  On the other hand, people who want to know how to use it and do not want to explore it by themselves can go online and watch the video made by Sparkol, VideoScribe or other users.  As for how to use it, you just have to add your images and text, set the time of the animation, record or import voiceover and publish/share the video. Those five easy steps have to be done for every video for the computer software in order to create a video.


Personal exploration of the software and personal thought:

The application is a little more complicated to use especially because of the lack of tutorial. In fact, there is a little tutorial at the beginning of the application but nothing that really explains how to use it to make good videos. On the other hand, the software for computers is better. Indeed, the 7-day trial offers great support and the how to sections is better than the application. Furthermore, for all the duration of the trial e-mail were send in order to give tips and how to videos were proposed in order to facilitate the making of the video.  You can also have tips and video that shows how it works every time you open the software, which is good for people who do not use it often.  As for the great variety of images that are available in the library, images from your own library can also be added. The time can also be adjusted in order to make some images last for less or more time. Voices can also be recorded to put over the images and to narrate the video. Furthermore, music can be added to the video. Texts and charts can also be added  which give the chance to teachers to evaluate writing and oral ability. The background and the drawing/writing method can be changed which can make a nice variation over time. Overall, the software is better than the application not only because of the tutorial but also because of the additional features that are available to the people using the computer version. Adding to that the fact that an offline mode is also available (you neesyncsort_videostills_3d to be online first, to log on
and enable this mode before going offline) makes it a great software that can be used everywhere.  After using it for several days, the possibilities of making videos and the option were still endless as to which type of video can someone make with that. All in all, this software, which is not only usefull for teachers but for multiple professions, is great and offers endless possibilities as to what videos people can create and to what end.

Teachers’ use:

This software is great for English teachers because they can use this video making application/software to make videos so they can explain rules such as how to make questions in the past, present or even other grammar rules in an interactive way. Students can also make a video instead of doing an oral presentation in front of the class, which sometimes can be trickier for the shy ones. Indeed, because they can record their voice and add image this can replace the actual presentation for introvert students. This is also possible for teachers to grade the video so it can be a good alternative to oral presentations, especially for those who are shy and lack confidence when it comes to speak another language. It is also a good alternative for traditional writing assignments.   Moreover, the videos are easy hqdefaultto have for grading given the fact that links can be send to the people you want, in this case the teacher.  The interactive part of this software can help theory being less annoying for students and can help creating a flipped classroom. As Stacey Roshan  mentioned, students can review the subject at home after school and they can see new material  through   introductory videos of their  next or previous subject or even homework. Indeed, by doing so they can have more time to practice and ask questions in class. It can also change the routine in the classroom and catch the attention of some students that otherwise would not listen.  Sparkol also offers a discount for school after a year of use if the school provide them with feedback which is also a good advantage for teachers who want to use it for multiple years.  As mentioned previously, the software is easy to use and offers Sparkol staff support and tutorial which makes it a good choice for teachers who want to change things around their classroom. Moreover, this software can be used for multiple subjects as seen with Roshan who used it in her Math class.

On the other hand, the software cost something and the 7-day trial does not give enough time to see if it really makes a difference in a classroom. The fact that there is no trial for students is also a downside because you cannot see the dynamic of the classroom while they are using it. It is also not sure that students will like it so the fact that it cost quite a lot in addition to those incertitudes make it a downside especially compared to other softwares that are free or cost less. In addition, some teachers still have questions about this software and the benefits of it in the classroom. Indeed as mentioned by Jana Tanigawa As teachers, we always need to see the balance tool and wanted outcome. Are we using the tool because it is cool or are we using it because it would help and support the learning outcomes?”

Overall, though, the software is great and it can be a good addition to ESL classroom. The software is easy to use and a lot of people recommended it for classroom use.  The tutorial and the free support also makes it a good option for schools who know they will use the software to its full potential.

Vanessa Crete