Category Archives: Blog article 3

Wideo: Introducing animated video in ESL classroom

What is Wideo?fb-image

Animated videos are accessible to everyone, making them simple to use in our everyday lives. As said in a video on Toole.com:

Animated videos are everywhere these days. You can find them in websites, social networks, blogs and emails. They increase interest and sale conversion. You too can capture and engage your audience without spending tones of money or times. […] Introducing Wideo, the most intuitive and easy to use tool out there to create animated videos online. With Wideo, you can achieve professional videos, even without any previous training.

Wideo was founded by Agu De Marco and Agus Esperon in 2012. Initially, the idea of an animated video tool was from Agu, but the whole project really started with the help of Agus’ idea of creating a simple tool that enables people without previous knowledge or training to create quality online videos

How to use it?

wideo_photo_1
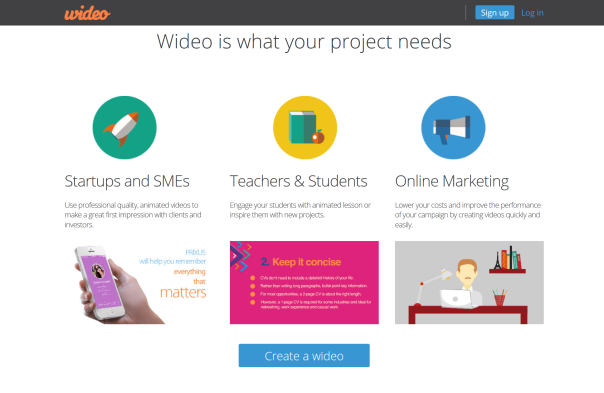
Wideo is basically a website that allows the creation of animated videos. In order to use it, you simply have to create an account, but without an internet access, the website is pretty much useless. But since we are in 2016, the internet accessibility is a problem for no one.

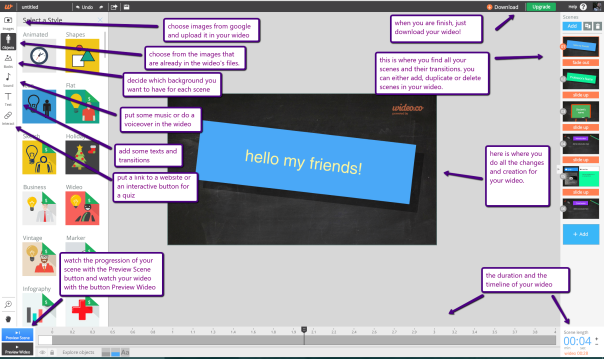
Users can choose (or upload their own) images, backgrounds, and sounds in order to create their own personalized video. That video can then be shared on social networks or embedded in websites or blogs. Wideo provides its users with a library of elements, objects, and fonts. Users can drag-and-drop elements into place in the Wideo editor then set the sequence of animations within their specific scenes. Each element can be re-used and the timing of the animation of each image can be individually adjusted.

Wikipedia

Everything works on a template system that you can give life through a series of presettings and predefined animations. You will be able to use an imposing image bank and evidence provided by Wideo, but you can also add your own by uploading them on the platform. Quite playful, you will thus be able to combine and animate images, text, videos and music.

here is a short video of 44 seconds on how to use Wideo: https://youtu.be/VlnLbOgPcdU

My experience

My final impression of Wideo went beyond what I have first expected. The tool enables you to do so many thing and everything is clearly explained in short tutorials on the website. On the other hand, I only experimented the free version and the complete version offers way more options, which could make it a bit harder to comprehend and assimilate. Since I only did a quick overview of the paid version, I am not giving my opinion on it. wideo_photo_3_001


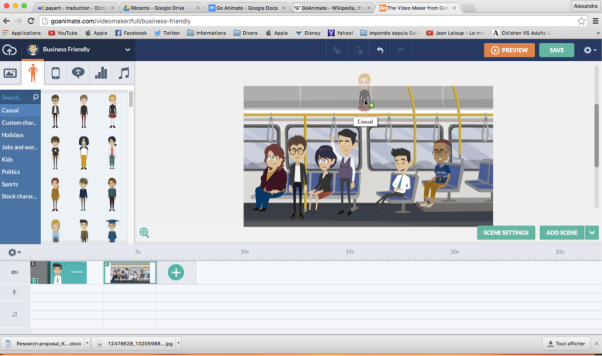
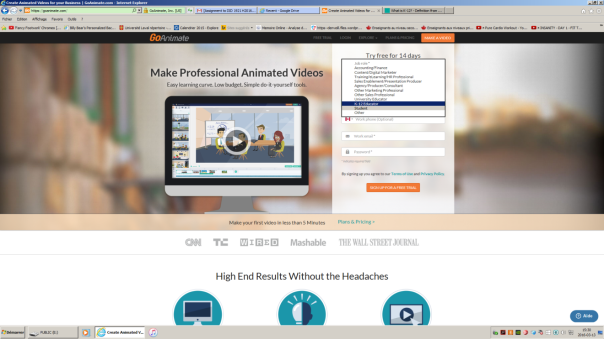
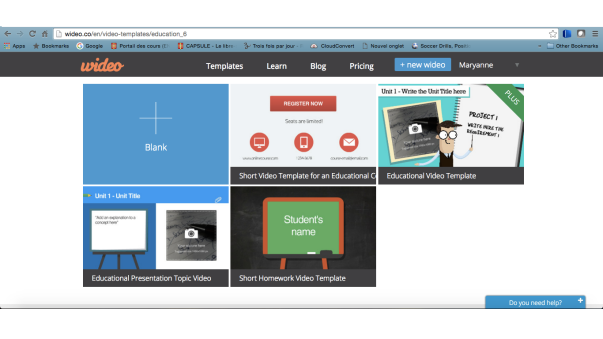
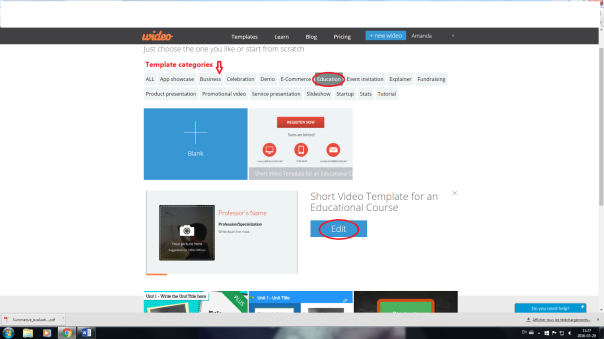
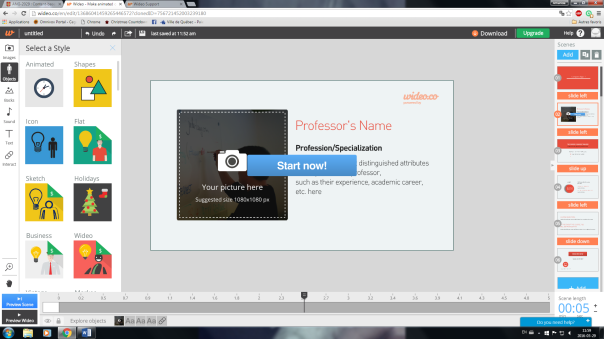
First I signed up and had to choose which trial I wanted to use. After choosing the free version that only let us create 30 seconds videos, I had to select my profession. The hope page was full of templates and keywords of specific types of templates. Everything was neat and simple, so I did not have much difficulties to find my way through the website. Here is a photo of how I discovered Wideo for the first time, explaining everything that I had to do in order to create my own “wideo”. Unfortunately, I lost my wideo due to a virus in my computer, but still, the photo represents well the ease I had while creating my wideo.

wideo_photo_4

Use as an ESL teacher

Wideo is an excellent tool for making videos
to communicate your ideas in an easy and intuitive way!

-Gerry Garbulsky, Professor of El Mundo de las Ideas

Wideo offers many possible uses in the world of education. It could be used as a great tool for making creative animated presentations. It can be used by teachers to make small video clips that should foster students’ attention. Whether to create a tutorial illustrate a concept or new materials of a course in a presentation. It could also be the main tool used for online educational courses. Since the students need a lot more support and information than in regular classes, the animated videos could be used as virtual classes and could help students who are more visual and need an interactive teaching method rather than a task-based method in order to succeed and understand the lessons.

On the Wideo blog, many tips were given by teachers on how Wideo could be used in ESL classrooms. Here are some interesting ones, which I totally recommend to teachers in primary schools and teachers who give online lessons:

  1. Motivate your students. Learners are more motivated to interact with educational content when it’s narrative or storytelling! Turn your teaching content into a story, plan it out and animate it.

  2. Encourage their Social skills – Share. Allowing students to create their own online video and sharing it with their friends and fam as part of their classroom experience, builds social skills. One of the most effective ways to learn something is to teach it to others!

  3. Reach all learning styles. Make your classroom well balanced! Video combines visual and auditory stimuli into one single package. Spreading things out across different styles, and creating short animated movies will address the naturally diverse nature of students’ methods for soaking up info through media.


Conclusion

Personally, if I had to create animated videos with any tools available for free, I would still use the full version of Wideo. Only with the free version, the possibilities are countless , so for a teacher, paying for a good tool that is simple and education is priceless. Its simplicity and its variety of functionalities makes it the best website for ESL teachers in need of safe and interactive tools to use in their classroom. Even though the full version is 228$/year, Wideo is worth the price. In my opinion, the tool can be used in almost any context related to ESL teaching and i definitely would use it in my classroom.

by Justine Fournier-Brassard

Laval University

VideoScribe, an interesting alternative to regular education

VideoScribe (http://www.videoscribe.co/) is a downloadable software that may be used to produce interactive videos. This tool has been developed by Sparkol, an English company based in Bristol, that specializes in video editing softwares. Created in 2012, VideoScribe is mainly designed for “all designers, graphic artists, marketers and bloggers”, but can obviously be used in the education system as well. According to Make Money on a Computer,

“VideoScribe […] is a comprehensive video animation software program. […] the company has been at the forefront of this highly popular method of animated marketing”


In this blog post, I will state the main characteristics and my personal impressions of the software after trying the 7-days free trial edition. I will also elaborate on possible uses of VideoScribe in a classroom environment.

Main characteristics

First, since VideoScribe is a software and not an application of some sort (yet), a download on a computer is required. As of now, March 24th 2016, VideoScribe for Android is a project that is in development and may be offered in a near future. Once the program is downloaded and the subscription to both VideoScribe and Sparkol done, you may use the software. For new users, like me (and probably you), a short tutorial video of a little over 2 minutes showing the basics of the program can be found on VideoScribe’s home page after downloading the platform. Also, VideoScribe has a Youtube channel (https://www.youtube.com/user/VideoScribetv) on which users and curious internauts can find additional and longer tutorials elaborating a bit more on more complex aspects of the software.

Once everything is installed, it is possible to start a new project. The way VideoScribe works is that the user can place images, writings and music on a canvas and the software will automatically generate a video of what is found on the board. In the video, images and writings are drawn on the board in the same order that the elements were placed in the timeline. The timeline is found at the bottom of the screen during elaboration and can be modified by the user whenever he/she wishes. Images can be found in a bank of over 500 pictures, but the number of available images may get bigger if you pay for a subscription. It is possible to import additional images, but the drawing during the video will not seem as natural as those that are offered by the software. There is also an important selection of short songs that can be used for the video. It is possible to import your own MP3 files as well, and you can record your voice over the video, which can be an interesting feature for educational purposes. For an example of some of those features, here is an example of what I quickly did with VideoScribe. Unfortunately, WordPress doesn’t support VideoScribe’s exported file since “.scribe” is not a common extension.

Impressions and use in education

My first thought on this interactive platform was that it looked attractive.  As Stacey Roshan, the NAIS “teacher of the future”, explains:

“That combination of handwriting with visuals, plus voiceover and light audio track, is powerful. Using VideoScribe enables me to do this type of work with ease, all animated to look quite professional.”

Like it or not, the first thing that leaves an impression is the look of something or someone, and VideoScribe is appealing by its colors and design. The use of visuals in a classroom, especially in ESL classes, is a major asset. The products are esthetically appealing to both the eyes and the ears, which is great to get students’ attention.But my second thought was “would I really use that in a classroom other than for a one-time thing?”. Well, the thing is that using the platform only once would not bring up its full potential. Using videos like this in class would not be  very practical, since pausing every now and then to answer possible questions on the theory would break the momentum of the videos. Creating videos using an interactive tool like VideoScribe, though, allows teachers to make a bank of useful activities and also allows everyone to benefit from a possible flipped classroom. By putting some efforts in the creation of many videos, a teacher could gather all of them on a webpage accessible by students from anywhere they want. This way, students could watch and listen to the theory at home as part of a homework and the teacher could focus a lot more on particular details and problems common to some students. VideoScribe also looks good and is quite easy to use. Opinions vary about this software, though. Jeff Lewis, from Student Centered Technology, explains:

With technology in education, I am primarily concerned with tools that will allow my students to communicate, create, and express themselves, and after making this short video, I think videoscribe may be too much for third graders.

Even if things look good and entertaining, it doesn’t mean that it is effective. In fact, in order to have students learn the most, it is important to keep it simple. Especially for younger students that tend to be fascinated by anything that is out of the ordinary, animations, music, and voiceovers may take the attention away from the main point of the video, which is the vocabulary or anything that is highlighted by the presentation.

The price range is also something that needs to be considered. It is possible to subscribe to a 7-day free trial, but more time will be necessary in order to create a good number of videos. A monthly subscription is 29 USD per month, which may be expensive on the long term for teachers and schools alike, but a yearly subscription is 144 USD, which is 12$ a month, which seems to be reasonable. Nevertheless, getting the money to pay for VideoScribe is not always possible and easy, depending on the school and the socio-economical area you teach in. Otherwise, it may be a good investment if you feel comfortable using the flipped classroom and interactive video softwares.

Wideo: Pretty good, but not good enough

When teachers feel like becoming creative, lots of wonderful tools can come to the rescue. There are many ways to become an up-to-date teacher ! Wideo is one of those platform where you can cut loose and create videos on any subject you like and share them with your students when time comes and vice versa. Unfortunately, it has a lot of downfalls, this post will explain everything you need to know about this tool.

Wideo is a beautiful websites that allows to create animated videos with texts and pictures that are called Wideos. You can get a free account, which gives you access to 30 sec long videos and a couple of templates. You can also pay 9$/month to have access to 90 sec long videos and all templates, 19$/month for 180 sec videos or 39$/month to have unlimited time and more. Once you registered, the website asks you what you are using the website as: for example, if you are a teacher, a student, an entrepreneur, etc. The website classifies their templates by categories that you can browse. As a future teacher, it is great to know that there is an Education category but less to know that it has only 5 templates, one of wich is blank and another one that requires you to upgrade to a paying program.Screen Shot 2016-04-17 at 10.08.45 PM 
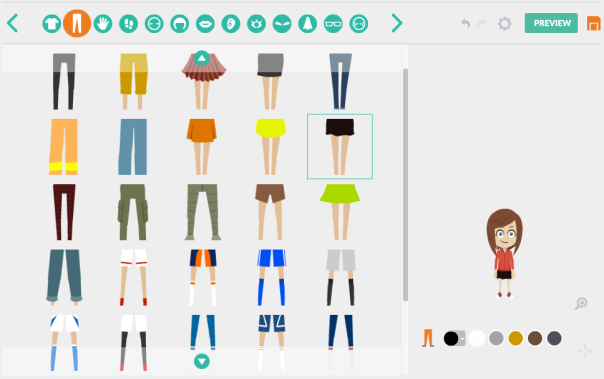
To create a Wideo, you can start from scratch, but you can also use a template, which is highly recommended for beginners. When using a template, creating your videos is very easy but also very fun ! Your video is divided in slides, just like a Powerpoint. You can change the background of every slide, using the ones from Wideo’s library or by uploading some of your own pictures. You can write in the provided text boxes but also add more if needed. You can customize the writing the same way as in any document: you change the font, the color and the size. This platform also allows you to add buttons to a video, such as a link to a website or a document.  You can even add sounds, such as a recorded voice or music. This allows to create an ambiance or explain the subject on the screen as it plays. You can also play with the transitions between the slides to create a more dynamic video. One point that I think is really great about Wideo is that it has a live chat with the support team, that means if you ever wonder “Hey, can I do this with Wideo ?” or “ Why isn’t this working”, you can ask them at any time. On the same line, this website has a “Learn” page that has many videos that explains every aspect of Wideo. It has tutorials on every tool of Wideo and it answer frequently asked questions. 

Screen Shot 2016-04-17 at 10.09.59 PM
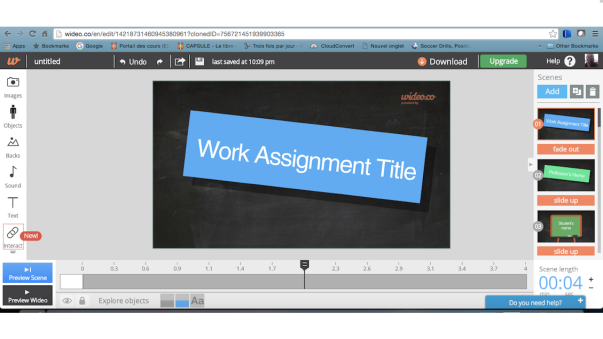
This tool can be a great add to any classroom. It would be great to make quick concept reviews that students can access at home; to help when they’re doing homework and studying for exams. These videos could easily become a resource for your classroom. Wideos can also be used in class to make theory more interesting. For example, when teaching new vocabulary words, the days of the week, months, ordinal numbers, etc, it would be very interesting to use it to introduce the theory in a fun way, with pictures, music, sounds and animation. It can easily be adapted to any group of age. I believe Wideo can also be given as a project for secondary level students. Since it is fairly easy to use and students are usually quite accustomed to technology, kids will quickly understand the basics. They could shortly present their future job or give the main characteristics of an animal or a sport. The students could work on their project individually but it could also be a project done in pairs. Although given the short length of the video, it would best be done individually.

Unfortunately, since Wideo only allows you to do 30 seconds videos for free, its options are very limited. It doesn’t allow you to do big projects with your students or explain extensive and complex theory You can fix this problem by paying 39$ per month to have unlimited time but this is a very unrealistic option for an everyday school here in Québec. Furthermore, there are many other websites and applications that can give you the same advantages but for free.

In conclusion, even thought this website has many considerable advantages such its pre-made templates and its user friendly configuration. This tool has many downside, the most prominent ones being its price and the shortness of the videos that comes with the free program. Video still has good sides to consider, it can be an easy tool to use when wanting to quickly create a fun video to introduce a new subject, unit or theory. It’s very user-friendly and fun to use, even tough you might not be good with technology, you and your students will quickly get the hang of it. It is still to remember that all these advantages can be found on other websites for free and without the time constraint.      All-in-all, this is an interesting tool that could be very interesting if it didn’t cost so much.       

Maryanne   

Videoscribe: Powerpoint’s better cousin

maker-faire-video-scribe-instructions-1-638

What is it?

When it comes to giving a good presentation, nothing is more important than the attention of the viewer or listener. Whether giving a small class to children or giving a one hour lecture to adults, the viewers must have some sort of engagement with the speaker and what he says, or else the attention span of these viewers will quickly go away. By then, it won’t matter what you have prepared: it will not have left a big enough impact and nothing will have been learned. And most of the time, visuals are an essential key to solving this problem.

While powerpoint is a serviceable tool for anybody giving a presentation, there exist other programs that offer a more interactive and appealing final product. One of those programs is called Videoscribe. Created by CEO Jon Air and Eric Oakland in 2008, Videoscribe “creates engaging scribe video animations quickly and easily without the need for technical ability or design know-how.” (file:///C:/Users/Francis/Downloads/How%20to%20Design%20Your%20Own%20Whiteboard%20Animation.pdf). Unlike powerpoints, videos on Videoscribe are done as one continuous flowing series of animated images that can be used for miscellaneous purposes like teaching a subject, giving instructions, presenting a plan and even more. This program is so effective that it claims having gotten the attention of the British Government to explain policies, the Swedish Parliament and even president Barack Obama himself. Claiming to be the first program on the web to enable simple self-made scribe videos, this video animation software program brings whiteboard animation to a new level. But how does it hold up as a whole?

My personal experience

Having personally used it, I can safely say that it is a simple tool to use. Upon downloading the program, a small video explains the basics, and that’s all you need to see before getting started. To try it out, I made a small video on hot spots to visit in Spain.

You can choose the animation you use for presenting an image or text, and it usually represented by a hand that writes with a marker. That is for the texts. When using images, you can also make them appear by having the “hand” dragging it on screen or having the previous image morph into the new one. Each animation can be edited by clicking on it, and three different timers can be tampered with: one for how long the animation lasts, another for how long the final text or image stays static and how long the transition is with the next animation. You can also edit the angle, size and color of the text or image like on any other software.

After each animation is created, it appears at the bottom of the screen on a timeline, to show which will appear first. You can change the order of the animations by simply dragging them wherever you want on the timeline. You can also adjust the length of the animation by editing it from the bottom of the timeline.

When adding images, videoscribe offers a variety of different pictures and drawings that can be well animated. As I said before, when animating a picture, the animation by default will be a hand paintbrushing the image from left to right. However, if you use an image from the program, the animation will be done by drawings, meaning that the animation ”hand” will draw the picture line after line, which gives a pretty good visual. You can also import images from your computer or from online. Unfortunately, I did not seem to be able to take images from my desktop, so instead I resorted to adding the direct link of the images online in order for them to be able to be used.

One practical aspect that videoscribe offers is that it is easy to organize and reorganize your images and text. It does not follow the traditional powerpoint by creating slide after slide. Instead, the program works a bit like Mural.ly: Your images can be put anywhere on a big ”whiteboard”, and the logical flow of your ”slides” will depend on how your organize them on the timeline. So instead of cutting directly to the next slide, your images transition in a way where the focus is moved in the direction you want, just like a camera filming a different area in a single shot. That is how the final product is presented. You can even add the option of zooming out at the end to include all of your pictures in the same frame.

Finally, you can add a soundtrack to your presentation. Just like for the images, you can select from a variety of background music, varying from rock to soft music. You can also import your own music onto the final product. The whole program can be used if you pay the full version. Otherwise, you only get a seven-day free trial like I did. Also, if you buy the full version. you get access to more fonts, images, and music.

Personal opinion and relevance for ESL teaching

As many people have as experienced as well as I, Videoscribe is definitely an easy tool to use. Not only that, but it also gives great results and is cost effective way to create whiteboard animation video. The only downside to it is that it has a laggy and slow software interface, especially for a big project. And this is not just a random fact, it is something I experienced myself. The software crashed more than once for various reasons. Sometimes it was because I had too many pictures, another time it was because I tried an animation that was too detailed. I was not even able to add my own created file to this blog post because it was not able to be read other than by Videoscribe itself. This come as an inconvenience because if someone ever wanted to do a big project, it would be difficult because of the lags.

As a future ESL teacher, I can see how this program could come in handy. Since a presentation must include out of the ordinary elements to be able to be memorable, videoscribe is the perfect tool for this because the animation is appealing and if fit to get the attention of younger viewers, especially because it looks like they are watching a movie. But since it cannot be used to big projects, it can be used for small lessons to give. Better yet, some teachers have even started using Videoscribe in flipped classrooms, and I realize how this can be a good thing. Since flipped classrooms need to be short, this tool is perfect to come across a specific subject and present it briefly with cool animations and engaging visuals. But since I do not really plan on maybe using flipped classrooms later in my career. I do not think I see myself using this software very often. Even if I had a good experience with it, I might not use it very often, only maybe to explain quick and general grammar rules, but never for a subject such as literature. In my opinion, there are other ways for such subjects. But as is, Videoscribe is an admirable tool that I can easily see come in handy for various situations, especially in ESL teaching.

Powtoon : Animate Your class

What is Powtoon?

PowToon is Web-based animation software that allows you to quickly and easily create animated presentations with your students by manipulating pre-created objects, imported images, provided music and user created voice-overs.

Powtoon creators’ main objective was to create presentation software that would be user friendly to anyone, even for people with no technical skills. The software main focus is the animation which is usually a complicated feature to use in any presentation software.

My experience

Before starting to discover the software, you have to create your account. The registration process is fairly standard and quick. As soon as I finished creating my account, I went directly in the tutorials section to verify if the software was as user-friendly as it claims to be.  The tutorial contains nine short videos of about a minute to explain some of the feature.  Then, I went straight into the interesting part which is creating my own presentation.  Powtoon allow you to start one from scratch or to choose a template that you find suitable for your presentation.  The templates can be filtered by category such as: Business, Education, and Training. One bad thing is that the education section contains the least amount of templates.

After the template selection, you are directed to the customization page. On the right side, there is the image gallery where you can find speech bubbles, characters, props and other things to help you customize your presentation. The transitions tab is also found on the right side of the screen.  The section on the left is basically identical to PowerPoint as it shows the slides you added to your presentation.

The most interesting feature is the animation timeline at the bottom of the screen, but it was quite disapointing to me. The timeline allow you to easily see the distribution of your animation. Even though the feature is simple to use, it has limitations in terms of precision as you can only time your animation within 0.5 seconds. Each slide can only be 20 seconds long.Also, the free version has a lot of limitations concerning customization with characters, animations and sounds. To access most of the content, you need a premium account.

The two most complicated aspects of PowerPoint, animations and timings are simplified with Powtoon and one is left with a very intuitive interface.

Use in ESL teaching

From the perspective of an ESL teacher, I find many ways in which this tool could be used inside classrooms. I would say that this tool is mainly for primary school students, but it could also be used in high school. The level of interest might drop in high school since they might find the layout a bit childish. The first interesting thing that could be done with Powtoon is a short presentation of yourself. For example, at the beginning of the school year, instead of doing a classic presentation where you tell the students your interest and what type of teacher you are, you could let the tool do it for you. Pick a character that looks like you, animate him and make him talk about your passions, your personality or anything else.  The students will probably love the originality. You could also do a presentation concerning the classroom rules.  Your little character would enumerate the rules that you set inside the classrooms.

Almost every task could be more interesting with this tool. For example, an ESL teacher could ask his students to make a short book report on Powtoon. Instead of writing their report like they usually would, they could customize their presentation with cool animations. I am pretty sure they would enjoy the creativity that the tool allows them.

Moreover, Powtoon could be use as an introduction for every class. You could make one presentation that would greet the students as well as informing them what the plan for today’s class is. Since the tool is more “toonish” humour might be a great thing to incorporate in your presentations. By doing so, you set a routine for your class and makes classroom management a lot easier because the little presentation tells the students that the class is beginning and they have to listen.

Finally, I would not recommend Powtoon for ESL teachers because of one main reason. The lack of customization with the free version is something that I find disapointing. With the free version, you can only access four characters and around twelve animations only. Other presentation tools such as PowerPoint gives a lot more freedom to create. Overall, it is not a bad software. The objective of the creators was to make an easy and user friendly presentation software. This objective was reached indeed, but I think they simplified it too much and removed possibilities to create more complex presentations.

Charles-André Richard

Université Laval

References

https://www.powtoon.com

http://www.techlearning.com/news/0002/product-review-powtoon/63310

http://www.brightcarbon.com/blog/technology-review-powtoon/

https://www.powtoon.com/blog/11-ways-to-use-powtoon-in-your-classroom/?utm_medium=Email&utm_campaign=Welcome-education-sequence-2&utm_source=middle-text-link

Voki

“Voki is an educational tool that allows users to create their very own talking character.”

Voki is created by Oddcast a New York based media technology company. The website offers students and teachers the opportunity to present information in a different way. The main Voki access is free for educators and students, but the other divisions of the website (Classroom, Presenter and Teach) have a yearly subscription price. Users can customize a character to their liking, it even represent them or a historical character.

Voki is an easy tool to use. In fact, after login in the website you can start creating you Vokis. Vokis are avatar you can create to you liking. The user can choose its look, add clothes, accesories and add a background. Once the Voki character is customized, an audio presentation can be attached to the character. After, the Voki is ready, you can easily share you presentation. Indeed, you can send your presentation by email and share on social media or on a blog. The Voki website also offers plenty of lesson plans for teachers to use, on various topics and personalized for different grade levels.

Voki offers more educational possibilities by offering different ways to share and use the characters. Indeed, the website also offers Voki Classroom, Voki Presenter and Voki Teach. “Voki Classroom is a student assignment management system for Voki.” This lets a teacher assign work to students while being able to access and change their privacy settings. It also make it easier to share the Vokis students made for assignements. Voki Presenter lets the educator build presentations for a class. This way, the teacher can add Vokis to slides in order to make presentations more fun and interactive. It also makes it easier for students who missed a class to catch up. Voki Teach includes the same features as Voki Presenter, while also including different lessons ready to use and teach.

My experience with Voki

When first trying Voki, I was very skepical of the functions it had to offer, but I was very surprised by how easy it is to use. In fact, after accessing the site, I first got to choose what type of face I wanted my Voki to have. Then, I was able to change and adjust multiple features of my character, which I found fun and impressive to use. I could also change my characters, makeup clothing and accessories to make it even more personalized.

Capture d’écran 2016-04-09 à 14.10.32

Then, I was able to add a voice to my character. Voki offers different methods for adding a voice to the character, which is very convenient. The first method was to call a phone number and enter a specific passcode, to record my audio to the character. The second method was to type in the text, which would generate a computer recording for my character. The third method was to directly record myself on the website with a microphone connected to my computer. The last method was to upload an audio file from my computer. I chose to use to add type in my text for a computer generated audio. This was very impressive to use, since I was able to chose the language my character was to speak in as well as one of the built in accents generated by the website.

Capture d’écran 2016-04-09 à 14.21.41.png

After adding the audio to my character, I was able to change the background in which I wanted my character to be. The website offers a wide variety to choose from and adapt to your character and presentation.

Capture d’écran 2016-04-09 à 14.24.26

Once I was done customizing my character, I was able to publish my character and choose the way I wanted to share it. Here it is. Overall, I found that using the website was very easy and found that the functions were varied and interesting.

My opinion as a futur ESL teacher

As a future ESL teacher, I find that Voki can be a useful tool for certain projects. In fact, I find it interesting that students can join their audio recordings to a character. This way they can do projects where they practice their oral skills without having the pressure of being in front of a class or being filmed. Moreover, I find that some of the animations can truly add to a simple presentation. Indeed since the Voki characters can be historical figures, it could be interesting to add the Voki during a lesson on that specific historical figure. It could be, in my opinion, a fun way to make presentations more engaging for students. Furthermore, Voki is very simple to use and the website offers multiple functions to personalize your character. All in all, I don’t think I would frequently use Voki as a future ESL teacher. In fact, if I was to have students make Vokis, I feel that students will waste their time on making a character and use it as a game instead of focusing on the oral presentation aspect of Vokis. I also feel that Vokis are a little childish for high school students. Maybe with elementary school students it could be pleasant to try, and use Vokis inside a class project, but Voki doesn’t service this age group. Indeed, after exploring the site I found out that students have to be 13 or older to sign up, which is deceiving, even though you can still use and build vokis without signing up to the website.

Other opinions

After looking at Voki, I looked for other users opinions. On the website Edshelf , a website dedicated to helping teachers find the right educational tool, users seemed overall pleased with Voki. In fact, lots of users reviewed the app by saying that it was more engaging and interactive for students than regular presentations. Some users pointed out some of the same downfalls of Voki as I did. Indeed, one user said that it would be more appropriate for younger students, since the characters are more juvenile. On another website for discovering teaching tools, Graphite, reviewed Voki by giving it three stars out of five. Graphite stated the pros of Voki as being more fun and entertaining for students, as mentioned previously by myself and other viewers. For the cons it stated that Voki wasn’t intuitive to use. Moreover, Graphite offers the possibility for teachers to rate the website and teachers rated it four stars out of five, which is better than I would have thought.

Overall, in my opinion, Voki isn’t the best educational tool, but in certain contexts it could be pleasant to add characters for special presentations on historical figure for example.

Dominique Falardeau

GoAnimate: Flip Your Teaching Around!

In the recent years, videos have acquired a growing importance on the Internet. Whether it is on YouTube, Facebook, or elsewhere, DIY (Do It Yourself) tutorials, advertisements, personal opinions, and more are shared through the Internet. However, creating videos can be time-consuming and may require a lot of material. GoAnimate has come up with a solution: easy, animated videos that can be created in only a few minutes.

What Is It?

According to their website, GoAnimate, which was created in 2007, is

The world’s number one do it yourself animated video website.

GoAnimate allows individuals to create animated videos. It can be used by individuals, businesses, or schools. This article will focus on GoAnimate for Schools.

What Is Specific to GoAnimate for Schools?

logo goAnimateGoAnimate for schools is the same application as GoAnimate, but it allows for much more security for your students. For example, each school has its own GoAnimate private address. Options like integration with social networks are blocked, only teachers can download a video or approve downloading, and props that are not school-safe are not available to students. Your students are assured to work in a safe environment. Also, GoAnimate for schools allows for easy classroom management. Teachers can manage groups that they create, contact their students through an e-mail system, and can approve or reject students’ videos and comments. Furthermore, the activity feed on the dashboard (homepage) allows teachers to see all of their student’s recent comments and videos. GoAnimate also offers many school-related templates which allow teachers to rapidly create simple videos. For a demo video of GoAnimate for schools, click here.

How Does It Work?

Signing up is simple and quick. If your school already has an account on GoAnimate for School, the “super teacher”, who is the person responsible for subscriptions, will add you to the account. Otherwise, you can create your account and become the super teacher yourself. GoAnimate offers a fourteen-day free trial to new members, but is a very expensive application to work with. Indeed, GoAnimate for School asks, for a year’s subscription, 59$ for a single teacher or 99$ for a teacher and up to 50 student users. It is important to mention that most ESL teachers at the primary level have a lot more than 50 students, so the bill can go up rather quickly, which is one of the disadvantages of GoAnimate.

GoAnimate guides users from the very beginning by offering a tutorial video. The video is helpful and explains the basics of how to use the application, but does not explain everything, such as where to create our own characters, how to record our voices, etc. My experience with GoAnimate has left me a bit frustrated because the website is not that intuitive, and so sometimes I had to look for a button or an option for almost a minute, which exasperated me. This can eventually cause classroom management problems if the students get impatient or decide not to do something because they are frustrated. One solution that I found useful for teachers is the FAQ (frequently asked questions section) and the informative blog, Educator Experiences. These two sources of information can help teachers improve their use of GoAnimate for Schools.

video maker
GoAnimate’s video maker

There are two options from which users can create videos. The first option is to make a video without a template. Teachers can choose from varied assets (themes): business friendly, stick figure it out, good on paper, and more. Making  a video is very simple, as it works on the principles of “drag-and-drop.” You can choose from a wide variety of templates, characters, props, text bubbles, vidgets, and sounds and music (see image on the right). You can also import media. If you feel creative, you can even create your own custom characters (see image below). I was impressed by the customization options: size, clothes and colours, haircut… Everything could be chosen according to my own taste! The best thing is that it does not end there! You can add actions to your characters, you can add enter/exit motions to both your characters and your props, and you can zoom in and zoom out. This can make videos look more realistic and is more efficient when it comes to catching students’ attention. Another great thing about those videos is that you can record your own voice, and the characters’ lips will be in sync with what you are saying. For people that are too shy, there is a text-to-speech option which allows people to write down what they want to say and choose a voice from a vast selection to say the text. While this option to add your own or a computer-produced voice seems quite nice, it is limiting. There is a twenty-second limit for voice recordings and a 180-character limit for text-to-speech dialogs. While the users can copy the scene and record another twenty seconds of speech, this leads to useless breaks. Furthermore, twenty seconds is not a lot for a student learning a second language to say the information he wants to convey.


custom characters

There is also a second way to make nice videos: templates. Templates are a good tool to use because they will allow you to create a video in a record time. They are like already set videos; teachers only have to choose from a limited selection of backgrounds and characters, record their voices (or use the text-to-speech tool), and voilà!

example of templates
Examples of themes from which users can create videos


A great thing about GoAnimate is that you can preview your videos before publishing them, and you can also save them to work on them later. Once the videos are published, you can still go back and work on them. However, beware, the systems is really slow when it comes to loading information. Every time you add a new recording of your voice and every time you want to preview your video, you will have to wait. Waiting once seems fine, but I can tell you that it gets heavier as you work on your video. Once again, not only teachers get exasperated. Your students might cut down on the reviewing because they are tired of waiting for the video to load.

My Opinion as an ESL Teacher and Uses in the ESL Classrooms

GoAnimate can be used in varied ways not only by ESL teachers, but also by their students! Everyone can make a video rather quickly. It is a tool that is particularly useful to get your information across and to test students’ comprehension of subject matters and oral production skills. Even though some teachers, such as Mary Beth Hertz, mention that GoAnimate is good to use with younger students, I would recommend using it with high school students. The fact that it is not so intuitive and that there is an impressive number of props, actions, characters, etc. that you can choose from can be confusing for younger students. Still, the level could be adapted to primary-level students by not having them use all of the functionalities available on the website. I think that students will love to work with GoAnimate. It is a lively, entertaining, and even fun, application that they will want to use more and more.

Once I started using it, I noticed that there were a lot of uses to GoAnimate. GoAnimate is especially useful when it comes to creating flipped classes. Flipped classes are organized so that students learn the class’ theory by looking at a video at home and use class time to practice with exercises and projects. In fact, Alisa Wolf emphasized:

Animated filmmaking is a powerful classroom tool. Teachers can make video lessons that students consume at their own pace, with as much repetition as needed for the lessons to become clear. Students prone to distraction can put on headphones and focus on the videos, eliminating classroom distractions and reducing the possibility of overstimulation.

GoAnimate videos are perfect to help students learn! The fact that they are animated will keep the students well focused.

GoAnimate can also be used to introduce new subjects with a powerful touch. As Jennifer Gonzalez stated,

A good video is like a shot of B-12 to any message you’re trying to get out there.

A short video can easily catch the students’ interest. There are many ways to do so. For example, if you are going to talk about a public personality, you can create a video of yourself interviewing the personality. The fact that the video is colorful and animated will automatically catch your students’ eye and the realistic aspect of the video will give your students something concrete to relate to.

GoAnimate can also be a more interesting alternative for students to demonstrate their learning. Indeed, as mentioned by Mary Beth Hertz,

There’s a very high engagement level with this program; students will love working with the props, animations, and effects to create professional looking animations. This could encourage reluctant writers to engage in script writing and story development more readily than they otherwise might. It’s also an excellent alternative to PowerPoint presentations and the like for students to demonstrate information they’ve gathered.

For students, GoAnimate is not just about reporting information, it is also about making it feel real, as they have characters report their findings. A short amount of class time can be spent showing the students’ videos, which will lead to students working even harder to create a final product which they can be proud of. Furthermore, as Holly Clark mentions:

Next time you want students to show you they understand a concept, consider having them create a GoAnimate for Schools project. You’ll find that they will watch their own videos over and over again.

As I was making my first video, I indeed watched it at least 20 times before the product was finished. It is true that I learned my arguments by heart just by doing my video. Here is the link to my first video on GoAnimate.

GoAnimate’s biggest advantage, according to myself, is that it can be an alternative to oral productions. Instead of having the students do their oral presentations in front of the whole class, when their performances’ level can be lowered by factors such as stress, have them record their speech on GoAnimate. This will provide you with a stress-free way of evaluating your students.

Even though educators seem to have an overall good view of the application, all the technical disadvantages of GoAnimate mentioned before, namely, the twenty-second speech limit, the unintuitive video maker, and the slow loading of previews, keep me from saying that I would use GoAnimate in my classroom. Even if it is a very good pedagogical tool and that I feel that it can be really useful, those limitations caused me much irritation. The high price of the subscription can also be very limiting in a public classroom setting. In addition, I have to agree with Brian S. and Mary Beth Hertz: the students might rush the writing process in order to skip ahead to the fun video-creating part and they might lose time by trying to use all of the available options of the website in their videos.

All in all, I would still recommend using GoAnimate for its very wide possible uses. I believe that it is a tool that can really increase students’ mastery of all subjects. However, I recommend that teachers do so only for short videos (no longer than two minutes) and that, prior to letting their students use the website, they go over the functionalities with them.

by Camille Leblanc, TESL student at Laval University

Whiteboard-Style Animation

Videoscribe is a whiteboard-style animation with several options, which can make tutorials or even lecture more captivating. Launched in 2012 by UK Sparkol Company, this software has multiple resources that can be useful in classroom teaching. It is available as a desktop version, an Ipad app and an android app on Google Play. This technology allows people to login with different devices. The desktop version offers a seven-day free trial that leads to three types of payment for full access. People can pay yearly for $12/month ($144/year) or monthly for $29/month. However, it is possible to cancel the subscription at any time. Another way to subscribe is by paying only once an amount of $665. According to Videoscribe’s website, buying it gives people access to extra features. They will be able to work offline, set up a HD resolution and export videos (WMV, MOV and AVI movies) and PNG or JPG sequences. Moreover, the main elements that people can add when using Videoscribe are images from the Videoscribe’s gallery. They can also import their own gallery, text, voiceover and soundtrack. Afterward, people may set animation times. Nevertheless, Videoscribe has multiple options that can come in handy in order to enhance and polish the video’s quality.


To give a better idea of what Videoscribe can do, the description below provides its detailed use. After signing up through Sparkol website, you are relayed on the project screen where there are all of the saved scribes. It is possible to organize them or put them online. Once you have clicked on your project you can start editing it. On the edit page there are three main elements: the tool bar at the top, the timeline at the bottom and the canvas in the middle. As mentioned above, from the tool bar, you can add images, voiceover and soundtrack. From the image icon, you can either search for your images in the gallery or import them. By right clicking on the image, you can press preview and it shows you how the image will be drawn. After adding the image in the canvas, you can see the image properties, from which you can change how it looks and how it is animated. It is also visible on the timeline, from which you can change the order. The next icon is the text. It allows you to write on the canvas. It has almost the same properties as the image, except that you can change the font and color. Just like the image, you can move, rotate or expand it and it is also added on the timeline. In order to see what your canvas looks like, there is a play button at the top right that plays what you have done since the beginning. Then, you can add voiceover whether it is by recording it using another device and importing it or by recording it while playing your video. Another possibility that you can find on the tool bar is the soundtrack icon. Videoscribe has its own gallery of music and you also have the option of importing your own as well. For each soundtrack you can loop it if it is not long enough. After setting up your video, you can decide how the camera films it by using zoom in and zoom out for each sequence. At the end of your project you can save it locally or online with the first icon of the tool bar. It is also possible to publish it via Facebook, YouTube and you can add it on a PowerPoint slide or create a video file. You can now start on a different project.

Even though the free trial has not as many features as the full access, I was able to experience Videoscribe. I first signed up for the free week and I immediately started a new project. I used my canvas in order to introduce new vocabulary to elementary school students. I created a title, which was amazing animals and fantastic beasts. I then divided the animals into three categories: forest animals, African animals and sea animals. Each time the camera changed toward a new set of animals, it focused first on the category and then on the animals. The voiceover that I added presented each animal and some of their characteristics. I also added a soundtrack at the beginning and at the end of the video. I then concluded the project by asking the students to describe their favourite animal.

Capture d’écran 2016-03-29 à 21.17.25.png

Capture d’écran 2016-03-29 à 21.19.11.png

My Opinion as an ESL Teacher and Uses in the ESL classroom

Videoscribe has many possibilities to make lessons more enjoyable and as a future ESL teacher I consider using it. It has an Education licence, which gives school discount depending on the student number. Teachers, students and staff member would therefore be able to login. They would also have access at school and at home and they have free support. Using Videoscribe in class provides multiple possibilities to ESL teaching. You can use it as a way to reverse or flipped classroom. Thus students are introduced to the new subject at home with an interactive video and they are ready to start next class. This is what exactly did Stacey Roshan and she explained how she does it

In my classroom, we have reversed that mentality. We do problem-solving in the classroom and then discussion at the board which is very student-driven and based on their needs and concerns for the day. Then, for homework, students watch a video lesson that I’ve created, which serves as a basis for class the next day. 

I find this idea very interesting, because she is making a video that is not only more stimulating for the students but they watch it at home so they can be ready for next class. Also, if one student did not understand, he/she can replay the video as many times as he/she wants. However, one particularly thing that is brought up by optimussourcing.com, is the lack of text one can include in the presentation. Indeed, during a presentation, there a hand that is writing everything and it can become annoying to see it in a large amount. This is why optimissourcing mentioned

Therefore either your speech or a pre-recorded voiceover needs to be used to put over detailed information, where the programme is best used for largely visual elements

I have to agree with them, videoscrive is a very stimulating tool and it should not be overwhelmed with “text”. It is now time to use images, music and a voiceover.

All in all, videoscribe is more interesting to students when introducing new dry topics. Then, reviewing exam can help students concentrate. It is a good way to change the routine in class. I believe it can help students to be more receptive to the lesson.


Wideo: An Innovative Way of Using Videos in Class!

Wideo is a website that is made to create animated videos. Anyone can create an account, as long as they have internet access. Wideo has a free version, which is the version I explored and worked with. Wideo also offers a more complete version, WIdeoPlus, that users have to pay for. At a first glance, I found that Wideo offers many different templates and suggests what they might be the most useful for by classifying all of the templates into categories such as business, event invitation, education (YAY!), product videos and many more.

As a future teacher, seeing that there was an “education” category, it immediately got my attention. When I clicked on the “education” tab, I was a little disappointed by the fact that there were just five templates available, one of which was a “blank” one, and another one required the “plus version” of Wideo to be able to use it. Ultimately, three templates were left at our disposal. All three templates were basically short videos of about 30 seconds that showed how teachers could use these videos in or for a classroom. One of the templates was a course presentation/advertisement, giving all of the course details, the schedule, the professor’s information, the topics that will be covered ect. The next model videos were ones that were created for assigning homework or assignments and introducing new concepts or tropics. These last two templates provided space for the unit number and the unit title as well as an area where a picture and text could be added. After watching all of the templates, I decided that it was time to give the creation of a video a try. To begin, I simply chose one of the provided templates and I clicked on the “edit” button.

Wideo_category_template_editbutton

When the edit page opened, I noticed that the page layout looked a little like window moviemaker’s, but clearly Wideo’s layout is much more visually appealing. Not only is Wideo’s layout more visually appealing, but the addition of various items into the video is very straight forward and clearly indicated. On the left side of the page, the creator can add pictures, backgrounds, audio files, objects as well as links to the video. At the bottom of the page, there is a “time bar” where the creator can adjust the length of a certain scene and where they can add special effects and transitions to individual items on a slide, or to the whole slide itself. Finally, on the right side of the screen, all of the individual slides or pages are ordered by what plays first in the video, the ordering can be changed by simply clicking and dragging a slide to where you want it to appear in the video. Transitions between slides can also be added to help the video flow. The addition, deletion or the cloning of slides can also be done from the right side of the “edit” page. Moreover, Wideo automatically saves any videos you are working on regularly, which is always a good thing, especially while working online and technology because unfortunately, you never know when your Internet might cut or when your computer might crash.

Wideo_Edit_Template

While exploring the website, I found a “Learn” tab where all of the different tools are explained and where short tutorials can be watched to help the creator figure out how to use the website. This page comes with frequently asked questions and answers as well as links to new videos to help the user with just about anything that they might have trouble with. Wideo also has a YouTube channel that users can subscribe to in order to learn about updates and new functions that have been added to the website. This “learn” page can help new users, who aren’t necessarily comfortable with technology, begin creating videos.

When I first started playing around with this tool, I didn’t really see how an ESL teacher could use animated videos in class, other than to help explain a new concept. For example, an ESL teacher who wants to introduce the present progressive could create a video that first explains how and when to use this verb tense (the subject, auxiliary “to be” and then the verb +ING), but I thought, this could be done using a simple chalkboard. A teacher who is a little more creative could use the animations to benefit the students’ understanding though, Rather than just having the theoretical approach and the grammar rules in the video, why not provide specific examples by animating different characters? After providing the grammar explanations, the teacher could have characters act out certain things such as a girl who is running and then explain the “she is run+ing”. By including different examples, the theory will become concrete, thus helping the students remember what they have just learned. Moreover, once these videos are created the teacher can use them over and over again, either as a review of the subject, or even year after year, which makes the lesson planning much easier.

Although I could not find any teachers’ opinions on using Wideo for classroom purposes, I did find a few articles on how using videos can increase the students’ motivation and interest when learning a subject. According to “The Center for Teaching and Learning” from the University of North Carolina at Charlotte, using videos in class “engages viewers from multiple senses – sight and sound – and can generate excitement about a subject or concept. Students will enjoy the experience and retain more information from the class” (http://teaching.uncc.edu/learning-resources/articles-books/best-practice/using-video/why-use-video). I also found studies that proved that “teaching methods that include the use of video and audio will, in effect, “reach more students and provide more opportunities for neural development and learning.” (http://www.libraryvideo.com/articles/article18.asp ). Although creating videos might be more time-consuming compared to preparing your lesson and carrying out the lesson as the class is being given, using videos does help students learn in the long-run, especially if the videos are made available to the students so that they can watch them over again if anything is unclear to them. Using videos to help teach can also be a good way to try using a “flipped classroom” where students could watch the short videos you created from their homes, and then come back the next day and work on assignments or projects from school.

My Opinion on Powtoon as a Future ESL Teacher

What is Powtoon?

Powtoon is an easy-to-use 2D animated presentation tool. It allows the users to save their flash animations and present them. There are three pricing options, so that it is accessible to everyone: free, professional (starting at 20$ per month), and agency (starting at 40$ per month). The higher options have a greater amount of options.

How does it work?

Sans titre 4
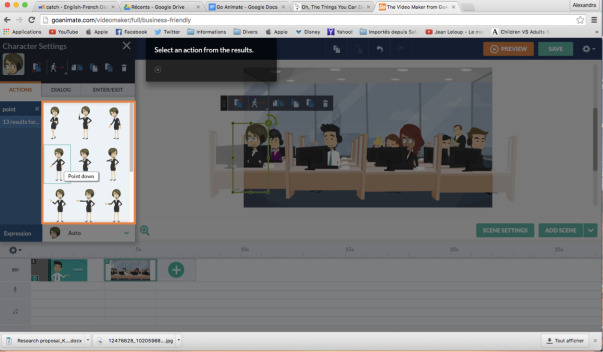
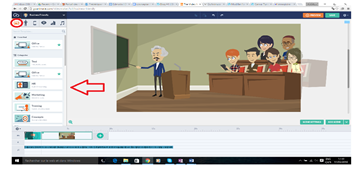
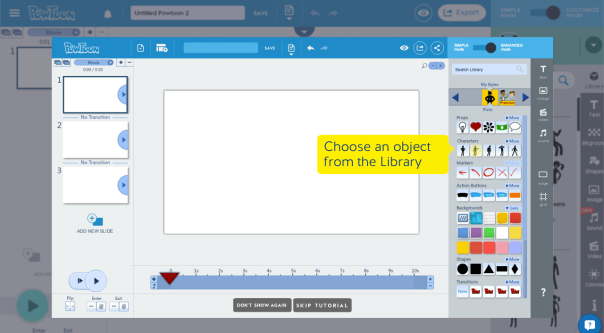
To create a new flash animation, the user has to subscribe. Then, he chooses between two options: “Start from Scratch” or “Customize a Ready Made Powtoon”. The first option exposes numerous templates that are ready to be modified on the needs. The second option allows the user to choose amongst different animations for different situations, sometimes nothing needs to be changed. Then, the animations are separated by topics: “Business”, “Marketing and Sales”, “Training”, “Education”, “Personal/Social/Fun”, and “Events and Greeting Cards”. Once an animation is chosen, the possibilities are endless. Powtoon allows the users to play with the colors, with the text, with the images, with the animations, and with the sounds. At the end, the video presentation can be posted on Youtube, Vimeo or Wistia or it can simply be saved as an MP4 file, as a PPT file or as a PDF file. On the time line provided, the user can put whatever he wants: he can choose a background, he can add logos and images, and he can put an animated characters. These same characters can move and do different things, such as talking, waving, or smiling. Then, at a given point on the time line, he can change images, he can change what the character is doing, etc. At any time during the video, he can add or delete something. For example, if he wants to make a video of a teacher talking to his students, walking to the other side of the classroom, and then telling another thing, he can. First, he chooses a school background, an animated character and a text or with an actual voice. Then, he animates the character to “talking”. At a given point, let’s say at 20 seconds, he can make the character move to the other side of the classroom by choosing the right animation. After 5 seconds, he stops the animation on the timeline, and he can then start making the animated character speak again. As complicated as it may sound, Powtoon make the possibilities to create attractive animations endless!

ESL Teacher’s Point of View
From an ESL teacher’s point of view, I think Powtoon is a useful tool. First, it is easy to use for everyone, teachers and students. In less than two minutes, I was already subscribed and I was working on my first project. The website also gives a tutorial option in the beginning, to make the creation process easier.

Then, it has endless possibilities for teachers and for students. A teacher can choose theSans titre 7 “education” section and create or modify a video to originally present themselves, the content of their course or the content of a specific project. A student can use Powtoon to make a presentation more interactive and more original.

Finally, the animations are fun. I personally think Powtoon is an excellent alternative to presentation tools such as Power-Point. The videos made online with the website are generally more interactive, present more animations, and are more pleasing to the eye than a simple PPT presentation. It is important to use techniques to keep students’ attention in class, and I think having a good visual support can help.

As for students, they could use the tool during different ESL projects. First, they could use it to do an animated video with a “voiceover”. For example, they could be in pairs. With Powtoon, they could create a funny animation with two characters, and these characters could have the students’ voice. This would be a fun way to practice their pronunciation and speaking skills in their second language, without having to do an oral presentation in front of the classroom. The project could be presented in front of the classroom, so that students are motivated to do a good job. Then, the students could use it as a visual support for a teaching act. For example, each week, a team could have to present a one a grammar rule of their second language using Powtoon and its animated characters. Not only this could improve the students’ knowledge of the rules and their writing skills, it would motivate the students, as they are given the role of a “teacher”.

Other critiques 

Powtoon’s reviews are generally positive. Users state that the online software is easy and Sans titre 6fun to use. Alicia Leonard, a math teacher, says: “I used this tool to create a flipped math lesson for one of my graduate classes. I had SO much fun with this, and found so much value in it, I actually upgraded to the EXTREMELY reasonably priced student subscription. The only weaknesses I could find with this tool are related to the limitations put on the user of the free version. They disappear when you pay the nominal fee for one of the many different upgrade types.” As mentioned earlier, there are different pricing options. The free version does not allow users to use every option. For example, the Powtoon logo stays on the animation, a membership is necessary to delete it.

An English Language Arts teacher, Shari M., states that “as teachers, we normally think more is better, but what Powtoon teaches students is how to create a presentation which will keep your intended audience’s attention and pull out the important information (gist, theme, etc.). […] Its focus on audience, message, and time, aligns nicely with some of argumentative and persuasive writing strategies. It can be used to help write an effective thesis, used as a “trailer” for an argumentative essay, or to simply provide the writer with another way of looking at writing an effective thesis statement!” In fact, visual support is a big part of the teaching process. An educator cannot expect his students to learn effectively if he does not have their attention. By creating an animated video with Powtoon, the teacher makes sure that students pay attention to the lesson.

Conclusion

As a future ESL teacher and as a student, I think Powtoon is an useful animated presentation tool that can be use in any given situation. As well as being easy to use for everyone, it is fun and original. Keeping the class’ attention has never been easier!

Maximme Grenier

The Scribing Revolution

VideoScribe is an application that lets you create scribe videos or whiteboard animations. The animations are drawn onto the white background by a human hand. The application allows you to create videos with images, music and voiceover. It lets you communicate clear, structured ideas as well as tell your own stories to the public. VideoScribe is easy to use and would be efficient in a classroom environment since it stimulates viewers’ anticipation, it requires a low budget and it provides multisensory learning which improves students’ problem solving abilities and memory recall.

First, VideoScribe is a tool that promotes curiosity. The tool creates what is described by artists as viewer completion. Viewer completion is the way the human mind can complete an image despite the lack of details. For example, a student could see a complex word or the beginning of a sentence being written in front of his eyes and could make inferences pertaining to the rest of the word or sentence. Whiteboard animations also stimulate viewer anticipation which is when the audience has to guess what is being drawn next. Viewer anticipation creates enjoyment and curiosity and fosters the learning and engagement of students. For example, a teacher could create an activity in which students would have to guess, with an image being drawn on the board, challenging animal names such as sloth or hyrax. Moreover, VideoScribe supports flipped classrooms since students can make their own scribes at home. Flipped classrooms allow students to spend more time on finding problems and solving them, on collaboration, on research and on knowledge building  with the help of their teachers and their peers. According to an article on a Glen Rose School in Texas, VideoScribe is a fun and tactile experience that can be enjoyed by all ages. Teachers can share their scribes on a school platform and students can create their own scribes easily at home. Not only does VideoScribe foster curiosity among students, it also supports their learning in an enjoyable environment.

Second, the application does not require an important amount of money from teachers and from the school in general. The application, which costs 12$ a month or 144$ a year, enables ESL teachers to create all sorts of activities. With the tool, users can add images from the web or from a template, add text, charts, music from the web or from a template and add a voiceover. VideoScribe enables users to create high quality material at a low cost. Teachers do not have to hire a professional to film a video, to hire actors to play in it or to hire a graphic designer to edit the video. The application allows teachers to create small functional language activities or even entire grammar lessons. I tested the tool and was surprised at how easy it is to use. I was also amazed at how many options there are, such as choosing the default hand from a wide selection of hands, or even adding your own hand to draw whiteboard animations. The application is convenient to teachers and to schools in terms of budget, time, resources.

Third, VideoScribes provides multisensory learning (hearing and sight) which improves the way students solve problems. According to a study conducted by cognitive psychologist Richard E. Mayer on three groups of students (one group taught using sight, one using hearing and the third one using sight and hearing), multisensory environments foster performance and accurate recalls with better resolution and longer retention of information. The results have shown that multisensory learning improves problem solving by 50-75%. The ability to solve problem is part of the intellectual competencies students from the MELS programme have to develop. As a teacher, I could improve my future students’ problem solving abilities by creating multisensory whiteboard animations which would also increase their motivation. Therefore, using VideoScribe in the classroom would be beneficial for students because they could understand the information better and retain it longer.

In conclusion, VideoScribe is an affordable, easy-to-use application that would improve my students’ anticipation or curiosity, their ability to understand concepts and their ability to retain these concepts. I think VideoScribe would be useful in the classroom to increase my students’ motivation. Therefore, the atmosphere of the class would improve, the students’ attitude towards learning a second language would be more positive and the general success of the class would certainly rise.

GoAnimate

What it is goanimate-review-for-schools

GoAnimate is a website to create videos for different purposes. It can be used either for business or education, but this blog will mostly be about the educational side. You can do all your videos by yourself because it is really simple to use.

How it works

The website works as a teacher and student community. If you are the first teacher in your school to register, you will be asked to register your school and create a school profile. Then, you will be asked to choose a “super teacher” who will be the person in charge of adding teachers to the Dashboard (the home page) and managing comments or posts published on the Dashboard. After, you can create your own profile and classes to which your students can access with a group code.

studio_screenshot_bizFriendly-550x372

This is where the fun part starts: creating your own videos. The first thing you have to do is choose a theme out of the 17 available. The best one to choose if you are a teacher is obviously “School Chronicles Template” where you have a classroom, a blackboard, a hallway, a schoolyard, a locker room and a bedroom setting. Next, you have to select the two characters out of the ten available. Those two characters will be the ones having a dialogue of your choice, which is the next step. You can either record your own voice or write a dialogue of up to 30 exchanges and choose the language, emotion, and voice of your choice. Once you get familiar with the tool, you can create more elaborated videos with  various settings in the same video, props, time frames and more. You can preview and edit your video as you wish before posting it to the Dashboard. Once it is published, the students and teachers who have access to your group can view it and add comments.

screenshot05_full

How to use it in an ESL classroom

You can use GoAnimate to present your class content in a pre-made video like in a flipped classroom. Alice Chen, an English teacher, flipped her classroom and chose GoAnimate:

What if you could flip your lesson in a fun and humorous way? Instead of filming myself explaining a concept, I prefer to use the colorful and unique characters from GoAnimate for Schools to do it for me.

GoAnimate can enhance your flipped classroom and make it more catchy for your students! It’s a great way to introduce the concept of flipped classroom because it will be something totally new for your students and I think they will be more interested in animated video than in a video of you talking. However, you are not the only one who can create and post videos: your students can too! This is a creative way to have them practice their writing skills by writing a dialogue and see their work animated. It can make them practice their oral skills without having to give a presentation in front of the whole class and being shy to film themselves. What is great about GoAnimate is that there is an “Educator Experiences” section and a “Lesson Gallery” where you can get new ideas and reviews from other teachers. Overall, teachers who used GoAnimated were really impressed by the simplicity and the motivation of their students:

GoAnimate provides a place for kids to watch their stories come to life. There’s a very high engagement level with this program; students will love working with the props, animations, and effects to create professional looking animations. – Mary Beth Hertz

I think students would invest more in their work by using such a tool and that they would be proud when seeing the final result. If you show them examples of videos, I’m sure they will want to start right away and have tons of original ideas.

My point of view

As a future ESL teacher, I would definitely try out GoAnimate with my students. When I tested the tool, I thought it was very simple and fun to use. To test it out, I created a video of teachers greeting their students in the classroom. Even though I do not like recording my voice and listen to it, I would recommend not using the voices templates. They sound ridiculously robotic even if there is an “emotion” option, it feels like they always talk on the same tone. I think students will benefit more from hearing a real person with a real accent and a good pronunciation talk than from hearing a robot. Another negative side of GoAnimate is that it is costly, considering that many schools do not have a huge budget for new pedagogical tools. You can try it out for free for about two weeks, but then you must subscribe and pay around 100$ a month.

Overall, I think my students would be very motivated to complete tasks using this great tool. I agree with Jacqueline Slogan when she says:

Students seem to respond with more interest when using their own creations when presenting projects to their classmates. And this website is fun enough that the viewing students are as interested as those who have created the presentations.

It is true that the students’ interest must be much higher to create project with GoAnimate and to listen to their peers’ work. It also gives them the chance to be more creative and have fun while learning. It can be time demanding at first, but remember that once a video is created, it can be reuse in the future.

Karine Veilleux, TESL student at Laval University

GoAnimate: Make Your Class More Interesting

Nowadays, it is a real challenge to entertain students. Fortunately, software tools are here to help teachers make their classes more interesting and more adapted to students’ needs, like GoAnimate.

What is it?

GoAnimate is a software tool where you can create professional animated videos. With GoAnimate, one can create business videos to explain complex topics or train employees. With a free trial of 14 days, it gives the opportunity to explore the tool and then decide whether or not to buy it.

GOANIMATEEEE

How does it work?

With GoAnimate, you can promote, present, train, explain and entertain your audience. You can choose from business-friendly video, whiteboard animation, video infographics or common craft.

While creating a video, the first step is to give it a title and a subtitle. You just have to double click on the placeholder to give your video an opening title. On the left corner at the bottom of the page, you just have to click on the + icon to add a scene to your video. Then, you have several categories at your disposition, varying from the office to home. After that, select a template to put on your timeline. The choices are endless, from a conference room, to a restaurant, to the theaters, etc. Every template contains characters, backgrounds, props and textboxes. Everything is already done; you just have to customize it.To modify a character, just click on it. You can change his hair, his skin color, his eyes and much more. Characters can do hundred of actions like pointing at someone, paying something or even cooking. There is a search bar where you can type the action you want your character to do. After you have chosen your action, just click on the select button. Characters can inline a dialog by recording your voice, uploading a file or put a text-to-speech. All characters and props can be swapped. You can browse and select a character from the left tray and see it update on the stage. There is also a wide variety of characters choice.

goanimate for schools.png

To create a transition, like going from day to night, click on your scene and select scene settings. Then, you can change the background color. You can also add effects such as transition with previous scene and visual effects. You can also upload your own images, audio files, outside videos, bounces and logos in your video. Finally, to publish your video, download to video, export it and post it on social medias.

GoAnimate for schools

GoAnimate for schools is a platform where both students and teachers can create animated videos for the classroom. Videos and technologies are huge these days, with GoAnimate, students can master subjects like English, math, history and more. This is a good way to engage students. Each school animated website has a secret address. Integration with social networks is blocked; it makes it safer for both students and teachers. Downloading and sharing are available but it requires the teacher’s approval. All characters and background are adapted for schools. It also got quick video maker and full video maker. Students and teachers can choose from a variety of characters, backgrounds, props and music. For shy students, there is a text to speech actor that contains more than 20 languages. There is nothing to draw, nothing to download, no programming; just great results with drag and drop tools.

A great alternative

Instead of giving readings and homework to your students, you can give them a GoAnimate video to watch. It will be fun for them and they will learn at the same time. It is also a new inventive way to teach new topics and materials to students. With animated videos, it will be easier for them to understand what is being learned. It is also an original way to teach your lesson and it might get students more motivated.

Students can also create a story about the topic of their choice or a topic chosen by the teacher. They could then do an oral presentation about their topic and present their project to the whole class. This is a good way to enhance their creativity. Also, the tool is in English so it is a good way for students to practice their L2.

To explain professions or any other topic, you could use different characters with different jobs and ask students to guess what are their jobs. This would activate students’ prior knowledge and they would learn new vocabulary words.

My opinion as an ESL teacher

I think that GoAnimate is a great tool for both students and teachers. It is simple and easy to use. Animated videos always attract the eyes of students, especially younger ones, so this is a good platform to keep them focus and on task. As a future ESL teacher, one interesting activity that I would do with my students is to create a story or have them do an oral presentation using GoAnimate. It goes beyond the tradition powerpoint and word texts and it may motivate students to do more. I really like the fact that they did a GoAnimate especially for schools, this is a good alternative to other platforms and it is unique and interactive.

One concern is the price; some schools do not have extra budgets to have software tools since books are quite expensive. 39$/month or 299$/year is quite high-priced for a software tool.

In general, I strongly believe that GoAnimate is a useful platform for ESL classroom and that it can be used to do many projects, homework and more. It offers endless possibilities for both students and teachers and I would definitely use this tool as a teacher.

Dorothée Grenier

TESL student

Wideo, it’s a piece of cake

Wideo is an online platform which allows users to easily create professional looking videos. Over the last few days, I have explored the free version of Wideo and have found it quite difficult to use. But because my computer using skills are pretty much as good as a monkey’s (no offense to monkeys intended), I have decided to ask my 11 years old brother to try to make a video using Wideo. He came back 20 minutes later wondering why he couldn’t make his video more than 30 seconds long. It is, thus, safe enough to say that a teacher using Wideo with his/her students would have no problem teaching them how to use it.

monstrosity

Ok, we now are about two weeks later. Back when I first wrote this blog post, I couldn’t get my brother to show me how Wideo worked. (you know how 10 years old can be) I since baked and decorated a cake for his entire hockey team and their parents. It took me a whole day to decorate the 40 portions monstrosity, but it was worth it because he agreed to show me how wideo works. He also agreed to do the dishes for a week, but let’s not get into that. I am now able to give you my educated opinion about the software. Additionally, I talked with one of my teachers about possible solutions to some of Wideo’s shortcomings, which I will also mention in this blog post

As it turns out, creating videos can actually be pretty easy. If you choose one of the premade video templatetemplates
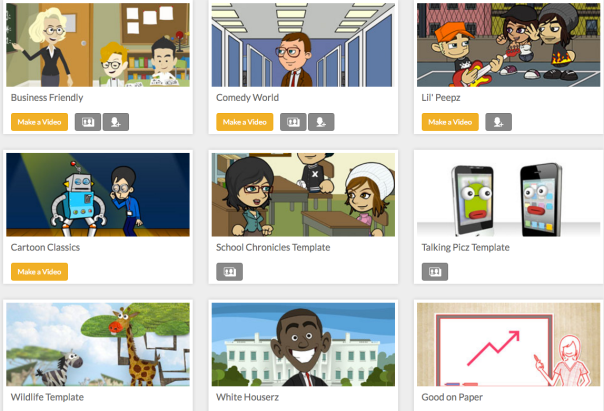
s. Of course, you can always choose to start with a blank slate, but because I am a beginner with computers (which doesn’t make sense because I’m 19) I chose to stick to the templates. Wideo offers a wide variety of template. However not all templates are free; some require you to switch to the paid version of the website. One template even said highly recommended for beginners, so I obviously picked this one.

Once I had picked my template, editing my wideo was a piece of cake (or 40). In this picture, I detailed the main functions which you need to know if you want to successfully complete a wideo. Before having students try to do a wideo, I would minimally make sure to teach them these functions. functions

Using the left toolbar, I was able to customize the basic template I chose to create my very own wideo  I uploaded  images to the video using the image button, Added an animated waving girl using the object button, Added a background to the first page using the backs button. Though I did not use these last three buttons, I could have added a button using the interact button, text using the text button, and sound using the sound button  (the button, the music, and the text in my video were included in the template).

In order to customize the elements of the templates, I simply double clicked on each of them. This is how I managed to make a cat picture I added appear. By default, the animation takes place at the beginning of the scene. In order to change that, I simply clicked on the cat picture in explore object section. I then simply selected the animation on the timeline, and moved it where I wanted it to be. To make sure my scene had turned out the way I wanted it to I clicked on preview scene on the bottom left of the screen.

fffffff

Overall, my video was pretty easy to create, and with a little more practice, I could move on to creating videos from a blank slate. Getting familiar with wideo this way made the learning process very easy. It almost made me wonder why I had so much trouble with wideo in the first place. According to Richard Byrne, the fact that it is easy to use is one of the main advantages of wideo. I now agree with this opinion; when doing a video activity in the classroom, the last thing you want is half of the class doing nothing because they do not understand how to use the software. If you really want to make sure this doesn’t happen, it could be a good idea to have the students work in pairs, with at least one student in the pair being good with computers.

Wideo has some drawbacks. The first one being the time limit on videos. With the free version, it is only possible to create 30 seconds long videos. But when we think about it, my 28 seconds video about my cat (I don’t own a cat) contained a total of 41 words. For young ESL learners, that can be a lot of words. ESL teachers in grade 5 or 6 often ask their students to write short paragraphs, so asking them to do so in the form of a Wideo could prove to be quite fun. Teacherfirst.com  mentions that the tool can be used to have the students create a video explaining a wide variety of subjects. In the ESL classroom, the subject could be anything from what they did last summer to their favorite pizza toppings.

When I talked with my teacher about this shortcoming of wideo, he gave me a good idea; make two wideos, and assemble them in a video editing software. I thus wanted to download my wideo to try his idea, but, unfortunately, downloading a wideo costs money. Of course, some people may think that it could be worth it to pay to get all of the functionalities of wideo, but in the Quebec school context, schools are trying to be cost effective and buying an online video making software might not be a priority. This is why I would recommend Wideo to grade 5 and 6 students, for whom the 30 seconds format is perfect to write the equivalent of a small paragraph. Also, as my brother proved, grade 5 and 6 students will be perfectly able to use the software.

To conclude, wideo is a great tool if you want to easily create beautiful videos. I would recommend that you give it a try, especially if you teach grade 5 or 6 students.


Voki: A Good Idea Poorly Presented


What is Voki?


Voki is a website that allows its users to create talking avatars which they can publish and share online for others to see and hear.

 Attention Teachers –

Voki also enables you to facilitate rigorous, inquiry-based learning, manage student assessment, and effectively analyze the outcomes. Millions of teachers and students all over the world have discovered the power of Voki and we would like to bring our blended premium learning tools to your classroom.

The Voki Team


Research


There are three different versions of the website tool, namely, Voki-Free, Voki Classroom, and Voki Presenter. According to the Pricing section, Voki Classroom and Voki Presenter are individually available for different costs depending on desired subscription time and the number of accounts desired. They are also available together for a reduced price.

According to the article  Web 2.0 Tools for Teachers, there are various strong points and weak points to the Voki web tool. The most striking ones are that “students don’t need a microphone – they can use any telephone, including their personal cellphone. Voki recordings can be called in by phone, created with text-to-speech (typing), using a microphone, or by uploading an MP3 file” and it is “TOO fun—making the avatar is so much fun that students lose their focus on task at hand, and spend more time making funny avatars”. Furthermore, this article provides various ideas for classroom applications.

Similarly, various online sources describe different ways to use Voki in the classroom. In his article Voki Creates an Education Site… Twenty Ways To Integrate Talking Avatars In The Classroom by Michael Gorman, the author provides a list of 20 interesting ways to use Voki in the classroom including test reviews, scavenger hunts, story writing and story telling, poetry and music composition, and much more.


Personal Experimentation


When experimenting with the free version of this tool, I ran into various malfunctions.

Firstly, the website did not recognize the accent in my name so my name appeared as Mélanie Lalonde instead of Mélanie Lalonde. This is not very useful for the application of this tool in a place such as Quebec in which many students might have accents in their names.

Secondly, when editing my personal information, the function edit “my birthday” was there but was unclickable so I was not able to edit my birth date.

Thirdly, there are always advertisements on both sides of the web page as seen in the image below, which is not recommended for pedagogical use with students.

Fourthly, I experience difficulties when creating my avatar. Although there are various possible ways to record and the process to record a voice segment was fairly clear and easy, I was confused as to how to create my character in the beginning. When seeing the dice under the illustration of the avatar, I though one had to randomly select a character which was not the case. Now a days we are so used to having a tutorial video or pop-up that explains how to proceed, but there is no such thing provided on this website. Once taking the time to play around with it, I found that it was fairly easy to create an avatar. However, the experience was time consuming which is something one wants to avoid, especially with students in the classroom.  Furthermore, some features such as accessories were unavailable in the free version of the tool.

Lastly, as voice recordings cannot be any longer than 60 seconds in the free version Voki, this might not be suitable for every user’s needs. It is true that it is possible to make more than one voice recording but it becomes a hassle as one has to create other avatars.

Voki (2).png

Although the process of creating an avatar, recording a voice segment, publishing and sharing the Voki turned out to be fairly easy, the experience as a whole was not great. Running into such malfunctions negatively affects the user’s outlook on the website as a whole, causing the great idea of communicating through avatars to be overlooked.


Pedagogical Applications


The idea behind Voki can be useful in the classroom in a variety of ways as illustrated by the applications presented in the image below. However, when using the free version of the website, the options become very limited, mostly because recorded segments are limited to 60 seconds and there is no access to the management system, the presentation tool, and the ready-to-teach material.

usevoki

As a whole, this web tool provides an interesting way of evaluating students’ oral competencies when having students record audio segments using their own voices. It also introduces students to new ways of using the web for communication purposes.


ESL Teaching Applications


This idea behind the online tool can be useful when it comes to second language learning. Through the use of avatars, students are not pressured under the stress of standing up in front of the class to speak a new language in which they are prone to make errors. While eliminating the stress factor, the use of such a tool allows students who are shy to be able to deliver good speech.
voki-banner

Furthermore, Voki allows teachers to evaluate their students on the C1 competency as the students’ record their own voices in order to make their avatars speak. This can be a wonderful experience for the students who can record their segments as often as they like until they are completely satisfied with them.

Finally, as teachers can also create avatars to which their voice recordings are attached, students are exposed to language being taught. It is important for ESL students to hear the language they are learning in order to have clear examples of pronunciation, fluency, and intonation. Although it is true that such a tool is not necessary as students can hear the language in the classroom, Voki provides new opportunities by allowing students to hear the language outside the classroom, whenever and where ever they like.


Conclusion


After researching and experimenting with this tool, I came to the conclusion that Voki is a time consuming web tool that is based on a good idea that is simply poorly presented. Although the tool provides a secure environment for students to practice their oral competencies, the presentation of the website and the limited amount of recording time hinders the idea.

I cannot say that I would use Voki in the classroom but if I come across a well-presented website with a similar idea that provide more focus on the voice recording itself rather than on the visual aspect of the avatar, I would definitely use it in the classroom.


Mélanie Lalonde, an ESL teacher in training from Laval University


Powtoon: Traditional Learning Revised

During the past years, technology has been occupying an increasingly important role in education. Indeed, it has begun to change the dynamics of traditional learning and has progressively evolved to meet new educational standards.

With this in mind, Ilya Spitalnik, Daniel Zaturansky and Sven Hoffman joined forces in 2012 to develop a new online platform that would offer an interesting alternative to traditional teaching methods.

What is PowToon?

PowToon is an online platform destined to create personalized animated videos.

Three versions of the platform are offered: the free version, allowing up to five-minute presentations to be created, and the pro and business version, available at the monthly cost of 19$ and 59$, respectively. Subscriptions to the pro version offer more free music and styles, and allow for longer videos to be created.

How does it work?

To create a free account on PowToon, users must first provide their full name and email address, as well as the purpose for using the application (business, marketing and sales, training, education, personal and social events, etc.).

Once logged in, two choices are offered: users can either customize a ready-made PowToon or create a new one using a blank template.

A tutorial is then offered in order to explain the key features of the application. The web page looks like the following:

Screen Shot 2016-03-21 at 10.08.11 AM.png

On the top of the page, users can access the standard functions related to animated video making such as the save, preview and export feature.

On the left hand side of the screen, options concerning additional templates are offered. Users can either decide to use the slideshow or movie format to create their presentations. Slides can then be viewed or rearranged by simply dragging them up and down the menu.

On the right hand side, options concerning special effects and graphics such as props, characters, markers, action buttons, backgrounds, and shapes, can be found. By using the timeline bar at the bottom of the screen, users can easily animate their characters by adding various effects.

Pedagogic use for an ESL teacher

As a future ESL teacher, PowToon offers a variety of options for creating simple and engaging animated presentations.

On one hand, teachers can present their course content, lesson plans, and activities by simply creating various slides using the application. Voiced explanations, along with animated characters, can then be added to the timeline to make the content more dynamic.

For example, some ESL teachers have previously used this application to explain grammar points to their students in a compelling and engaging way:

On the other hand, students can make their own PowToon presentations. With the help of the provided tutorial, students can navigate the platform and use their creativity to personalize their slides. PowToon can therefore serve as a visual aid during an oral presentation or for project-based assignments such as a book summary or review.

My opinion as a future ESL teacher

PowToon is an innovate, dynamic and creative tool that can be used to meet many educational purposes. Indeed, it allows ESL teachers to develop a new alternative to traditional teaching referred to as “flipped classroom.”

“The ‘flipped classroom’ is a pedagogical model in which the typical lecture and homework elements of a course are reversed. Short video lectures are viewed by students at home before the class session, while in-class time is devoted to exercises, projects, or discussions.” –Educause Learning Initiative

This phenomenon, gaining popularity all across the globe, includes numerous advantages for ESL teachers.

First, by exporting videos on Youtube, all students can have access to the course content at all times, as only an Internet connection is required. Lessons and activities can be easily accessed and shared amongst teachers and students. Consequently, this allows students to learn and progress at their own pace, reviewing certain lessons if necessary.

Second, using the “flipped classroom” technique with the help of Powtoon allows teachers to maximize classroom time by focusing on practice exercises, rather than theoretical concepts. Teachers can therefore spend more one-one-time with their students, which are, in turn, given the opportunity to ask questions about content material they find difficult or confusing.

Indeed, as noted by volunteer teacher Mr. Edson Tellez, using Powtoon in the classroom seems to have had beneficial effects on the students’ learning:

“They’re getting more creative, more receptive, and more dynamic in each class” –Edson Tellez, volunteer teacher.

Third, by creating such videos, students are free from distractions and interruptions that are likely to occur in a traditional classroom environment. This allows for a great time-saver, as it prevents teachers from having to interrupt their lessons to spend time on disciplinary measures.

Lastly, even teachers with limited computer skills can use PowToon, as the application is easy to navigate and use!

This is what Amy Gibson, High School teacher, attempted to explain:

“Finally, a presentation tool that incorporates an intuitive user interface, super cool comic graphics, is 200% less frustrating than Prezi, and offers a zillion more options than the free version of GoAnimate” –Amy Gibson, High School teacher.

That being said, by taking into account the benefits of using the “flipped classroom” method in second language classrooms, I would definitely recommend Powtoon to all ESL teachers.

Voki: A Fun Teaching Tool

According to Voki.com,

Educate, engage and enjoy with all our Voki products!

What is Voki?

Often used in the field of education, Voki is a website that allows the creation of animated characters. Voki users can create an avatar that looks like them or leaves room for imagination. They can also make their characters speak with their voice or use the pre-recorded voices available on the website. The avatars can finally be placed on a website. Voki also offers three other options for teachers to help them in their teaching: Voki Classroom, Voki Presenter and Voki Teach.

voki logo

Creating an Avatar

Creating an avatar is simple and free. First, users must create a Voki account. Registration is simple and fast. Then by clicking on the “Create a new voki” tab, usersboki create 
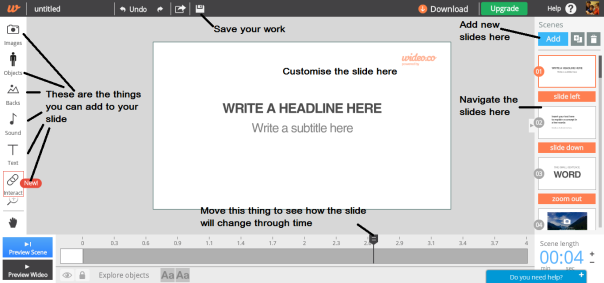
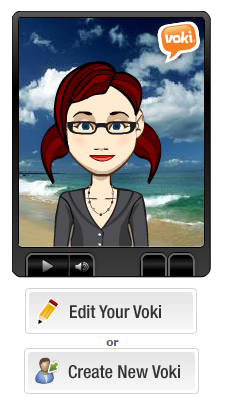
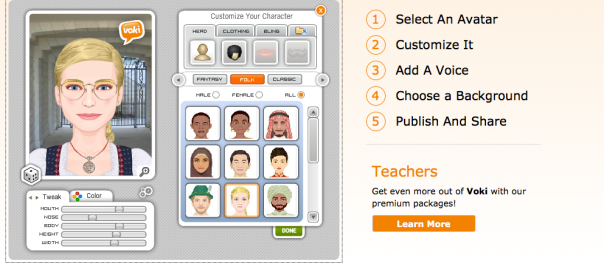
of the software can create their avatar. They can choose a character among different styles: classical, animal, Oddballs, and more. They can also choose its clothes and accessories. A background can also be added and users can play with different colors to modify their character. Then, to make their character talk, the users of the website have four options: Record By Phone, Text To Speech, Record With Microphone and Upload An Audio File. It is important to mention that the “Text To Record” option allows the user to choose the language, sex and accent which the text will be read. Finally, users can email their Voki or post it on a blog, website or social media.

Here is a really helpful tutorial that shows how to go about using Voki.

As mentioned above, the website also offers other options than creating an avatar. Voki Classroom is one of these options; it allows teachers to manage their students’ assignments with accounts. Also, Voki Presenter is another option available on the website; an option that allows teachers to create visual and audio presentations, using avatars. Finally, Voki Teach offers teachers prebuilt presentations and lesson plans. It is important to mention here that the Voki option is free but the three other options are not free. You can consult the price list on the website.

My experience

From the very first time I used Voki, I immediately loved this website. First, the website is very easy to use. It is very clear and offers many explanations throughout creation. The software also has a section that provides users many ideas and a multitude of user woki ananatips. Also, some websites offer clear explanations on how to use Voki. Prezi.com was one of those websites that helped me create my avatar. If I would have to use voki in my class, I would show my students this website to make sure they clearly understand what are the different steps in order to create an avatar.  In addition, the site offers a very attractive and original content. I really enjoyed creating an avatar; the website offers a wide variety of options to create it. I had fun changing the hair, the clothes, the accessories, and the wallpaper of my animated character. Finally, the only thing I enjoyed less is the rapidity of the website. It was quite long to record my voice and then post my avatar on my Facebook profile, for example. In other words, the website lags a little.


My Point of View as a Future ESL Teacher

According to José Picardo,

Voki allows teachers and students to create speaking avatars in a fun, stimulating and engaging way.

Indeed, as a future English teacher, I believe that this software can only be beneficial for teaching. First, it is clear that using technology in class always interests students. By using this website, students can only be interested, entertained and motivated. This way, they participate more in class. Moreover, Voki can be enjoyable for learning a language. According to technology4kids.pbworks.com,

It’s a great way to improve your students’ speaking and listening skills in an engaging and innovative way.

As mentioned above, the avatar can take the voice you want. It is interesting for students to hear and become familiar with other voices than the one of the teacher. Students can therefore improve their ability to understand a language. Afterwards, it is worth using Voki to allow students to improve their ability to communicate in a second language. Learning a new language requires a lot of practice then asking students to create an avatar and then record audio recordings, teachers can help them to improve their ability to communicate orally. Finally, the website is easy to use, but I think it would be too complicated for elementary students to use it. I think I would use it most with high school students since it would be a waste of time to explain my young students the record section. I believe there are easier and faster ways to record elementary pupils.

There are many different types of activities that can be done with Voki. Some websites such as educationworld.com and techlearning.com provide teachers a range of ideas. Vocabulary, icebreaker and writing activities are different tasks mentioned by the two websites to help teachers include the use of avatars in class.

As a future teacher, I would use Voki for different purposes. First, in order to entertain my students, sometimes, instead of giving instructions orally, I would have my avatar give them instructions. Every now and then, I would change my avatar and its voice. This way, students would be likely to listen to different voices and accents.

Also, instead of asking my students to do an oral presentation, I would probably ask them to record their presentation through the use of an avatar. This way, some students would feel more comfortable and at the same time, I believe it is an interesting way to evaluate students.

whyyy

Conclusion

In conclusion, the Voki website, which is fun to use, offers many advantages for teachers that can greatly assist them in their teaching. Whether it is creating an avatar, using Voki Classroom to manage students’ assignments, using Voki Presenter to create entertaining presentations, or simply using Voki Teach in order to use preconceived lessons, Voki is the indispensable website for teachers. In addition, given the growing popularity of the use of different technologies, students can only appreciate the use of such a website to help them in their learning. Guaranteed fun!

Anabel Drouin

Laval University


GoAnimate

What is GoAnimate?

GoAnimate was launched in 2007 by Alvin Hung. It was first designed for business people to create animated videos easily. In 2011, GoAnimate for schools was founded with security and privacy settings agoanimate.com mentioned:

So we went back to our roots and started banging out product adaptations to serve a much wider range of users. In 2011, GoAnimate for Schools was publicly launched in a “Back to School” campaign, featuring dedicated privacy, security, content moderation, and group management features. Since then, thousands of schools on six continents have subscribed.

Briefly, GoAnimate is an online platform that allows you to create professional-looking and entertaining presentations. It is offered at a reasonable cost. In fact, you can benefit from a free trial for 14 days, after which you need to start paying. It costs fifty-nine dollars yearly for a teacher and ninety-nine dollars for a whole classroom.

How does it work?

GoAnimate is rather easy to use. It is an online software that offers you endless possibilities to create videos. The platform comprises of 2D and whiteboard animations. This video software generates the animation for you. You only have to drag and drop the characters, backgrounds, music and the props you want, as shown in the picture below:(This picture was taken from my first video, I really enjoyed trying to create one!!)

num1.png

GoAnimate is a ‘’Fill-in-the-blank’’ type software, so everyone can get accustomed to GoAnimate quickly. The first time you log in as a user, there is a tutorial video that guides you in using different features of the platform as you can see on the picture below:

num2.png

In your video, you can add templates, characters, props, texts, widgets and sounds. You can even record your own voice and assign it to a character. If you are too shy to do so, you can also take sounds that GoAnimate provides you, such as a campfire ambiance and chicken peeps. There is also a wide range of characters’ settings that you can change, such as  emotions, actions and dialogs. You can either import your own background or you can choose from the built-in libraries, which include endless features.

As for GoAnimate for schools, when you sign up as a teacher, you can create a class library that only the teacher and his/her students can have access to. The  instructional videos created by the teacher will be posted in this library and students can refer to them whenever they want to. Given that it is a school-safe version of GoAnimate, parents should not fear this interface. No one can see the students’ videos unless the teacher makes them public.

Spice up your ESL classrooms

GoAnimate can greatly innovate ESL classrooms. Indeed, teachers can easily integrate the platform to either their evaluations or their lessons. For example, teachers can evaluate their students’ pronunciation by having them record their own voices and assigning them to a character. Another great thing about GoAnimate is that teachers can moderate and comment their students’ videos.

Teachers can also evaluate their students’ writing abilities with GoAnimate. Using this interface might enhance students’ motivation when it comes to complete a writing task. Indeed, given that students see their story coming to life with different animations and characters, it might encourage them to be more enthusiastic when doing a written task. ESL teachers can give a specific subject to his/her students and have them create a video related to this subject. For example, if a teacher is having a unit on restaurants and seeing food vocabulary with his/her students, he/she could ask the students to produce a video related to this unit. I sincerely think that students would prefer working with GoAnimate then doing a powerpoint or a typical research paper. As Mary Beth Hertz , an English Language Arts teacher, pointed out, GoAnimate can also be useful in terms of evaluating children with writing disorders:

English language learners can demonstrate their mastery of English by recording a scene in English with their own voice. This can also be a way for kids with disabilities, who may not be able to type, to still successfully show what they know to an audience. 

I completely agree with the fact that students who have writing disorders could benefit from GoAnimate, as mentioned by Miss Mary Beth Hertz. ESL teachers could, for example, have these students create a video with their own voice. Given that students with writing disabilities are struggling when it comes to doing writing tasks, they would have the option of recording their own voice. This way, every student would have a chance to equally success in the class.

Mary Beth Hertz also mentioned that teachers can use GoAnimate to teach with “the flipped classroom” model :

GoAnimate for Schools has a Lesson Gallery for teachers who are using animations to create informational videos for their classes. Students in their class can view these videos, which can also be embedded in a website. This has the potential to support the “flipped classroom” model where students often learn through video outside of the classroom. 

Again, I think that the idea of miss Mary Beth Hertz is really good. ESL teachers could use the  “flipped classroom” model to make their classes less passive and more interactive. By doing this, students could go through some content at home. It would also make learning less boring for them.

Using the interface enables students to explore their creativity, develop their critical thinking and enhance their communicative skills. A teacher could ask his/her students to predict the end of a novel or a movie by creating scenes on GoAnimate. By doing so, students demonstrate their understanding of the novel or the movie and practice their writing and speaking skills. Students would be keen doing so because it involves technology.

Jennifer Gonzalez, a language arts teacher, identified creative ways that ESL teachers can include GoAnimate in their classrooms:

And most importantly, STUDENTS can create GoAnimate videos to demonstrate or extend learning. Instead of a written book report, a PowerPoint on the Civil War, or a science research paper, students can create an animated video. Student organizations can use the videos to promote and advertise their activities or accomplishments. Video projects can be used as independent work to differentiate for student ability or interests. High school juniors and seniors can use GoAnimate videos as part of college applications. English language learners can compose dialogues or experiment with different accents. The possibilities really are endless.

I think that the possibilities mentioned by Miss Gonzalez are ingenious and I also believe that students would really enjoy these ideas.Students are used to make powerpoints or write a research paper, it is getting old and boring for them. GoAnimate would bring something new. I think that by having them creating animated videos, it would catch the students’ attention and that they would be really motivated. In other words, GoAnimate would make learning much funnier for students.

To get some ideas on how to use GoAnimate in your classroom, you can visit this website: http://blog.goanimate4schools.com/category/press-and-mentions/

A FAQ is also available on https://goanimate4schools.com/public_faq . It is really useful for teachers who are trying to learn how to use this wonderful tool.

My experience

When I first logged in on the interface, I quickly grasped how the website worked. In my opinion, GoAnimate is a great and easy-to-use tool to create animated videos.  It is a tool that students would be enthusiastic to discover since it is not traditional. 

As a teacher, I would definitely use GoAnimate for story-telling and digital creation for students of all ages. Indeed, teachers from the primary level could use GoAnimate for story-telling because, as we all know, kids love to hear stories! I was a little bit mixed up when I created my first video. I was really happy that there was an integrated tutorial to guide me through my exploration of the platform. For this reason, I think that it would be a little bit complicated for younger students to create videos using GoAnimate because there are a lot of features and they might get lost…In my opinion, students over grade four would quickly understand the functioning of the platform. As for teachers of high school level, they could have their students create interactive videos. I am sure that they would enjoy doing so! (Personally, I loved it!) 

Unfortunately, there is one problem that I came across as I was navigated through the platform… When I tried to log in on GoAnimate for Schools, I was not able to because I needed a private school login URL. Because of this, I could not fully explore the platform at its finest. Another concern that I have is the price, but again… It is free to try! If you like using the platform, it is affordable;  it amounts to less than two dollars per week. As a teacher, I think I would afford this cost for the sake of students’ enthusiasm toward projects.

All in all, I think that GoAnimate for school is a great presentation tool that offers its users endless possibilities to spice up their lessons or your evaluations. I would definitely use this platform as a teacher.
Alexandra Jacques – TESL student at Laval University

Voki: Talking Avatars


What is Voki?

Voki is a website that help you create you own personalized talking avatar. You have multiple choices to personalize the appearance of your avatar and you can choose to either use your own voice for it to talk or right down what you want it to say using one of the various voices that are provided.voki 3 parts

There are three different ways of using Voki: Voki, Voki Classroom, and Voki presenter (with Voki Teach). The basic version of Voki is available for free upon registration, but the two other versions are not. They each cost around 50$ per year. With the basic version of Voki, the length is limited to a 60 seconds recording. In this article, I will focus more on Voki and Voki Classroom since I want to explain how this website can be used in an ESL classroom and whether it is useful or not in such a classroom in my opinion.

my voki

Here is an example of what you can do with Voki

Voki Classroom

As presented in this video from the official Voki team, Voki Classroom is creative, easy to use and it motivates students. Voki Classroom has three main sections: Manage Students, Manage Classes, and Review. In the Manage Students section, you can view all you students (up to a maximum of 100) as well as their login and password that are provided by the website. If you decide to use Voki Classroom, you can add your students (max. 100 students) and you will be provided with a login and a password for every student. This means that they won’t have to register in order to use Voki Classroom, as long as you give them their personalized login and passwords. In the Manage Classes section, you can see all your different classes and the lessons you created. For each lesson, you can write a description of what you expect your students to accomplish. In the Review section, you can select a class and an assignment and see your students’ work. The different categories such as “All”, “Get Started”, “Ready for Review”, Try Again”, and “Approved” help you select what you can see and filter what you want to see. In this section, you can review and approve your students’ Vokis. You can also decide to share it with everyone or to keep it private.

voki classroom

How does Voki work?

It’s pretty easy to create a Voki, you first select the appearance of your character, the background and the colour of the player. Then, you can either record your own voice with a microphone, call in your voice using your phone, upload a recording made previously,or type-in a text and select a voice that is provided by the website. Finally, all that is left for you to do is to publish your talking avatar. For a more complete tutorial on how to use Voki, you can watch this video or go through this PDF.

How to use Voki in an ESL classroom and why

Voki can be a great tool in a language class to test students’ oral interaction as they can “hide” themselves behind their avatar and feel more comfortable while producing their message. A downfall of using Voki in a classroom is that not all of the Vokis you can create will necessarily look good or be appropriate for a classroom environment (see this example). Jason Cunningham from EducationWorld suggests 4 activities to use Voki in the classroom: icebreaker activity, vocabulary rundown, fictional characters come to life, and historical figures. Michael Gorman proposes 20 different ways of using Voki in a classroom such as a classroom newsletter, course annoucements, testing, vocabulary or scavenger hunts. All in all, Voki can be used in many different ways to promote oral interaction.

why use voki

My Opinion

I don’t think I would use Voki in my ESL classroom. I think that students would first find it nice and fun, but I feel like they would quickly lose interest. The fact that you need to pay 50$ per year to get access to the classroom function is also pretty expensive if you look at what you can do with this web tool. I think that this amount of money could easily be put somewhere else to provide your students with better learning tools promoting oral interaction. I also think that some students might use Voki in an undesirable way (see the bad example above). Some students like to be the clown and I feel like they might end up creating something that was not expected and clearly not wanted. Voki can be a great tool in certain circumstances, I think that it could be used in an ESL classroom effectively, but I certainly wouldn’t rely only on this tool to test my students on oral interaction.

Christine Poulin, future ESL teacher.

An Overview of GoAnimate ( Blog article 3)

What is it?

According to Wikipedia,

“GoAnimate is a cloud-based, animated video creation platform [, which] is designed to allow business people [and other individuals] with no background in animation to quickly and easily create animated videos.”

GoAnimate was originally built by Alvin Hung in 2007. He wanted to create a short animated video but could not find any appropriate sites for his project. Thus, he created an online animated video creation platform that could serve his needs and others’ needs. In 2008, Go!Animate, which shifted to GoAnimate in 2012, was created. At first, GoAnimate was only used by regular individuals, such as teenagers and kids, but, the platform became more and more popular and held a lot of attention in the community. Therefore, businesses, such as Youtube, companies and schools asked to became partners. Of course, GoAnimate was not ready for that. For this reason, the owners of GoAnimate developed the website’s tools, such as its logo, themes, templates and business features, and adapted their product so that it could serve a much wider range of users. In 2011, GoAnimate also created a school animated video creation platform for teachers and students called GoAnimate for School “[…] featuring dedicated privacy, security, content moderation, and group management features.”  In 2012, GoAnimate became a whole new website with a lot of helpful and creative tools to create an animated video for anyone.

What does it offer?

As said earlier, GoAnimate is an animated video creation platform that allows individuals, from students to business associates, to use sophisticated filming tools to create their own short video. The video creation platform is designed to respond to a lot of different people’s needs. Just by creating your account, you can see all the possibilities that are offered to you; you can register as a K-12 educator, student, accountant, marketing professional and more.homepage

When entering your homepage, GoAnimate greets users with a video that shows them how to begin with the platform, which really helped me to understand  how to create a video with their tools. Basically, GoAnimate provides a lot of possible templates that you can use depending on the type of video you want to create. Thus, you do not start with nothing, you have a lot of things that are offered to you beforehand, and, throughout the creation of your video, you can personalize the site’s features. To start your video, GoAnimate asks you to write an opening title; the size, the color, the type of writing and the background of your text can be adapted to your style. After this step, add a new scene to your video by choosing a category from 32 possible templates. Thus, a business man can decide to present his project using the office, marketing or finance template. Templates for schools, such as education and training, are possible as well. After clicking on the category,  different scenes are showed to you; you just have to drag one to the scene setting rectangle at the bottom of the page or you can click on the rectangle entitled “Add scene” at the bottom right of the page. You can add as many scenes as you want to your video.goAnimatemplatereal

You can also add narration, music and effects by clicking on the scene that you want at the bottom of the page. Then, you can change the scene settings (music, narration and effect) and the duration of your scene. The music can come from GoAnimate’s list or from your own music list, and, for the narration, you can use GoAnimate’s voice cover, type a text, or record your own voice. After adding additional features to your scenes, you can add other characters by clicking on the man at the left corner of your page. A lot of possible characters are offered to you, from business men or women to children or school educators; you can also change their clothing, their hairstyle, the shape of their face and body, their eye color, and more.goAnimatecharacter

Moreover, you can change your characters’ action and position by clicking on them. Then, a range of possible actions will be offered to you at the left of the page. Also, you can personalize the objects of the scene by clicking on them.goanimateaction

Subsequent to this step, other features are offered to you. Amongst others, you can add texts, sounds (campfire, chicken peep, and ocean), grids, and percentages to your video. When your video is done, you click on preview at the top right corner of the page, which allows you to see your video before its published,  to notice some dysfunctions or mistakes in your video, and to correct them afterwards. Then, you can save it on your homepage as a draft, as private or as public, and you can now show the final product to others. GoAnimate for Schools is the safe version of GoAnimate; students’ videos cannot be published on the public internet nor shared on social networks without the teacher’s approval. GoAnimate for Schools offers quite the same things as GoAnimate, but it is more restricted (no weapons, no drugs or alcohol…). Teachers have the possibility to block offensive or disrespectful language and pictures that they don’t want their students to use, and they have the privilege to look at their students’ videos before allowing them to publish it on the class’ homepage.

My experience

To begin, I could not enter on GoAnimate for Schools because I needed a private school login URL, which I did not have. Thus, I will stick with GoAnimate, which is quite similar to the school platform.

The first thing I noticed about GoAnimate is that it is accessible for all people of different ages and different countries, and that there is a lot of support and documentation as how the platform works and on other aspects of it. There were a lot of videos on the platform and on social media (YouTube) to guide new users.

When I logged in the animated video creation platform, I registered as a student, which allowed me to see the site from a student perspective, even if students, teachers and other professionals have access to almost the same thing on the platform. At first, it was quite difficult to create the video because there were too many options offered to me, which can be overwhelming for students, especially for young students. Thus, I do not recommend to use this platform for elementary students because it is too advanced for their age, and they may not have the patience to do a project this big. However, I recommend to use it with older students from high school, Cegep or University, because it will develop their creativity, critical-thinking, and technological skills, which are very important skills to master at their age. Furthermore, the animated video creation platform helps learners to master English since the platform is only in this language; they need to write and read texts in English, and to speak in English to record their voice. Therefore, students can improve their English competencies (C1, C2, and C3). Even though the options can be overwhelming, it is also useful to have a lot of options for the creation of a video since all students have different interests. Thus, if a student wants to make a video on holidays and another one wants to make it on science and technology, they can do it. For school projects, I recommend teachers to use the platform for group or pair work since it can be a lot of work for one person. Finally, GoAnimate is a useful design and creation website that engages students in digital creation of professional-looking animations.

Use in ESL teaching

The possibilities on GoAnimate are endless. As said on GoAnimate for Schools app on Google Chrome, teachers can use the platform “[…] for flipped classrooms, lesson introductions, presentations and reports, language training and to engage students with special needs.”  For instance, ESL teachers can use GoAnimate to practice and develop ESL students’ spoken, writing and reading English. GoAnimate can be used as a tool to demonstrate and evaluate students’ mastery of the English competencies by asking them to record their voice in English, to put their writing skills into action, and to read the description and instruction of each templates, which is in line with Mary Berth Hez’s point of view.

In addition, ESL teachers can use this platform to present some new topics in English, which can be used as an alternative to PowerPoint presentations, since a lot of different templates are offered on the website. As presented by  Michelle S., an English Language teacher, GoAnimate can be used “[…] to create announcements, instructions, or project examples for […] students, which [she] embed[s]  in [her] online classes for [students] to view.” Most of the time, she uses this website to have students create a project that reflects their learning of the class’ subjects. For this reason, the platform is very useful to evaluate students’ improvement throughout the year. Also, students can learn some new English vocabulary from the teacher and students’  video that may include new words because of the many options available on the platform.

Some of the more negative points are that it is impossible to attribute students’ grade of their work on the website, the projects on the website may last for a long period of time without a clear due date, and some educators find that there are some inappropriate cartoon violence and crude language for students, which are more restricted in GoAnimate for Schools, but still remain a little bit present. Also, GoAnimate is not free; the school has to pay 2$ per student per year for an unlimited number of HD videos. In my oponion, it  can be a good deal,  but it always depends on the number of students you have in your class and how many classes you have.

Overall, I recommend this platform for all teachers but especially ESL teachers. The platform makes learning a new language more interesting for students because of the different templates and options available on the website. For instance, the teacher can experiment different English accents to make the class more interesting. Thus, students will be more motivated to learn and to use the TL (target language). Finally, ESL teachers can really benefit from this website, especially from the tools available for the presentation of new units and subjects, and for the evaluation of students’ English skills development.