Category Archives: Blog article 4

Storybird: a Great Way to Train your Imagination

Getting started

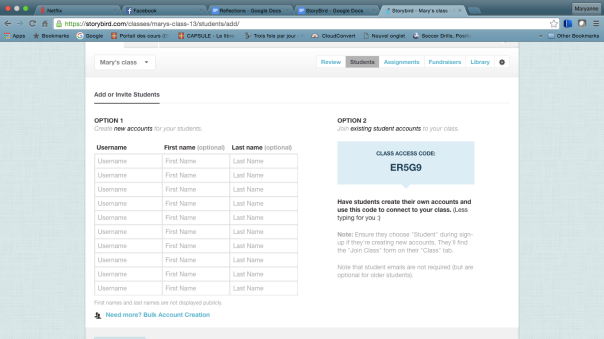
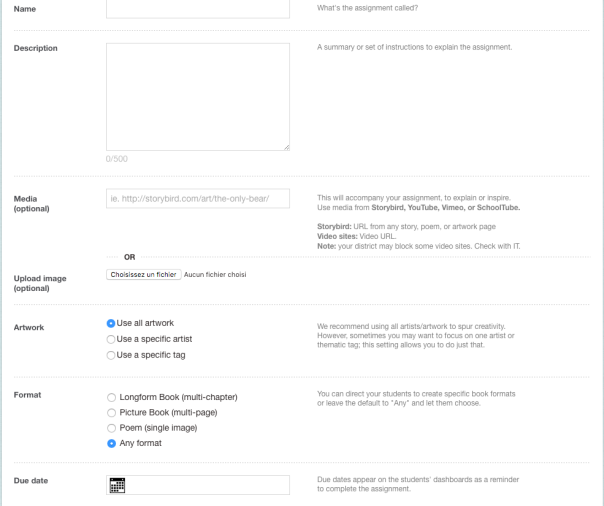
Storybird is an awesome website that allows you to use images created by artists from around word to invent stories. In order to do so, you first need to register for free on the website. You can select the reason why you use Storybird: if you are an artist, a teacher, someone who uses it for fun, etc. When registered as a teacher, you can create a classroom and add you students. This does not require an email address for the student, as ot will be a “kids account”. You can create the accounts yourself from your own account. They can also register themselves without an email address if they check “Student” when registering. If you choose to make them register by themselves, they can join your classroom with the code provided on the teacher’s account.

Screen Shot 2016-04-24 at 5.05.47 PM

How it works

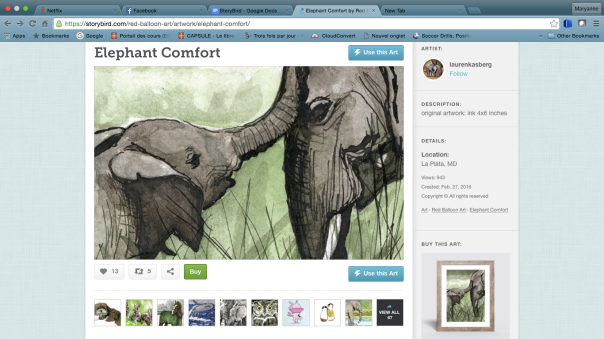
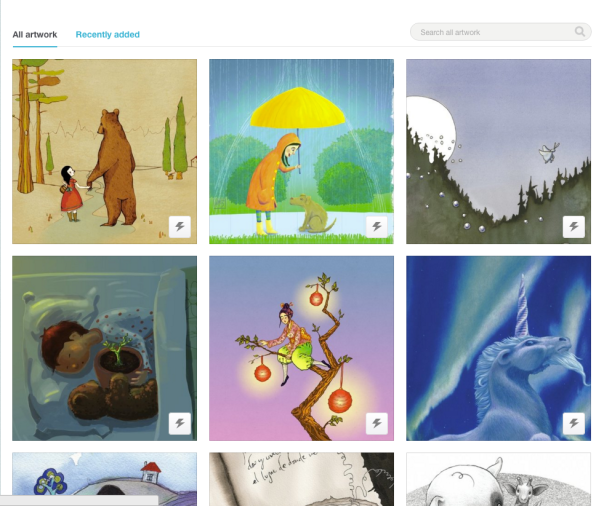
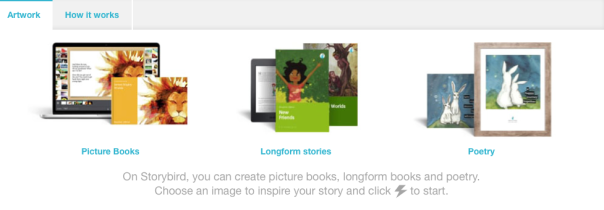
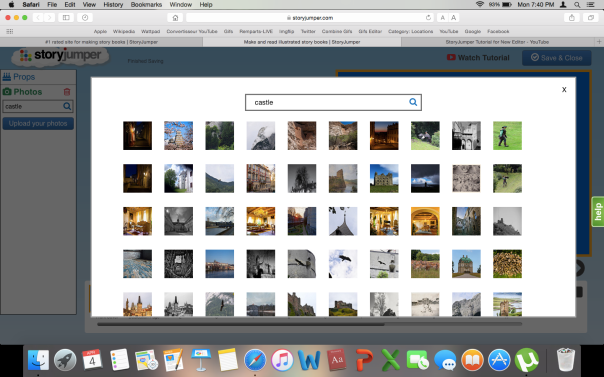
Storybird has an incredible artwork bank. It has every style of you can imagine: paint, aquarelle, pastel, pencil drawing etc. You can search something in particular through the search bar, for example : I searched “Elephant” and 101 artwork with elephants, 66 longform books, 11405 picture books and 2 people appeared. Everything was related to elephants. When you click on a picture, it opens with all the related information. On the right hand of the screen, you have the name of the artist who created it, where they are from and some information about the original artwork. You also have the option to follow the artist. Below the picture, you have the all other works from this professional. If you want to use this picture, you can click on the lighting bolt icon situated in the middle if the picture and choose what you want to do between a longform book, a picture book and a poem.

Screen Shot 2016-04-24 at 7.18.00 PMScreen Shot 2016-04-24 at 7.48.25 PM

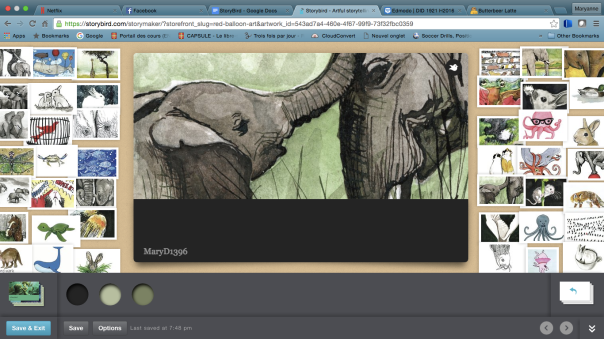
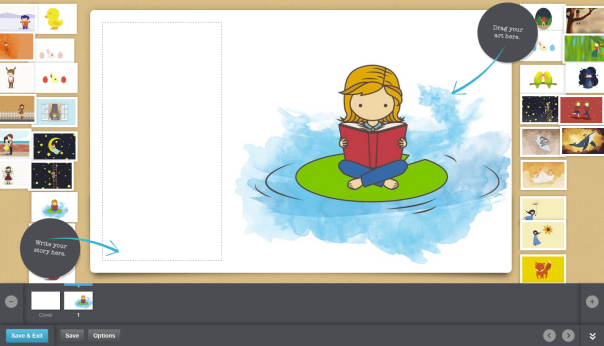
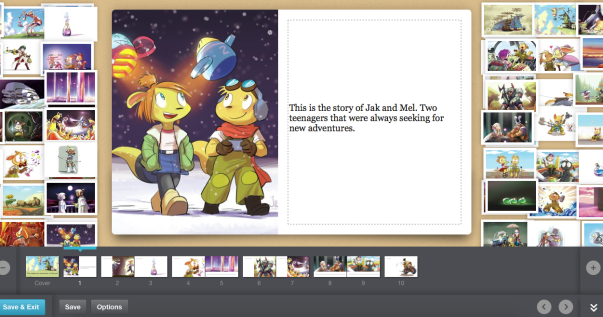
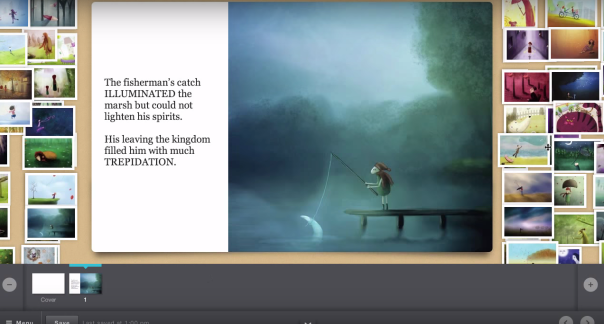
When you open the image in the creating platform, you have the cover page of your book in the center,  surrounding it are all the other artworks from the artist. You can search through them by dragging them around. You can also drag any image from there to your book to change the picture or you can also do so by clicking the picture on your cover page or the icon on the top right of the picture. The longform book is more like a book with chapters where you can write long texts but add less pictures, and the picture book is where you can add pictures to every page but have less space for text. They both function the same way as described above.

For the poems, you have the picture you chose in the middle and surrounding it are random words. All you have to do to create your poem is drag to desired words on the picture. You cannot add your words. Since I found it odd not to be able to write my own words, I did some research. Here is what Storybird says about this :

Storybird is about creative constraints. We purposefully trim away dozens of features to keep you focused and having fun as you write stories or make poems. So we don’t offer art uploads or text input for poems as a way to make the app surprising and inventive.  By imposing these constraints, your brain creates connections and ideas that you otherwise wouldn’t have. And that’s cool.”

Screen Shot 2016-04-24 at 9.08.55 PMYou can refresh the words you have with the icon on the bottom right but that will also change the words you have added to your picture. You can also change the picture if for whatever reason you don’t like it anymore.

When you are done with your creation, you can save and quit if you didn’t finish your longform book or your picture book. You can also publish them when you are done. For poems, you can publish it privately or publicly on the website, there is no save button.

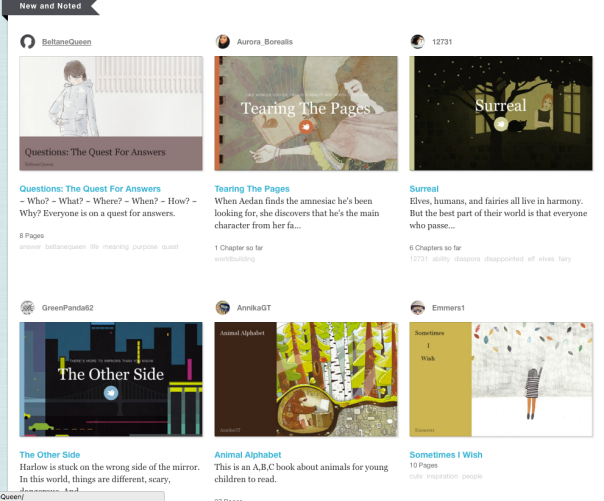
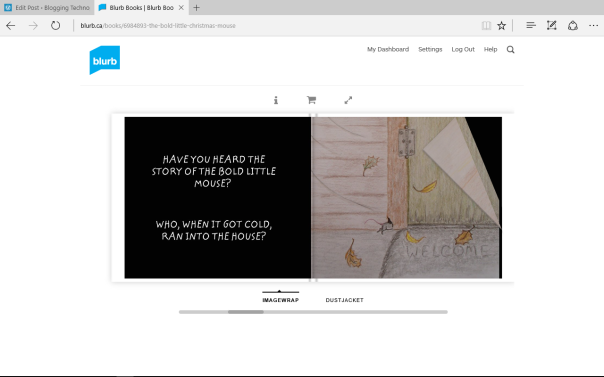
Storybird can also be used as a reading surface. You have access to every story that what publicly published, their are thousand of books and poems of any kind. you can browse them by category and read them for free. People can comment and “heart” books. The reading platform is very simple and ergonomic.

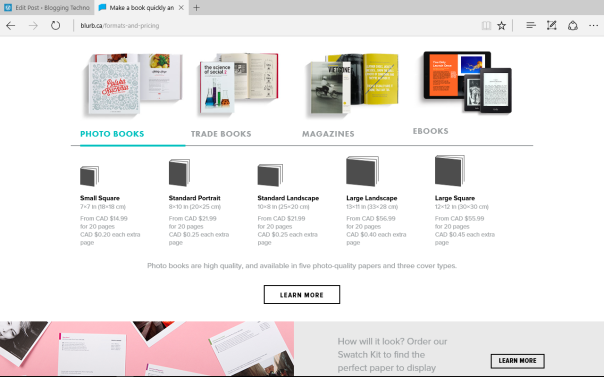
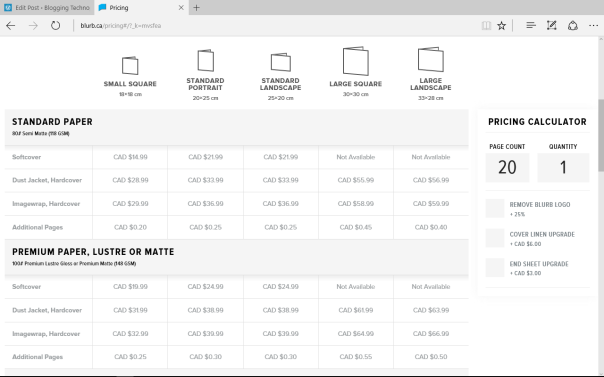
You can even get your books professionally printed. A hardcover starts at 29.99$ while a softcover is only 12.59$

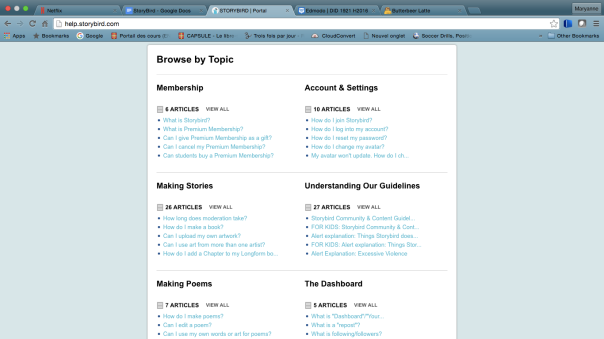
While doing my research pertaining to the poems, I found the Help/FAQ page, where Storybird answers the most commonly asked questions, divided by subject, such as Memberships, making poems, Educator/students, parents, etc. This very useful page pretty much answers any question you can possibly have. It’s a very good resource for parents, teachers and students. It can also help you use Storybird to its full potential.

Screen Shot 2016-04-24 at 10.13.23 PM

Use in ESL classroom

Storybird has so many potential, It would take me hours to write about everything you can do with it.For instance, you could do an Alphabet book with elementary school students. A picture for every letter of the alphabet and a small description of the chosen word. For example, Airplane for A, Banana’s for B, etc. For this, the Picture book would be chosen as it allows to add many pictures and short texts. It can also easily be used to teach new vocabulary in an ESL classroom for elementary school students. It could be a very interesting way to engage the students and make their vocabulary list more interesting to learn. Storybird could also be great for secondary school  ESL students to do writing compositions has it can engage their creative writing. Students could choose their own pictures to write on create a story around it. The whole class could also have the same image to write on. Volunteers could then read their story aloud. It could be very interesting to see what different ideas came up. Another great project with elementary school would be create a class story book. Each student would create a story in English, at the end, they are all gathered in the same book that they could publish and print. For the reading aspect, Storybird could be used on iPads for the reading period. Students can browse a story of the “picture book” type, as they are shorter, and can quickly read them during the allowed time. While reading some teacher reviews, I found a great idea published by Diane C. on Graphite.Org, she says: 

Some of my colleagues (4th grade teachers) are using it with their students. Each student has their own account. The teacher poses a challenge, students search for the artwork to meet that challenge, and then write the story.
I think it could make great homework, to propose a small challenge they have to complete during the week. Such as writing a short story about elephants, in the simple past. Or writing a story about an astronaut using puns. The possibilities and endless !

All in all, I find Storybird to be an amazing tool to use in class, I would definitely have no problem using it. I think many awesome projects can be created that engage children’s imagination, one of their greatest tool. I find it very versatile and simple to use. I strongly recommend Storybird.

My Story – A Storybook Maker

My story Book Creator for Kids is an application designed for children, to make stories with their iphone, ipad or ipod touch. This app IMG_2788was designed by Bright Bot, an app creating company that focuses on creating educational applications. As stated on brightbot.com, the company aimed at creating an app that “unleashes a child’s creativity”. Still according to brightbot.com,  My story encourages creative expressions, artistic skills, language development and creative thinking skills. Plus, the success of the app speaks for itself with over 850 000 downloads from people all over the world.

How it works

My story is a very user friendly app, with a self-explanatory interface. The first step was to create my account. After I could directly start creating my story ! I clicked on “Add a Book”,  and titled my book. Now the fun part started. I explored the designing features while making my book. The first feature offered is the recording of a voice over for your story. I just had to click on the red icon at the top right of the screen, and recorded my voice. If I was not satisfied with my recording, I only pressed the little red “x” on the recording icon and I could restart my recording.

The second feature to design the story  is called “Media”. To access the “Media”, I clicked on the green icon with a painting and immediately, an image gallery appeared. I could chose from animals, accessories, transportation etc. Moreover, I could add my own pictures from my gallery by clicking on the green icon, take a picture by clicking on the red icon or even type a text using the purple icon.

IMG_2797

The third designing tool is the “Brushes and Erasers”. With this tool, I could add color to the page, or draw something using my imagination. If I was not satisfied, I just took the eraser and corrected my drawing. The brushes come in different styles and forms, and the color range offered is very large, therefore one can express his/her creativity in various ways.

IMG_2787

The last tool is the “Page Manager”. This tool is there to help you order the pages of your storybook. This is also the place I needed to go when I wanted to add a page to my story. If you want to add a page between two existing pages you can, thanks to the Page Manager. To exit the Page Manager, I just had to click on the green button “Done”.

IMG_2789

When my storybook was done, I was redirected in my library. By clicking on my storybook, I had access to three different options : “View”, “Edit”, and “Share”. When I clicked on “View”, a short video started of my story, I heard my voice over and the pages turned automatically. If I wanted to change my story for some reason, I just add to click “Edit”. Finally, one of the most interesting feature of the app is that I could share my storybook, on iBooks, by e-mail, etc.

IMG_2794

Another important feature of this app is the “Grown-up Check ”. A “Grown-up check” window appears every time you have the possibility to buy something or to share your story. The purpose of this “Grown-up Check” is to make sure the decision that is about to be taken is under an adult’s supervision.

My Opinion About this Tool

To begin, I really enjoyed my experience with the tool. It was easy to use, and very self-explanatory. However, as stated on commonsensemedia.org, a little tutorial or an help page that one can access at anytime in the making of his/her storybook is missing. There is no coaching or help page. Moreover, one of the downside of this app is that not all the content is free. In fact, with the free version of the app, you get only a few illustrations for free and the others need to be bought. Nevertheless, even if there is some minor downsides to this app, this app is very well built. It was easy to use and I enjoyed myself while creating my book, and exploring the various features. I think that this application has a lot of potential as a teaching tool.

Uses of the App for ESL Teaching

This application could easily have many uses in the second language classroom. The creative aspect of the application makes it fun for students and teachers. Plus, the fact that it is easy to use makes it perfect for students, even the young ones.

“I have been using My Story with my students for almost two years now and we love it!!! It is so much fun and easy to use and parents love it as well!!!! ” – Aggie1976 from mystoryapp.org

It allows the students to be creative in the second language and write about subjects that truly interest them.  Therefore, they practice concrete vocabulary and are more likely to use it in natural contexts in their life. Additionally, the sharing option of the application allows the teacher to receive the students’ storybooks as homework or practice for evaluating their writing skills. Plus, with the recorder, the children can practice their oral skills. The teacher can even evaluate them with the voice over that they did. It would allow more shy students to feel comfortable to speak the second language. I personally think this application would be the most appreciated in elementary school because it is colourful, playful and reminds of illustrated books for young children.

Lisa-Marie Deschênes, future ESL teacher


Storybird, the Story of an Enchantment

Once in a while, people come across new applications, new tools, new ideas, etc. that will simply leave them speechless because they are so incredible. Storybird has done just that for me. From the very beginning, Storybird has impressed me with its simplicity, its usefulness, and its overall simple beauty.

What Is It?

Storybird, founded in 2012, is a website that allows users from all age to create highlystorybird
aesthetic picture books, longform books, or poems including images, in just a few clicks. All the published stories are available as part of big library from which users can read books. This is a highly popular website; according to Storybird, more than 15 million stories have already been published on the website. It can be used by regular users, educators/teachers, or students. This article will focus on using the website from a teacher’s account.

What Is Specific to Storybird When Used by Teachers and Students?

As soon as they sign up, teachers are asked to create a class to manage their students. Once you have created a class, you can start creating assignments (see image on the right). You can write in specific information, such as the description and a due date. Once your students create a story, they can hand in their assignments in just a click. Once you have the assignments, you can grade them. You can even give awards to students (number 1, etc.).


assignment
Creating an assignment for the students


The great thing about Storybird is that you can be reassured that your students are in security. Students don’t need to give an e-mail address to create an account, and they will use a username rather than a first and last name. Also, the books published by the students can be seen in the class’ library, but cannot be seen by the other users of Storybird.

Storybird also allows schools to raise money by selling the students’ books through fundraiser (you get 30% of the sales).

How Does It Work?

Signing up is really simple. All you need is an e-mail address and a password. Storybird is completely free of charge, but you have to pay if you want to print your books (the price varies according to the kind of book). The price can be reduced if teachers buy bulk download credit (basically, package deals). A premium membership can also be bought.

Many tutorials are available, as well as informative videos on youtube. This YouTube publicity of Storybird is particularly inspiring and reflects how I feel about the website:

A teacher once told me that Storybird doesn’t feel like learning. I love that quote because it sums up how we designed Storybird to work. It’s inspirational, it’s beautiful. It’s lightweight and easy to use.

The tutorials and explanative picture books were simple, well-explained, and answered all of my questions.

 The first step to writing is choosing an artwork that inspires you (see image below). The website offers a wide variety of art from which users can choose from.

types of art
Choice of art


Once you have chosen the perfect image, start creating your book. To create a book, you only have to choose a cover and a title, drag in images and add in your text (see image below). You can have as many pages as you like. All forms of book share one advantage: users can invite collaborators! Hence, Storybird can be used for teamwork. The feedback and comment options can also be used toward this goal.

Creaing a picture book.png
Creating a story book


Once the story is written, it can be published in the class privately or publicly. If they are published publicly, the stories have to go through a moderation process; this makes sure that their content is safe for all students. The stories can also be shared on social medias or printed.

Storybird also has a social side, with a blog and options such as following users and liking their stories.

My Opinion as an ESL Teacher and Uses in the ESL classroom

Everyone can enjoy the artistic website and let their creativity run free and create amazingly aesthetic books. Storybird is particularly useful for increasing creativity, interesting students to literature, and helping students memorize new vocabulary. Many teachers, such as Jocelyn Curry, state that Storybird is a tool that is particularly adapted to younger students (primary level). I have to agree that the website, in all its simplicity and with its “drag-and-drop” functioning, seems perfectly adapted to younger students and constitutes an easy way for them to create art of which they can be proud. Nonetheless, I would also recommend using Storybird for high school students. The length of the text can go from one sentence to a whole book. So, why not have high school students do their creative writing directly on the website? Storybird is definitely a mesmerizing website from which students will love to work. It is simple, beautiful, and it engages students on a very high level of creativity. It is also user-friendly, so you do not have to worry about your students being lost.

Right from the start, I realized that there were far more uses to Storybird than what I had expected. Storybird can be used to help ESL students remember vocabulary more effectively. You can have them create a story using the new words learned in class. This is especially appropriate for high school students, since they already have the basic vocabulary needed to write their original stories. As Mike Penella stated,

I think it’s wonderful for teaching vocabulary. I think the thematic and visual associations that these exercises would create are going to cement those concepts in people’s minds long after, say, flashcards or sample sentences have been forgotten.

The fact that the students have to re-use the newly acquired vocabulary in an actual concept (realistic or not depending on what they choose to write) will help them remember the words, and especially its uses, more vividly. Also, simply by creating stories, students will have to learn new words in link with the pictures the website provides them with. In a naturalistic setting, where the words are necessary, students are more likely to remember the vocabulary they acquired.

Storybird can also be used to boost the students’ creativity. When I tried the website, just looking at the images was enough to get me inspired and to write a short story. Click here to see my first published picture book (please not that it might not be available yet because the moderation process can take a few weeks). As mentioned by Stephen Davis,

Without requiring any artistic ability, students drag and drop characters and images onto a digital storyboard. Students are inspired by the themes and artwork available on Storybird: abstract thoughts and emotions students could not express easily come to the surface.

Indeed, students can go on the website and choose their images from a very wide selection. By dragging the images of their choice in their book, the inspiration will come to the students naturally. Teachers can set up varied assignments for their ESL students that can take the form of weekly writing sessions to end-of-semester projects. Storybird is a nice way for teachers to keep track of their students’ writing skills. Another highly engaging activity for students that teachers could implement in their classrooms consists of choosing a series of five to ten images and having the students write what they think happened. To encourage even more interaction, this could be done as a whole class weekly activity; the chosen version of the story could be written into a weekly class picture book. In addition to working on creativity, such an activity would have ESL students practise interacting with each other as they decide what to write. As the teacher chooses the images, the activity can even be funny. Choose pictures of weird monsters, talking Jell-O, or whatever will make your students laugh, and you will receive more and more student participation.

My favorite use of Storybird is for storytime, simply. Storybird is filled to the brim with all sorts of stories, and there is surely one that your students will like. Implementing a reading circle in your class in not only very feasible with the website, but also money-saving. Instead of having to buy books, you have a full library at your disposition (see image below). Furthermore, the stories can be read in full screen, so the students can listen to you and practise their reading while they look at the book on a Smart Board, for example. To have your students engage even more seriously in their writing process, you can implement a reading circle with books created by the students. As Renée Jordan mentioned,

Publishing books is an important final aspect of the stages of writing. Storybird provides a high quality avenue for students to self-publish their work. This will increase their engagement and sense of ownership over the writing process.

Your students will work harder to create a work that they will be proud to show to their peers.

library.png
Example of books available to all in Storybird’s library


Another way to encourage reading is by having students read stories from the website on their own. They can use the search tool to find stories about themes that interest them. As Renée Jordan stated,

Beyond writing, Storybird can be an excellent method to increase the time a child spends reading. Children can read other children’s stories, or those of their friends. There are multiple genres available for children to choose from, which increases the likelihood that each student will discover something that interests them. Furthermore, professional authors use Storybird to connect with their fans, which allows children access to their stories as well.

This is a much better option than assigning one mandatory book for the class; students can find something to read that actually interests them. Furthermore, there are books adapted to all levels of English on the website. Your ESL students will easily be able to find a book adapted to their level of English that they will enjoy reading. As they read, you students will increase their vocabulary and knowledge of the sentence structure.

Storybird has a lot of advantages, as mentioned throughout the text, such as offering a private and safe environment for your students to post their books, a very simple functioning on which students will not waste time, and an option for collaboration and feedback (comments) that allows for students to make projects together or help each other. It is user-friendly, the images are beautiful, and the tutorials are there to keep you from having any questions. As mentioned earlier, students do not have to worry about artistic skills; the images are created for them.

However, Storybird has a few disadvantages that cannot be ignored. Indeed, the website was designed to have users choose pictures and then write from those pictures. It is hence hard to have your students write a story beforehand; no images can be imported and the art offered by the website is loosely related, which I consider to be limiting for students who like to plan ahead. That is, the pictures do not have a logical link between each other and recurring characters are really rare. Also, the rewards which can be awarded by the teachers should be avoided as much as possible in order to avoid between-classmate competition. Still, don’t let these small disadvantages discourage you from using the website.

All in all, I would definitely recommend the use of Storybird in the classroom. It has so many possible uses and it will surely increase your students’ creativity and interest in reading. Still, be aware that your students should work from the images to create a story and not the reverse, or otherwise they might get stuck with no images that illustrate the story that they wanted to tell.

by Camille Leblanc, TESL student

Book Creator

WHAT IS BOOK CREATOR

Book Creator is an app available on the App Store designed by Red Jumper Limited  and is used to create simple, but beautiful eBooks, which can be shared with classmates or the world. Although it is very similar to Book Writer, which was the topic of my third blog, this new tool offers several different interesting features. Unfortunately, the full version of Book Creator is 7$, and the free one has substantively less options. Hence, this blog will review only the free version, so I will not be able to go in depth about all of the options offered by Book Creator. However, I strongly believe that the free version has more than enough content to satisfy the needs of an L2 classroom. The various and original tools are fun and entertaining for new language learners and galvanize creativity. However, a major disadvantage is that this app can only be used on the iPad, and not on the iPhone. Since I had exhausted my iPad’s battery by watching Grey’s Anatomy all day, I could not download the app on my iPhone and immediately start my blog.

https://otswithapps.files.wordpress.com/2012/11/book-creator-pic1a.png

This is the easy interactive interface of Book Creator.

WHAT DOES IT OFFER?

Book Creator offers a number of functions that are specifically tailored to suit a classroom’s needs. You can add text and photos, and even rotate the images to personify the book. The tactic screen of the iPad allows the users to manually place objects where they want. This allows students to express themselves and personifies the experience even more. Moreover, the user can even draw if he or she wants to. However, I have tried that option and noticed it is extremely difficult to draw with a finger. I am aware that there are special pencils designed for that purpose, but students will not have them in class, hence rendering this function useless. Another cool option that users can fool around with is the audio. If the iPad is connected  to iTunes and has an internet connection, one can add songs from his playlists directly to his book. I have tried out this function myself, and it works much better than with Book Writer. Furthermore, one the best tools that this app offers is its sharing functions. One can share his book electronically once completed, or even use the iCloud service to store all of his projects. That function is especially useful in a classroom, since the teacher can regroup all of his students work in one place instead of downloading each book individually. Additionally, if one wishes to use Book Creator for professional purposes, he can easily upload his book on the web or send it to iTunes by email with a click of a button. If the book is approved, it will be published and there for the whole world to see and buy.However, this type of eBook is not ideal for long novels, as it can get very repetitive, and the format does not support very big projects. Overall, all of these incredible tools allow for the creation of either a photo book, an audio book, a fairy tale, or a mix of all these!

HOW BOOK WRITER WORKS AND MY EXPERIENCE

Red Jumper Limited has managed to create a user-friendly app that also possesses complex features and interesting mechanics. The interface regroups all of the options, which is perfect for lower level students, since they will not have to search for the tools. According to several YouTube videos I watched, the customization options on the paid version are much more extensive, as you can even choose the format of your book. A downside is that the free version only allows you to create one book. This is less than ideal for students, as they have to erase their creations every time they start a new project. Nonetheless, the iCloud function allows them to store their books on their computers so they can look at them anytime.

Amanda Bidel, a Language Arts teacher and an App reviewer, mentions that “Book Creator for iPad is an amazingly easy-to-use digital book-making tool. With guidance, even kids in early elementary school grades can use this technology tool to produce and publish their own simple books or comics with images, videos, and audio. Readers can access published books via iBooks or other online sources, or books can be printed on paper. ” I do agree that this tool is mainly for elementary students, but even I, a University student, have had some much fun playing around with all of the interactive tools and creating my own story books. However, this is not to say that High School students will not appreciate, but the projects will have to be tweaked so they reach expectations.

The company that has created this app has even designed a YouTube channel specifically dedicated to Book Creator. They upload monthly tutorials that explain in depth how the app works, and shed light on the less known tools. Moreover, the administrators of the channel take the time to answer every comment on each of their videos. If one has a question or is unsure of how Book Creator works, they can ask a question, and will surely get an answer from them.

ESL CONTEXT AND OVERALL IMPRESSIONS

Book Creator is perfect for the ESL classroom, since it enables students to use their imagination to write a fictional story, or helps them organize information in brainstorming session. This is particularly helpful for second language learners, since they can use their critical writing skills, and since they can share the books, students can read and review their peers’ project. Adam Foster, an elementary teacher, has written a guide on how to use Book Creator in the classroom. While I could only get my hands on the summary, the book discusses numerous ways the app can be implemented in the classroom. It also provides examples of student works, tutorials, advice, and so on. He also suggests that teachers’ use this app to create their lesson plans, since the interactive menu make it easy to structure and prepare activities.

iPad educators, an internet organization that shares the best tools of mobile technology, has ranked Book Creator has one of the most useful apps for teachers’ and students’ alike. They provide ten tips on how to use it effectively in a classroom. These range from scanning content to audio feedback. Students who have little experience with technology can easily work with this app and create according to their style. All of the tools allow for great variety.

Personally, I would use this app in my classroom, because I believe that writing and reading are the best way to learn a language. ESL learners often complain that they do not understand vocabulary, or do not write about subjects that interest them. Book Creator fixes all of that. Students can create their own story which undoubtedly will interest them and thus create an emotional bond. This will cause them to invest additional time in their projects, practice their writing skills extensively, and acquire more vocabulary. It is a win-win situation, and as suggested by Cormac Cahill, these types of activities can be turned into competitions, thus motivating students even more. He states that students are filled with pride when their stories are chosen and posted on the white board for everyone to see.

Overall, I would have to say that Book Creator is an essential app for teachers who have the appropriate resources in their classroom. It is obviously not every school that is fortunate enough to provide iPads to every students, but those who can afford it should definitely follow Adam Foster’s guide on how to maximize the use of this wonderful tool.

Litlift.com: a Free and Easy Of Access Website

Litlift.com is a free website that lets you create stories which you can share on the Internet. The website is completely private and is very simple to use. Users can export their work whether it is a book, a chapter, a scene, a character or an item from anywhere in the world since the website can be used easily on mobile phones. Litlift.com could be useful for me as an ESL teacher because it would allow my students to become expert at writing stories with the writing guide and it would allow me to review, correct and give feedback on my students’ work.

Firstly, there is a complete writing guide on the website with detailed instructions on how to proceed when writing a story. The writing guide contains six steps which help students in their writing process. It can be useful for students as well as for teachers to get to know the steps to writing a proper story. The first step, getting started, provides tips on what are the three key things successful novels have in common: they relate to a concept the author has a strong passion for or knowledge about, they contain a revolutionary theme/idea or novel approach to old theme, they present simply sublime writing). This section also raises a few questions to make sure students will write a story that is important to them such as, “Is this a topic you are interested or passionate about?” Step 1a concerns plot road or space where students can brainstorm on the elements that would be useful for their story’s plot such as the main conflict or themes of the work. Step 1b pertains to character road or the character’s name, traits, background information or personal struggles. Step 2 is a progress check where students can reflect on their story, think about whether it is personal to their emotions and ask themselves if they still feel the same energy from reading their story a second time. Step 3, the opponent, allows students to develop the antagonist or other characters in the story. Step 4 shows students the proper structure of a text. Indeed, it explains the main parts of a text (the intro, the middle and the end) and it contains a progress check after each section with specific questions such as, “Is the lead character worth following?” Step 5 is a step which allows students to divide their story by chapters or by scenes. Finally, Step 6 pertains to the writing of a small summary and to revisions. Students are encouraged to take a break from writing for a few weeks which will allow them to think of a title for their work. The title generator is a useful tool for students who have troubling coming up with a creative title. Students are then asked to read their work again and to answer to certain questions such as, “Does the story flow?” Finally, students must share a second draft with their peers for further revision.

Obviously, students and teachers do not necessarily have to use the writing guide and can start the creation process on their own. Some features are very convenient such as the name generator which, as the name suggests, generates names for the characters, the image generator which generates images, the location generator which generates a set for the story and the title generator which generates a title for a story. On one hand, according to The Fifth Dimension, the website is confusing and customer support is lacking. The author of the article mentions that the website is incomplete since the homepage claims to have a word processor and outlining features as part of the program but “there is no option to create or organize scenes, no timeline features, and no word processor.” However, the article was written over two years ago and the website has since been  changed and completely built up. On the other hand, according to Writerholic’s Anonymous, the website is highly effective since “it has helped [her] streamline [her] ideas, get them down, so they aren’t running around [her] mind, harassing [her] all day.” Indeed, with the website, teachers and students can be creative, write novels more easily and more quickly than with pen and paper.

Secondly, Litlift.com would allow me to correct my students’ work. If my future students shared their stories with me, I could give them feedback, comment on their texts and correct their mistakes. Moreover, it would help me teach the right example to my students. For instance, I could write a story following the complete writing guide and share it with my students as an example. They could draw on that example to add the relevant information or details to their stories. On the contrary, I could show students bad examples of stories such as a story where there is no antagonist or no conflict. This strategy could benefit me as a teacher because I would then be able to get a better understanding of the subject and to be able to explain it more easily to my students. The students would also benefit from seeing bad examples of stories because they could avoid making mistakes or effortlessly correct and revise their texts. In addition, teachers and students could write their stories anywhere and at any time with their electronic devices since the website is accessible everywhere. Therefore, it would be convenient to both teacher and students  who could respectively be able to give and receive feedback in no time.

In conclusion, the website Litlift.com would be beneficial for me as an ESL teacher because, by using the writing guide, my students could become experts story writers and since it would allow me to review, correct and give feedback their work. This website is free, easy to use and promotes creativity to future and current ESL teachers and students of english as a second language.


Storybird, let your creativity fly away

It only started as a gift that Mark Ury with his son wanted to give to his wife. However, it quickly expended and it was in 2010 that Storybird was launched. Based in Toronto, this social software became an “art-inspired storytelling”.

What is it?

Storybird is a storytelling tool that allows people to create a book in a short amount of time. It can afterwards be read, shared, published or even printed. When referring to a book, it does not mean an endless story. There are three types of writing that are possible with Storybird. People can create poetry, pictures book and longform stories.

What is Specific to Storybird for Schools?

Everyone who has the slightest bit of imagination can use Storybird. Whether you are a parent and you want to create a book for your children or you are yourself a kid, you can use Storybird and let your imagination fly away. Storybird is a free tool, which can be useful for school. According to their website, more than 5 millions students and 400,000 educators use Storybird. It is a great way to give free rein to students’ creativity and lead them toward the writing process. It is also free for educators and has more benefits. In fact, Storybird has a fundraiser for school. It allows educators to get 30% of the proceeds, which means that when parents are buying their children’s books, the classroom or the school receive 30% of all sales and books are also printed.

How does it work?

The following description shows how easy it is to use Storybird. For subscription, you need to get on the sign up page, which is pretty basic. Then, you can either enter as a teacher, student or as a regular user. As mentioned above, Storybird is a free tool, which means it allows you to use it plentifully without being stuck with trial version. After signing up, you are relayed to the studio page, from which you can click on different tabs to explore the website. At the top left of the screen, you have five options that are respectively named: you, studio, create, read and shop. The first icon refers to all of your stuff, bookshelf, following, setting, help/FAQ, etc. In your stuff you can see all of your book creations. The second icon, which is studio, refers to your account as, a teacher (user chosen for the purpose of the article). In this section, you can click on the tab such as review, students, assignment, fundraiser and library. The next icon is the one you are waiting for. By clicking on create; you are relayed to the artwork. In this section you can chose one of the three options. The first one is picture books. This option is essentially used to create short and visual stories. Here is an example of how to create a Picture book.

Capture d’écran 2016-04-05 à 20.53.31Capture d’écran 2016-04-05 à 20.54.53

Capture d’écran 2016-04-05 à 21.01.05

Use the search bar to look for all artwork or choose an image from a specific artist from the gallery. You are then relayed on the story maker from which you start creating your story by adding a cover page and pages as you write your story. Once you are done with one page, you can click on the plus button and if you want to go back, you just need to click on the page you want to modify.

Capture d’écran 2016-04-05 à 21.04.48

Capture d’écran 2016-04-08 à 15.40.31.png


There are five ways to position your picture. You can position it on the left or the right side, then on the top or the bottom side, or simply put it full screen. Afterwards, you just need to add your text.

As you look at you screen, several images from different artists or subjects are displayed on each side of your book. Thus you have to create your story based on these images. Unfortunately you cannot add images from another artwork.

Then, once you have created your story, you can save and exit. You have now different options offered. You can choose to publish your book privately or publicly, or leave it only visible by you if you are not finished.

The other option is to create a longform stories, which is more like writing a novel. Like Pictures book is about pictures, Longform is more about words. It can be referred as Google doc or Microsoft word. You can therefore write as long as you want and then change to another chapter and keep writing.

The last format but not the least, is poetry. It simply consists of choosing a single image that inspires you and a bank of words is given. From that you will have to create a poem or rhymes.

My Opinion as an ESL Teacher and Uses in the ESL Classrooms

A great thing about Storybird is that everyone can use it. Thus an ESL teacher can use it in order to create a book about grammar or to teach new vocabulary. It can be used in anyway and it only depends on what people want to share. As an ESL teacher, Stéphanie Pelletier mentioned in her blog that

“It is a great tool to promote writing and reading in the classroom […] they use their imagination to write any type of story that they like.”

In my opinion, I think she is right because student can create their own stories, which are not shut by some restrictions. Then, I think it can have positive effect and increase their motivation in their second language leaning process.

Susan Deger, who is an English teacher in Spain, has brought up an interesting fact about how to use Storybird with older students. She mentioned that she did a story activity with 15 years Old Spanish students but she was afraid that they would find it childish. In order to avoid this aspect, she told the students to write a book for kids. Ms. Deger seemed quite surprise since she commented:

“They were totally engaged in the activity and only stopped each time they needed help with vocabulary or sentence structure.”

She had great results and this is activity can clearly motivate the students, since they were at the end of the semester and they were quite tired.

Conclusion

All in all, I believe Storybird is a great way to increase students’ interest. It can be use as another way to bring up different subject or even have the students create their own books.

By Matthieu Cloutier, TESL student at Laval University

My Opinion on Inklewriter as a Future ESL Teacher

Sans titre 4

Inklewriter is a free tool that allows any user to write an interactive story and then share it as an URL or as a Kindle book. The readers of interactive stories have the possibility to choose their own “path”. For example, after each paragraph, they get to choose an option, the rest of the story changes depending on their choice.

How does it work?

The first step is to sign up. The website asks for an Email address and for a password. The
process takes about 10 seconds. Then, the website offers a quick tutorial on how to get started. It is possible to skip it, and get directly on a page called “write”. On this page, the jjjj
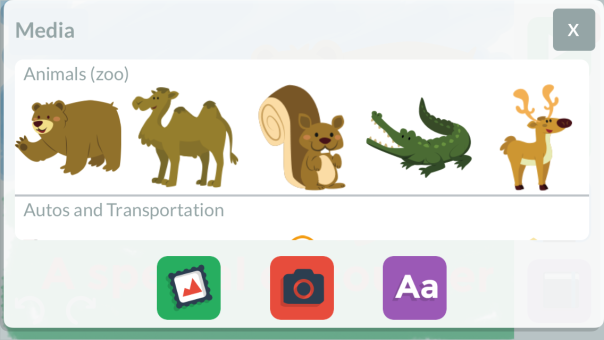
necessary elements to start an interactive story are already there for the user to fill: the title, the author, the name of the paragraph, the paragraph itself, and the options the reader can choose for this paragraph. The user can write as many options as he wants for a paragraph. When he is done with the options, the user has to write a new paragraph for each of these options. Then, he has to add options to each paragraph. This process goes on until the author ends his story. Moreover, in the “write” section of the website, there is a menu box with some useful tools: an option to put
the text in bold or in italic, to save the work so far, to add conditions, and to add images. When the user is satisfied with his story, he can click on the “share” button, therefore publishing his work. This will give him an url that he can sharejbjaaa with others. He can also decide to put in on Kindle, an app to read online books.

On the top right corner of Inklewriter, there are four sections: “map”, “contents”,
“write”, and “read”. The “map” section gives an overview of the story as a mind map. This can give a simpler resume of the story to visual users. The “contents” section gives an overview as a table of content. The “write” section is the main page mentioned above, where the user writes his story. Finally, the “read” section is the page where the author can read his story as the reader would. It is a preview of his published work.

ESL Teachers’ Point of View

In my opinion, as a future ESL teacher, I think this is a great tool to use in the classroom. First, as it is a beta version, it is pretty simple to use. In fact, there are a limited amount of options, but I think this is what makes it great. By having few options, the user does not need to experiment with the tool for a long time to understand it, he can start writing his story right away. It has a simple interface that makes it easy to work with in class, both for the students and for the teacher.

Then, I believe Inklewriter is a good way to increase writing and creativity in the classroom. In fact, it can be sometimes challenging for a teacher to get his students to write in their L2 (second language), and actually enjoy it. With this tool, not only the students work on their writing skills in the L2, but also on their creativity. By creating stories by themselves jjjjjjbjbbhor in groups, they make their imagination work to create something. It gives them freedom, and gives them the opportunity to explore their own writing style. This tool could be used by the teacher in a classroom setting to do a creative writing/week by week activity. For example, in pairs, students are assigned one week in the semester. During their respective week, the pair has to share their story created on Inklewriter with the whole class, and the class has to read their work. At the end, the student readers could write a small paragraph on how the story ended for them. This would be motivating for the students presenting each week to have their work read and written about by their peers. Moreover, this would encourage free writing as well as reading in the classroom. It would also give more opportunities for the teacher to see his students’ improvements and recurring mistakes in the C3 (writes and produces texts). Finally, Inklewriter is also a great way to include technology in an ESL classroom.

Other critiques

Joseph Humfrey and Jon Ingold, two teachers and writers for the website TeachersFirst, give an interesting alternative to the use of Inklewriter in the classroom: “As a more “serious” approach, use Inklewriter to present opinion pieces where you take a position and allow readers to click on questions about it. They could also click on statements expressing opposing views so you can write counterarguments to their points. This could end up being a powerful way to present an argument and evidence as required by Common Core writing standards.” It is interesting in a way that Inklewriter could be used for more than story writing, which makes it even more of a great tool. In fact, it could be used to develop students’ critical sense in the L2, as stated by the two teachers above. An ESL teacher could decide to mention a taboo issue, such as “What do you think about avortment?” The student would then have to create two options, and write about these two options.

One of Edshelf’s author states that “Inklewriter lets you write as you play, branching the story with choices, and then linking those stories back together again. It keeps track of which paths you’ve finished, and which still need to be written. There’s no set-up, no programming, no drawing diagrams. Just start writing and see where it takes you. Oh, and it’s free to use.” In fact, as stated earlier, it is a very simple tool. Any user can get the grasp of it in a short lapse of time. Some websites and blogs offer interactive stories, but the authors of these stories have to use programming, which is not easy nor accessible to everyone. Therefore, Inklewriter is an excellent alternative to students and to teachers, who usually want to keep things simple.

Conclusion

To conclude, I believe Inklewriter is a useful tool to use in the classroom because it is fairly simple, it can increase creative writing, it can improve students’ reading and writing skills in the L2, it involves technology in ESL classrooms, and it can even develop students’ critical sense. I would definitly use it in my classroom.

Maximme Grenier

My Storybook: Kids will love it!

What is it?

My Storybook is an extremely easy to use website that allows you to create online books complete with text, images, and printing options.

What does it offer?

There is nothing complicated about My Storybook: what you see is what you get. You can start creating your book as soon as you get on the home page. You only need to register when you want to save your work or when you book is finished. Creating an account is easy and takes les than a minute. Afterwards, since My Storybook is free, you can create as many mini-books as you want and store them in your personal library. You can decide to share them on the net so that other users can see them, or to keep them private. You can also brownse the website’s library and check out the work done by others.

My experience

While exploring the website, I was extremely pleased to notice how easy it was to navigate. When you start to create your book, you have access to a quick tutorial that introduces you to all the creating features. As there are only four, the tutorial is not even necessary. However, when teaching students how to use the website, it might come in handy. The four features are “Items”, “Draw”, “Text” and “Scene”. The manipulations are minimal and straightforward.

With “Items”, you can add characters, objects and decorations. There are only two choices of characters, a boy or a girl. You can modify their appearance by playing with the basic features, such as eyes, hair, clothes, etc. However, you should not expect to be able to create any character you want. My Storybook offers very limited creating options. In elementary school, this feature would certainly be an asset, as it would help the students to stay focused on the task. However, it is always possible to dowload your own pictures and to use them in your book. With “Draw”, you can choose to use a pencil, a small brush, a big brush, a circle dragger or a square dragger. You can also choose your color and adapt the size of your drawing tool. Note that drawing a good picture requires dexterity and patience.With “Text”, you can choose your font style and your font size as well as a font color and a background color. Finally, with “Scene”, you can add a picture as a background to your story. Options include scenes from school, forest, buildings, and more. You can also download your own. When you create your story, there is a small “overview” of your book on the right side of the screen, so that you always know what were the previous pages. You also have the options of adding and deleting pages.

It should also be noted that the website’s appearence seems to be made for elementary children. The buttons are big, there are no adds overwhelming the eye, and the menu features only three options: New Storybook, Library and Signing Out.

Regarding the library section of the website, there are four categories: My Books, Features Stories, Classroom Resources and Community Storybooks.

Moreover, when students publish their stories, the teacher can collect the links to evaluate their work. Students can also share their work between each other using the same method. Collaborative work on one project is possible, although only one student can have access to the book at a time. Overall, it seems a better idea to have students create their books alone, and then to share them.

Teachers can also have acces to a blog, where they will find teaching strategies, Author of the Month contests, tips for creating great stories, and much more.

Use in ESL teaching

Although the tool seems more fitted for elementary school, there are definitely a few options for older students. For elementary school, students could be asked to create a summary of a reading or to compose and illustrate short poetry. That would be an interesting alternative to traditional writing tasks. Moreover, it might increase the students’ motivation and interest as they would be involved in a creative task. Associating the creation process with the final product would also help them to remember it later on.  Another thing they could be asked to do would be to create a revision tool for themselves and their peers. For example, they could revise the correct forms of the past tense and match their answers with pictures (such as walked, thought, sang, etc.). Students could also be challenged to create stories that include specific words, images, or any other constraint that contributes to their learning. As Mrs.Woods writes, “the possibilities are endless”. In agreement with that, Larry Ferlazzo considers My Storybook to be the best free online tool for creating books.

Highschool students could be asked to use their own pictures to narate a more complicated short story, to challenge themselves in creating a story without words, or to use it as a way of learning new vocabulary or concepts.

My opinion as a future ESL teacher

I am aware that many areas of the educational system could use some improvement. Because of that, I was most pleased to see that a survey was available for teachers to describe what they like about the website, what could be improved, and how they would use it in their classroom.

As a former student and a future teacher, I believe that reading and writing are an essencial part in the process of second (or foreign) language learning. I would definitely use My Storybook in ESL elementary classes. I would not use it in highscool because the website’s layout is too childish and does not offer enough options. However, the limited options would be great in an elementary class.

Moreover, I would feel comfortable teaching students how to use a website that I understand and that provides me with tips on how to help the learners to create the best work possible. I am sure that the students would feel more interested in writing and would be proud to show their work to their friends and parents.

Creating a storybook in ESL teaching

Capture

Anyone who has already learned a second language in a classroom environment knows that creating while learning is an effective technique. Indeed, the information is easily retained and students are more motivated. That is why applications such as MyStorybook are getting very popular in language classrooms. Teachers are giving positive comments, since the application is easy for students to use and to access online. MyStorybook can be used in many ways in the ESL classrooms.

Students brainstormed words they know & we turned it into a book they can access @ home! – Amanda Hartnell, French teacher

First of all, MyStorybook is very easy to use. You can easily create a free teacher account to save your draft and to share it with other people. Students can also create an account and work in teams, if they use one account and they do not modify the story at the same time. As a future ESL teacher, I personnaly tried MyStorybook on the website and I found it very simple. When you click on create a storybook, it will open a page where you have a storybook draft. From there, you can find four creation tools on the left of the page : items, draw, text and scene. When you click on those tools, you have different options, such as images already in the system or images that you have saved in your computer. You can choose the color of your pencil if you want to draw, you can choose the color and the font of a text you want to add and you can modify the background.

mystorybook

On the right of your draft, you can change page by clicking on the black arrow or you can change page faster by using the storybook overview. Moreover, you can add a page by clicking on the blue button and you can also delete one by clicking on the bin. At the top of the page, if you do not understand how to use the different tools, you can watch a quick tutorial by clicking on the blue tutorial button. Also, you can save your draft clicking on the save option at the top right of the page. Beside the save button, you can access the menu. From there, you can start a new storybook or access your personal library. Creating is fun and easy with MyStorybook.

In an ESL classroom, MyStorybook could be used as a team or personal project. For instance, students could create their own storybook using elements they have learned during the year or simply by choosing a topic they like and share it with the class in an oral presentation. Furthermore, ESL teachers can use MyStorybook to teach new vocabulary words, perhaps to younger students. What is also interesting with this website, is that it is free and you can pay $5 to print and receive the book you have created. This last option can be interesting if you want to create a class project where every student is contributing to the creation of the book. Each student can then receive a copy of the book they created depending on the budget you have or if the parents want to contribute. Therefore, students can keep a souvenir of their English class. Finally, MyStorybook can be used as an interactive teaching tool or for evaluation. It is simple to create a story in class or at home, if a computer is available.

As a future ESL teacher, I would use MyStorybook, but with grade 5 and 6 elementary school students. It might be possible to use it with secondary 1 students in high school, but older students would not find this website very entertaining, unless the project proposed is challenging. Since it is so simple to use and to understand and since there are few functionalities, it is appropriate for younger students. I would also use it to evaluate their re-investment of knowledge and their writing competency. Moreover, it is a good tool to keep the students motivated in class, which is why I would use it for teaching new elements. Finally, I would recommend this website to every teacher, not only ESL teachers.

Noémy Lacasse
BEALS student

Anitales – Story Creator, Storytelling 2.

Children literature has been receiving an increasing amount of awareness these recent years. In many books made for children, images play a crucial role in helping the reader to understand new words and sentences. Sometimes, there is even an audio-recorded version of the text in order to facilitate the comprehension. Thanks to electronic books and new apps, it is now possible to learn language in a more interactive and a more pleasant way than it once was. The app “Anitales Story” is one of these new revolutionary app.

What is it?

Anitales story is a story creation app where the users can build an animated story and add different features to it. I’ll discuss the different use and possibilities for the classroom below, but first, we need a little background about the app. According to their product description on Amazon,

Anitales was created by a couple of parents who wanted to create an interactive and immersive world that encourages children to use their imaginations and have fun, whilst also improving their writing skills.

It is a brand-new app that came out this year on February the Nineteenth, and I have yet to find another app by their company, Mibao IT. There is very little details given on the creators of this app or on the company itself, but the overall rating on many different sites such as google play or amazon is always very high, 4.5/5 for the former and 5/5 for the latter. The app is a 100% free and there is no in-game purchase for additional contain.

Test of the App

The app is available on google play store and is not too big (48MB) when considering how much content is available for the users. Once the download is completed, you can open it and sign up with your username or create a new one. There is then the possibility to do different tutorials to understand how the app works. The app is very user friendly since it was designed so children could use it as well as adults. On the main page, there are different options given to the users as you can see in the picture below with clear options.

12952938_10209200545794450_1786151308_o (1)


To create a new story, all they need to do is to press “new story” and they will be brought to the story creation interface. The users first need to select a background such as a city, or a lake, and the sky color. They can then add different elements to the scene such as cartoon characters, objects, music, and weather. Drag-and-drop is the way to go to add new components to the story. Every new element you add can then be animated with a different feature

.12946891_10209197097628248_1104704006_o12922288_10209197097188237_1296473989_o

The animation interface is a small orange circle that appears when touching any element of a page. It allows the users to type a small text in a textbox and to use a voice recorder. The text and the audio will then be displayed and/or said by the character during that scene when reading the story. There is a 200-character limit for the text box and a 10-second limit for the audio recording. The users can also modify the different physical expression of the character when it “says” its text, and adjust the camera zoom if needed. There is also the possibility to add a narrator for each scene that will display a text and/or say a pre-recorded version of it.

12959286_10209202518603769_1858158203_o

To add other pages all you need to do is to press the small “+” sign at the bottom right corner of the screen. The scene will then be identical to the previous one but without the animations and the texts. The characters, the objects, and the background will be at the exact same position, so you don’t need to start from scratch on every page. You can also navigate through your different pages with the page editor interface. It allows users to modify both the text and the audio record of each character and of the narrator. However, you cannot change the play order of the quote on the page editor. This feature would be very useful to do fast editing without having to go back on each pages to do these modifications

.12970266_10209197094628173_443444257_o

Use for ESL

There are not that much professional reviews of Anitales – Story Creator since it came out a month ago, but I think digital storytelling apps should be used in the ESL classroom. It allows users to create complex stories with visual backgrounds, audio recordings, and texts. Classes nowadays need to be more interactive and engaging to the students.  As Melinda Kolk states it,

 The powerful combination of student voice and technology-rich product motivates students to perform high-level work and engages them in a process that helps make learning in the classroom relevant and exciting.

Indeed, Anitales is a tool that could be very efficient with elementary students. The easy access to basic graphic designing and movie editing can allow them to work on project that would otherwise be out of their reach. It could be used as a basis for individual project as well as team project. Indeed, every student can create on their own story, or work on the same story but focusing on different parts of it to produce a more elaborated one. Because of the overall cartoon style of the app, it might not be as well received by high school students who might find it too “childish” for them.


As a creative person who always liked to write and read stories, but who was terrible to draw or paint anything but potatoes, I would have loved an app like this one as a kid. As Glen Bull explained:

Digital storytelling is a particularly appealing use of an emerging technology for several reasons. It can provide a voice to struggling readers and writers who might not otherwise find an authentic means of expression.

It allows everyone to be equal when creating a visual story such as a comic for a language arts class. This is one of the reasons Anitales can be a very effective tool for ESL teaching. In order to help everyone to developing their English skills, we need different approaches to the teaching. Students who are very good with art in general might be more attracted by projects that use these graphic apps, while not scaring students that have terrible fine motor skills like me.


The app is only available in English or in Chinese, so students cannot cheat and put it back in French when the teacher is away. Another interesting point is the safe aspect of the app which was highly promoted by the founders of Anitales. As explained by their CEO and cofounder Jame Guo,

they [we] have created a closed social networking group, meaning that only a child’s real life friends will be in their friend circle. Unlike other social networking sites, there is no search function, forum, or live chat. Therefore users will need to know their friends exact user ID in order to add them.

Considering the growing number of apps available and advertised for school work, it is appropriate to have some restriction on the use of social network for the children in class. It also makes it easier to reassure both the school management and the parents on the use of this app in the classroom. There is also a time limit feature, which can be added to ensure a control over how much time each student can spend working on a digital tablet.

Final Thought

All in all, Anitales is a great app that could, and should be used in the ESL classroom because of the potential it offers to both the teachers and the students. It is a free and new app from a new company that I would recommend to every teacher in elementary school.


Blurb It

Numerous are the online sources available to all for creating books whether online or on paper. Some are widely known while some remain to be yet discovered. For those of you who haven’t discovered blurb.ca yet, you are missing out on something great.

blurb_newlogoIronically, I have introduced this online application with its own devise. According to its definition, blurb is a short description that praises something (such as a book) so that people will want to buy it.

Fortunately, blurb.ca does not need my praising as you will find out for yourselves what it can actually do, and for the simple fact that it is available to all for free.

Screenshot (9)


Research


After researching about this online application, I was pleasantly surprised by the extent of its usefulness. Various online sources are available for the users of this tool including a series of tutorial videos offered on the Blurb website. These tutorial videos are definitely worth mentioning as they are not your typical tutorials. They provide step-by-step procedures, offer expert advice, and most of them are close to an hour long!

According to the article Blurb Photo Book Review: Design, Print and Self Publish Your Photo Book, there are very few cons to the online application. These cons are that the website only offers book publishing, and that advance training is required for more complex software use. According to the author of this article, the Blurb BookWright and the Blurb BookSmart softwares, being able to create books offline or on a mobile application, integrating Adobe, the various self-publishing options, and the good customer service and online training, are the pros of this online tool. This article is worth the read as it describes virtually everything and anything related to the Blurb website and industry.

In another article entitled New Self-Publishing Options from Blurb and Book Design Templates, the author describes various advantages to the publishing system of blurb.ca. These advantages relate to printing, trim size, EBook conversion, software and much more. The author of this article illustrated her satisfaction of this tool’s publication system by saying:

I’d keep an eye on Blurb because it looks like they are aiming to become a viable alternative not only for your color books, but for standard black and white print on demand as well.


Personal Experimentation


Experimenting with this modern web tool was easy and pleasant. When it comes to creating a book, there were two software available (BookWright and Bookify) as shown in the picture below.

Screenshot (10).png

Once selecting one, creating a book was easy with the use of a selected template. These templates relate to various subject matter including baby picture books, wedding picture books, travel memories, and much more. With the help of a template and the various page layouts offered, creating a book is easier that you think when not having to constantly deal with formatting options. I will not go through the basics of designing the book pages as the software offered clear settings and directions as seen in the picture of the BookWright software below. There is nonetheless, a tutorial provided by the software to explain to users how everything works.

Screenshot (11)

However, I would like to discuss about when it comes to publishing one’s creation. I was surprised by the various formatting options provided by this web tool. These options include the type of the book cover, the size of the book, the type of paper used to make the pages of the book, the end sheets, the placement of the logo on the book, and much more as can be seen in the following two images below.

Screenshot (5).png

Screenshot (6).png

There was also a handy price list on one of the website’s pages which allowed to compare different pricing for different formats and quantities of books. Furthermore, the site provided volume discounts which can be useful for teacher who would like to publish various copies of a same book for students in their classroom.

Moreover, this online tool offers a wide variety of books for sail and distribution. There are various categories one can choose from when looking to purchase a book. These categories include history, education, fine art, photography, poetry, literature & fiction, children’s books, and much more. What is neat about the purchase section is that one can preview the books before deciding to order them as seen in the picture below. One can actually flip through the pages, not simply get a glimpse of what it might be about judging from the front and back covers.

Screenshot (2).png


Pedagogical Applications


There are various explicit and implicit pedagogical applications to this web tool that are worth mentioning. To begin with the obvious, blurb.ca is a fun way of introducing technology and literature in the classroom. The whole approach of the tool also ties into the world of media, introducing students to a subject they will undoubtedly run into throughout their schooling.

Other explicit pedagogical applications include: creating opportunities for students to express themselves through writing;  establishing a relation between subject matter such as art, language and technology; increasing student awareness about technological education-technology-picapplications; producing a final product which the students can actually hold and take home to keep; and providing a variety of books that can be purchased for the students to use in the classroom.

To continue with the less obvious, there are various implicit pedagogical applications to this web tool. Blurb.ca allows teachers to create different books for their students that can relate to the students themselves, their school, and even the topics being discussed in class. Making the subject matter interesting for the students ensures that the students give the teacher their full attention during a lesson. In this manner, one could introduce part of or all of the course material through created book which could eventually be used during further years to come.

Other implicit applications are found when students are asked to create books themselves by using the tool. When completing such an activity, the students will not feel like they are wasting their time because they will be able to get the end product. Such an activity is stimulating for the students which increases their motivation to complete a writing task. Furthermore, this tool can enhance classroom solidarity when the whole class works together to complete a book or a series of books.


ESL Teaching Applications


Although all of the previously stated pedagogical applications also apply in the ESL classroom, there are specific applications for the ESL class provided by this web tool.creative_writing1

Firstly, this tool can help ESL teachers evaluate their students’ English reading and writings skills depending on how the tool is used in class. Reading skills can be evaluated when students read ordered English books created by their teachers, peers, or unknown authors from blurb.ca. Writing skills can be evaluated when students have to create an English book or magazine of their own.

Secondly, this online tool allows students to be exposed to various different uses of the target language (English) through the production of different works such cook books, motivationnovels, poems, short stories, and many more. This is great to get the students’ attention as they might find something that interests them. When students like the task at hand and are interested in the subject matter, they become more motivated which is important when learning a second language.

Thirdly, blurb.ca allows students to read material that they actually really want to read. When the books are about themselves, their classmates, the school or any subject matter they have been discussing in class, students want to read them. This has the same effect as a subtitled English movie; even though students don’t understand everything the actors are saying, they keep on o-child-reading-facebookwatching because they can follow with the words on the screen. Similarly, when students don’t understand every word in a book, they keep on reading because they are interested by the subject matter. This is once again useful in the ESL classroom as interest in the second language is key in developing language skills.


Conclusion


After all is said and done, I can to the conclusion that blurb.ca is a tool that is undoubtedly very useful outside and inside the classroom. Such a tool provides wonderful opportunities for students to express themselves creatively through writing and for teachers to stimulate their students. The options with a tool like this one are limitless. It definitely deserves a blurb.

Create it. Print it. Sell it. Teach it. Blurb it.


Mélanie Lalonde, an ESL teacher in training from Laval University


Blurb.ca: Outstanding, yet suprisingly disapointing

What is it?

Did you ever wish to write your own independent book? Or your own magazine? Or even your own eBook? Or how about simply creating a photo album for a trip, birthday, or any other occasion you wish?

Ever since the vast advancement in technology in the past decade, people have slowly started having the opportunity to create, publish and even sell books without having to make some calls to a publisher for advice. The internet has many different programs to offer for book creation and publishing, but one of the biggest ones I have witnessed so far in Blurb.ca. And unlike some other recognized platforms such as Storybird or Storyjumper which are more focused on storytelling, this website goes beyond just telling tall tales.

Created back in 2005 by Eileen Gittins, Blurb.ca is a book creator platform, and it claims that it is a site that is easy to design, publish, promote, and sell professional-quality printed books and ebooks. Over the past decade, it has won many awards, joined with many other programs to grow bigger and published a great number of books for the public to buy. The site itself praises its accomplishments and states the many awards it got. But with all this big talk, does it live up to its reputation?

blurb_-20151109_creativepros_02

My personal experience

This site has a lot to talk about, and I was not able to look at every little thing that was accessible. Instead, I will talk about the relevant stuff that I noticed throughout my experience. I was also not able to try out some aspect, like the actual publishing and the final printed product, so I will only focus on the making of the book on PC.

Before even making a small example of the book, I was welcomed to blurb.ca with a lot of different options and possibilities. First, blurb.ca offers you a variety of choices of what your book can be. It is mainly focused on photo books of any kind, like weddings, baby pictures, trips, and more. You can also publish magazines, Cookbooks, Memoirs, Children’s Books, Portfolios, Business Books, Novels and Poetry. I mention this because Blurb.ca offers a specific template for whatever project you wish to work on. So instead of having to struggle to adjust your project with a unique template, you can start your project with a preset template, which can save you a lot of time. The format and the cover can also be chosen, and every price for it is mentioned.

There are also various ways in which you can create your book. Blurb.ca offers various ways to start off a project. You can use a downloadable platform called Bookwright, which is the one I tried out, or Booksmart users more used to Bookwright. You can also create your project using Adobe Indesign, Adobe lightroom, PDF, or even use social networks like Facebook, Instagram, and Flickr. Publishing your book can be done in three different ways. When online, you can sell your book trough Blurb itself, amazon and on the iBook store.

As for my personal experience, I tried creating a book using Bookwright. And as it is, the platform is pretty simple and straightforward. To try it out, I used old pictures from my college trip to Italy and tried making a photo album. What I was struck by at first was the variety of different model pages there were. Even if I had not started doing anything, at first, my book had 80 pages, and not one page had the same display on it. The only thing that could be put was a box to insert a text and boxes for pictures, but I found it quite nice to have so much variety in the different ways they were arranged. This way, instead of having to build my page from scratch, I could just take a page that closely suited what I needed and simply edit it slightly to my needs. Once again, I found this to be a time saver.

The rest of it was also pretty basic. Images could be taken from the desktop or from an added URL. Fonts, size, and colors for texts were varied. A practical option was present in the toolbar called the trim area. This allows the user to center the text and images so that they are not too close to the edges, similar to the way that texts are centered and aligned in a novel. This gives more freedom for editing because unlike Microsoft Word, where everything is safely centered, this means that you can use as much as the page as you want while being warned of what will not be printed out correctly. Finally, you can add info to your books, such as a description of the book, a personalized ISBN and more. When doing my album, I found it easy to navigate my way through the platform and did not need to consult more than one 90-second video to be able to work my way trough it with fluidity.

Pros and cons

In my opinion, I think that Blurb.ca is a legitimate book writing webtool. When I was using it, I had no problems whatsoever, and although I did not have the opportunity to complete a full album and try publishing it, I still thought that BookWright, Blurb’s book app, was easy to understand and use. The only con I found was that the service only offered standard hard and softcover books. However, when doing a bit of research, it did not seem like I had a shared point of view.

When visiting their site, Blurb.ca tells how good they are and how they have done a lot of improvements since 2005 (http://www.blurb.ca/company-profile) (http://www.blurb.ca/about-blurb). But aside from that, at least 80% of the reviews I have seen from users are negative. Ratings go from 2.4 out of 10 to 29%, and seldom did I see good ratings. From what I could gather, the negative comments are due to two main things, the first one being the final printed version of the books. One user stated “One big disaster! Avoid like the plague!” and “My book was printed with a lot of errors, with big stains extending throughout the pages.”. Another stated that “When I received the order one of the books was assembled incorrectly, and the other was someone else’s book”. Even some stated that the final layout for their eBooks was not made correctly, stating that “there was an issue with the layout of my eBook in that all of the line breaks were missing. My print preview contained the line breaks”. Many more comments state printing errors, and there seems to be a lot a variety in the mistakes that are made, which are not mistakes that I could witness firsthand, given I did not publish my book.

The other bad comment surging often is concerning customer service. One thing I did not mention was that Blurb.ca offers a customer service for anyone who has questions. I did not discover this until reading comments about it. One customer stated “I was not able to acquire the photos on my MAC using their instructions on the site, and they did not answer email requests for assistance nor will you ever get someone to answer a phone request”. Another said that “my customer support representative was out of the office after our initial contact and failed to hand off my issue to someone else in her absence”. A certain client under the username billiam1906 even detailed everything wrong that happened when he tried to contact Blurb, and it seems like everything went simply wrong. In short, Blurb.ca seems to have many problems, despite it being over a decade old.

Personal use in ESL teaching

But when everything is said and done, considering what is good and bad, I still think that this tool has some really good potential when it comes to teaching English as a second a language. Although I do not see myself using this for a big project, I can imagine that I could be using this to inspire linguistic creativity. Since some kids find writing texts boring, they can now use a software with not so unfamiliar settings to write their minds out. And since Blurb does not have preset images like in other book creating platforms, kids can easily search the web for anything they find interesting. When going on trips, which happens often in ESL classes, using Blurb as a means to create a photo album is also perfect. Instead of having them make a scrapbook, they can now make their own and share them with their class in a more elegant design. Finally, I see this tool as a motivation for creative students. Once they discover what this tool can do, they can independently write their own novels and be able to show them to their family and friends in a legitimate and conventional way. It would make them feel as if their work is taken more seriously now that it takes the form of a real book. In short, I can see the potential in using such a vast webtool, even with its flaws.

Gabriel Walsh

LitLift: Make Writing a Passion

Change your ways of writing traditional papers with LitLift tool where students can enhance their creativity and practice their writing skills at the same time.

What is it?

LitLift is a writing software where one can write an online novel or story for free. With LitLift, you can start writing as a hobby or start a bestseller. This software helps you to write, organize, store and share your stories (if you want so). The goal of the website is to promote writing and have people find a passion in writing.

litlift-writing-application-27246646

How does it work?

First, you will have to create an account by clicking on the sign up now icon and to fill in the required information or you can sign in with Facebook, Twitter and Google+. After you created your account, you can start writing. To write a book, just click on the “new book” icon on the right upper corner. You will have to give your book a title and a description in order to get started. Then, you will have the opportunity to add or to remove chapters, scenes, characters, settings and items. To add a chapter, you just have to click on your book(s) and click on the chapter icon and add one. You will have to give a name and a description of your chapter. To create a scene, you will have to add a name to it, a date and time and a body. To create a character, you have to tell his or her name, if he or she has a major or minor role in the novel or the story and a description of the character. You can add a random quirk or a random trait to your character. There are included features that you can modify or eliminate such as appearance, background, hobbies, mannerisms, education, occupation, family, ancestry, friends, questions and interviews. You can also create a random character by clicking on the icon “generate a random character” on the upper right corner. To add a setting to your story, you just have to say where it takes place and a description of it. Finally, to add items to your book or story, you just have to name it and give a description of it.

Sans titre.pngWith LitLift, teachers can get their students involved in many different ways. Teachers can ask students to write a story about anything they want or about a specific topic related to something they saw in class. Students could also show it to the class and present it when it is completed. Students could peer-review their classmates’ stories and give and receive feedback on their work to improve their writing skill. Instead of using Microsoft Word to write a text, using a platform like LitLift may play a role in students’ motivation since it is specifically made for writing texts and story. Writing a story is a task that can be done individually, but also in teams. With LiftLit, one student could be responsible to write about characters, another one about scenes, etc. or they could all brainstorm together and write everything as a group. This will enhance group work and we all know that two or more heads are better than one.

My opinion as an ESL teacher

I strongly believe that having students write a story or a book is an awesome way to have them enhance their creativity and practice their C3. What I really enjoyed about this website is the endless possibilities to add as many characteristics as you want for your characters. I really like the character traits generator, which is really helpful for students who lack inspiration. You can organize everything very well with this platform from scenes to chapters as stated in the writerholic blog. Unfortunately, one problem, as mentioned inthe fifth dimension blog, is that you cannot add characters from previous books in a new book. For example, if your book has 40 characters and you decide to write the following of the first book, you will have to write down each character again. This is a complete waste of time and it becomes a major problem when you write several books with all the same characters. Furthermore, the website, in general, is pretty basic. It did not attract my eyes and I thought it did not look very modern and appropriate for students nowadays. However, overall I think the website is great and is pretty complete for students who want to get more involved in writing. This software would be appropriate and would be of a great use in ESL classrooms.

Dorothée Grenier

TESL student

Storybird: An Online Storytelling Community

Stories are part of a child’s development. Children learn new vocabulary words through bedtime stories read by their parents, develop their moral sense through fairytales without even noticing, read short stories and novels for certain classes before analyzing various aspects in depth, etc. Stories indeed are at the centre of young children’s language acquisition and development. So when Storybird was first introduced to me, I could not be more interested and excited. This website not only enables anyone to create an account and then write storybooks, long stories and even poetry which can be paired with illustrations from the Storybird gallery; you can have access to all published Storybird works and read them without having to log in. The pictures at the disposition of every Storybird writer are all produced by professional artists: this website hires artists to paint and draw illustrations for its users.

Capture d’écran 2016-04-05 à 17.43.29.png

Storybird also has an educator function, which enables teachers to create private classrooms, host discussions, add assignments, review and grade students’ work, share creations and even raise funds by selling students’ stories in a book format. Your class’s stories will also be available to all of its students in a private library, and assignments handed-in will automatically be classified in both the class’s library and the assignment’s sub-library. Another tool, available for classroom management, enables students to collaborate with others, providing them with a list of classmates that are still looking for a partner. Classes can have an unlimited number of students and their accounts do not require them to have an e-mail; the teacher creates all of the students’ accounts and later hands them their code and temporary password. This way, class access is restricted yet easy to manage for elementary school pupils. The video aimed for educators using Storybird, issued by the creators of this application, summarizes all of the tools available and serves as a tutorial as well in order to master this application before introducing it to students.

Fostering Creativity

Educators using this tool all agree: Storybird helps students throughout the creative process and even provides a stating point to those having difficulties to find a subject. As classroom teacher Eric W. from West Ottawa High School mentions, “The pictures can inspire writers who aren’t sure where to take their tale, [but] are varied enough to provide room for creativity” (www.graphite.com). Illustrations thus foster creativity yet do not impose any subject or guideline to users. Writing a short story with images using Storybird could be a great alternative to the classic narrative assignment, this being more fun than writing one in class and offering a fun closure project to a unit about story elements as mentioned T.P., a technology teacher in New York (www.graphite.com). Students also seemed to be more engaged in the activity because it was different and new. Personally, I find this tool marvelous because it inspires students who are not necessarily into writing, whereas it provides high quality and unique illustrations that will surely enhance stronger students’ work. I adored the fact that I could make short story book to read to kids at work, during nap time, as well as to add images to the longer stories I write in my free time. As a future ESL educator, I plan on using this tool for the ending project of a narrative unit or even to create picture books containing all vocabulary words to learn every week. Capture d’écran 2016-04-05 à 17.47.44.png

For all Grades

Another positive point about this tool is that Storybird can be used will all kinds of students, from kindergarden to college. Indeed, as previously mentioned, literature is part of every children’s development. A kindergarden or a first cycle elementary teacher could easily write short story books to read to their students. It is a fun way to integrate new vocabulary words in a personalized story, with content that attracts pupils attention. Another use of Storybird is to publish the final version of high schoolers’ modernization of a fairytale for example, which is a common project carried out with secondary three to five students. Classroom teacher Allison T also mentioned that she “used this for [her] Parenting & Child Development students to create books to teach about the importance of reading and books for children during the toddler years” (www.graphite.com), in college. Since the Bacc. for teaching English as a second language enables me to teach both elementary and high school students, I try to discover tools that fit all of my possible clientele. Storybird is a good one in my opinion, as it only provides a canvas for creating unique story books to either activate and trigger younger pupils’ creativity or even to provide a visual support for older students’ work. Children at the daycare I work for loved the workshop I built with Storybird. They were between four and eight years old, and they enjoyed brainstorming from the pictures I chose and then writing together a story. We made three teams and at the end, each team’s educator read the final products to the others. Children loved it and parents were surprised to learn that they could find the stories with the links shared on the school’s Facebook page. This is definitely an activity I would carry out in an ESL class later on.

Share Stories

A great point about Storybird is that you can share your stories on many social networks, as well as share the link to your latest creation with others. Technology and arts teacher Capture d’écran 2016-04-05 à 19.39.24
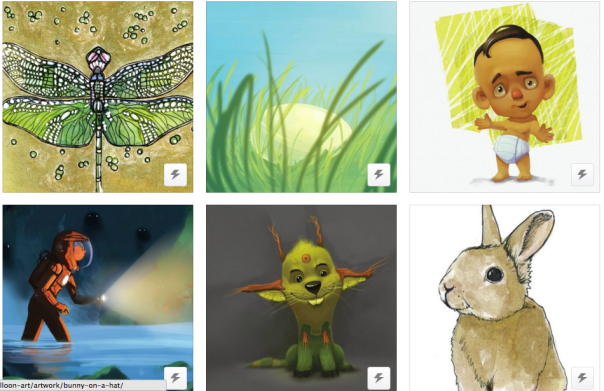
T.P. also noted in a review about Storybird that “students did love publishing their finished work, sending links to share it with their families, and tagging stories with descriptive terms” (www.graphite.com). One can share on Facebook, Twitter, Pinterest, Instagram and Tumblr, or send a link to it via text message or e-mail. The possibilities are almost endless with this tool. I feel that the sharing option is very important these days since technology is becoming more present in the educational system. It also makes students’ work accessible to parents, which they like a lot. As I experienced with my kindergarden children, students were proud to show their story with their parents, and the latter were glad to keep trace of their child’s work. As a future ESL teacher, I place communication with parents in my top priorities. I think that involving parents in their child’s school life is crucial and a simple thing such as sharing a story made in class can have a great impact. Parents trust you and a long-term relationship can be developed through small details like this, helping if the student struggles more at school.

Some Issues

When exploring the many functions of Storybird, only two problems stood out: the impossibility to upload personal illustrations and to record one’s voice reading the story. Eric W (www.graphite.com) and  Breanna D (www.graphite.com), two English classroom teachers, supported my point of view through their personal reviews of the application. Indeed, I think that an upload function would benefit artistic students as they could build a story book from scratch and share it with their peers. As for the recording option, it would be of a great help to practice students’ pronunciation as well as to help students with special needs to better understand the story presented by the teacher. I intend to use Storybird in my second practicum to present vocabulary words in a new and fun way to elementary students, and having the words recorded combined to an illustration of the object would greatly help younger students. Learning words would never have been easier, since they would have a visual support and immediately learn how to pronounce it. However, the downfalls of Storybird are not major and thus the application is a must try for ESL teachers, as well as for every language teacher.

Agathe Poirier

Bookpress: the Free and Easy Way to Write your own Book

What is bookPress

BookPress is an app for Ipad that allows students and teachers to create all kind of books. This app was developed by Bookemon, a platform that promotes the creation of educational online projects on Ipad and Iphone for free. With bookPress, teachers can create books such as recipe books, yearbooks, storybooks, children’s books, etc.

My experience with bookPress

When I downloaded the app, I was very surprised to see that there was only one version. For what I have seen with applications dealing with book creation, most of them offer at least two versions: either free and paying or original and educational. I was also disappointed to notice that there were no tutorial to learn how to use the tool when I opened the app for the first time. I had to learn everything on my own. To be honest, it did not take me long to master bookPress. However, I would have liked to have an overview of the tool before starting using it. I would have felt more equipped and in control of the project I had planned to do.

I decided to do a recipe book to test bookPress. When you click on the New Book + bouton, a menu showing all the project possibilities opens. I selected the Cookbook tab and then, once again, a menu showing all the available templates opened. Once again, I was slightly disappointed when I saw the templates. I thought they were rather dated and  looked a little bit kitsch. Of course, this is a minor and esthetic detail but, I believe that with all the other app on the market focusing on the same goal as bookPress, I think that this detail make the app far behind all the others. As a teacher, this detail would have bothered me and I would maybe have chosen a similar app instead of bookPress for this reason. Plus, the templates did not allow major modifications. It is a good thing if you do not want to bother with what your project will look like. However, I felt like the book I created was not mine. Since, I could not modify the background or the main colour of the recipe pages, I felt like I could not make this project mine. On a more positive note, the templates I looked at were well designed and easy to use. I was able to do my project in a couple of minutes without any problems.

On a ESL teacher point of view

According to ecucationworld.com, a website that povides teachers, administrators, and school staff lessons templates, classroom-ready resources, reviews of apps, etc., using bookPress is

“A quick and efficient way to make your idea a reality” .

I agree with ecucationworld.com, this app is simple to use and gets the job done.  The concept of bookPress is a great way to incorporate technology in a redaction project. Teachers could easily have students download this app on Ipads ( if they have access to them) without asking for money to the school since the app is completely free. Of course, teachers would have to take some time to explain to the students how to use the app due to the lack of tutorial. However, this task should not take long since bookPress is quite easy and simple to use.

On teachinglotewithipads.wordpress.com, a blog that offers teachers’ review of applications, one teacher said:

“I quite like this app as it is intuitive to use, making creating a book a very easy process. I created this eBook in less than 5 minutes.”

In conclusion, I believe bookPress is a good educational tool. It offers a wide variety of project options and could be used with students of elementary and high school. In addition, it is easy to use and since it is free, it is accessible to everyone who has an Ipad. With a slight upgrade of the templates, this application would be almost perfect.

My Storybook: Creativity Simplified

Reading and writing have tremendous value in the acquisition of a foreign language. They allow learners to identify new words in contexts that make sense, to consciously or unconsciously take note of how words are spelled, and to learn new vocabulary in a more exciting and less restrictive environment than a classroom. But in a society where technology prevails, some children and teenagers might feel like reading books in a library is an outdated activity. My Storybook (2014) seems to understand that and created an interesting application that allows the creation of personified books.

What is it?

My Storybook describes itself as a website that allows people of all ages to

         Create a storybook [and] make your story come to life.

Children, teachers and parents alike can create little books by writing texts, adding characters and backgrounds. While anyone could use this app for personal use, it also has an interesting pedagogical value.

How does it work?

My Storybook is astonishingly easy to use. As soon as someone gets on the main page of the website, www.mystorybook.com, he or she can start making its own electronic booklet. No need for registration at first. It may be needed later though, as you may want to save and/or share the story. An important fact that may suit schools and school boards very well is that the website can be used for free by anyone. My Storybook is more a community website than a company looking for profits. the website users also have the option to print their booklet in high-quality hardcover for 5$. It is interesting if a good book has been made by a child and he wants to keep it as a souvenir. The money will be used to maintain the website’s basic needs.

369636_orig

When you start doing your first storybook by clicking the big “Create a storybook” button in the middle of the website’s main page, you are redirected to the creation tool. You will find the first page, four buttons on the left (Items, Draw, Text, and Scene), a slide line of all the pages as well as a “Add Page” button. There is also a tutorial button on top of the screen that contains a little slideshow of seven short videos explaining the basics of the app. By clicking on the “Items” icon, a small window will appear on the left of the screen and will let you choose from a selection of images to add to the page you are on. You may add characters, animals, buildings, and so on. The character’s features are customizable, but the other elements are not. It is also possible to import images from the web of from the hard drive. The “Draw” button allows the creator to draw more specific things, since the range of available items is quite limited. Drawing may be a little hard though, as it requires a good amount of talent to draw something appealing. This feature is pretty much like the Paint tool that is on Microsoft computers. It’s still fun to use and children may like it since it allows more creativity. The “Text” icon is the main item that will be used to write the story. While it is possible to change the title just by clicking on the title that is already there (My First Storybook), texts will first be written in a box that opens on the left of the screen when editing the next pages. Finally, the “Scene” feature makes it possible to add a background to the page. Everytime a modification is made, the stroybook is saved on the account. It should also be mentionned that the size of everything except the background can be modified with the mouse, just like a picture in about any application.

After completing the storybook, you can save it if you have registered. You can either save it on your profile as a private book or publish it in My storybook’s library. A user can also modify his or her storybooks at any given time, even if has been previously published.  In the library, there are four sections: “My Books”, “Featured Stories”, “Classroom Resources” and “Community Storybooks”. The first section contains the storybooks that the user saved on its account. The second one features storybooks that are new and well done. The subjects of those books vary a lot and while some may be of use in education, some are more personal to their creators. The third section has a few school booklets that can be used in the classroom. They are for different subjects, but since the website is only two years old, there are only three published booklets in this category. The last section, “Community Storybooks”, features stories of about any subject. Some are pretty basic and probably made by children while some are more complete and demonstrate that the author gave a lot of time in its work. While testing the website, I decided not to publish my own storybook since I kept it pretty basic and simply wanted to test the tool. You can still see the result of my work by clicking on this link.

Opinion as an ESL teacher and potential use in education

As an ESL teacher, I think that this tool has an interesting potential for pedagogical use. As stated previously, I consider that reading and writing are as important in a student’s learning process than verbal proficiency, even though a lot of activities are generally based on conversation. Therefore, using My Storybook as a tool for a school project may be a good idea, since students would be able to be creative and practice their writing with an attractive and entertaining environment. I would use My Storybook as a project after completing a unit. I would give a list of words and expressions to include in a story by the student. Specific details about individual or teamwork, and difficulty of the words must be adapted to the group the activity is presented to.  The benefits of this kind of application are that it may break the monotony of regular English classes, it stimulates the interest of students through technology and it doesn’t restrain the work on a project to the school since it can be used at home. As mentionned by Amanda Hartnell,

Students brainstormed words they know & we turned it into a book they can access at home!

What is highlighted here is that the final product is accessible on any electronic device with an internet connection. Students can use the tool at school, of course, but also at home, which is great since there is much less limitations for students who wish to work more on the project after classes. It’s also fun to keep track of a project you did after the year is over.

Also, when thinking about the use of technology, Mrs. Wood thinks that

This website is a great use of technology because it allows students the opportunity to create something that they may be reluctant to create using simple pencil and paper. The tool also allows students to access other storybooks created by their peers as well as share theirs with the world. This opens up the walls of the classroom and also inspires students to create something of a higher quality. 

I agree with her. It’s not every student that is extatic about the idea of writing something with a paper and a pen, far from it. The idea of writing a story on an app with pictures of characters, animals, buildings, and backgrounds, on the other hand, may catch the attention of a few students. The creative aspect of the tool is something that students may appreciate, and the fact that everyone has access to interesting final products, students may get inspired by what they see or read and they might try to innovate and use different items.

Overall, I think that the potential of this application is pretty good! the fact that it is free and really easy to use, even by people who are not used to navigating on the web. It may be used in many ways: as a short project for a unit, as a common activity in class as a whole group, as a year-long project, etc. As long as the teacher takes in consideration the needs of capacities of the groups in reading and writing, Mystorybook.com will probably prove to be an efficient to trigger the students’ creativity in a way that benefits the collective learning.

Frédéric Masson

Inklewriter; Making writing fun again

Interactive stories are a very popular genre amongst kids and pre-teen.                                     
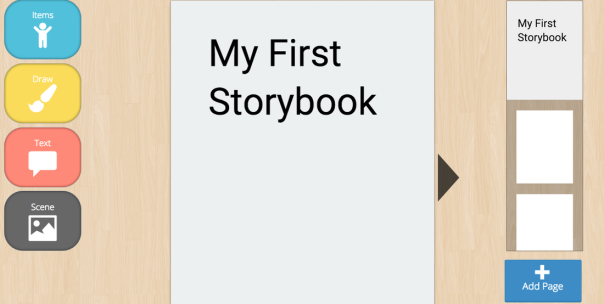
I remember as a kid reading the Passepeur series and reading each book several times in order to know how the story could have ended differently. These books, even though they were first written in 1997 are still read by tens of thousands of kids all through the province of Québec. As a kid, I remember being so obsessed with these books that I tried to write one myself only to fail because of the sheer difficulty of writing an interactive book. But what if there was an easy way for students to write their very own interactive story? Well, now there is. Inklewriter is a website that lets people easily create their own interactive stories.

The interface is quite simple and it does not contain too many functions, which is, in my opinion, very good because it prevents it from being overwhelming. Nigel Lane, an Irish English teacher also thinks that this uncluttered interface helps students focus on their writing. Because of this interface, it was very easy for me to learn how to use it. To this end, the tutorial available on the website were a great help. They showed me the basics of using the tool. In as few a 2:56 minutes, I was ready to start writing my very own story.

The picture below is the interface with a few personal annotations which highlight the most important features.story

An interactive story is like a tree, so step one is to create the trunk. The trunk is the introduction. In this paragraph, the author sets the mood of the story and introduces the main characters. At the end of the paragraph is where the interactive part of the story begins. All you need to do is click on “add option” and write and add a choice that your readers can make. Do this as many times as you want to create the first branches of the metaphorical tree. For each branch, you can continue the story, add more branches, or have two branches connect (run paragraphs together). The website makes it easy to keep track of the story using the map tool. Using this tool, it is possible to connect branches, click on any paragraph to modify it and, of course, keep track of the story’s structure. On another note, the toolbar on the lefthand side of the screen allows the author to add a picture to his/her story, to change the text (bold/italics), to run paragraphs together or to insert a new section (paragraph). When you are done with your story, just click share, and you will be given the link to your story. These are the most important features I understand about inklewriter.  Here is a story I have created for young elementary school children. The creation of this story was very simple and took me less than fifteen minutes. A similar story could be read with the whole class who would vote for the outcome of the story. Another thing which seems useful is the if option ( if
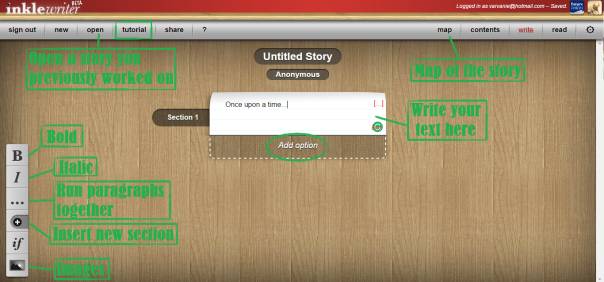
) on the site, they say it’s used to insert a condition to a test, but it vaguely sounds like a programming term, and I am honestly a little bit scared to find out what it is. If you know, you can tell me at virginie.gagne.5@ulaval.ca

This is what the map of my story looks like.story map.png

In their review of Inklewriter on the website teacher first, Joseph Humfrey and Jon Ingold were also very positive about this tool, also noting that the tutorials available on the site were easy to follow and very helpful. They also warn teachers who would like to use the tool that it is mainly for writing fiction, but that it may be used to“write an opinion piece with branches for people to ask click on questions about facets of your argument”. This is the only drawback I have found for the website, and, in my opinion, it is not a major one.

Another important thing they mentioned in their review was a very interesting option for teachers who want their students to create an Inklewriter account: it is possible to create an account without an E-mail. This is a very handy option since not all students have their own e-mail address. This easy process is described on Inklewriter’s website:

“Just give each student a unique name (including the school name), and enter that “@inklewriter”. Then give them a password, so that if they forget it, you can remind them.”

Having an account allows you to save the story, which can be useful. Subscription is also totally free, which means it is accessible in all schools.

In my opinion, but also in  Joseph Humfrey and Jon Ingold‘s opinion, it is very important to read a few stories written by other users in order to fully understand the structure of an interactive story. In a classroom setting, it could be fun to have students read an interactive book just before writing their own! According to Victor Epand, interactive stories are great fun for children to read because they combine the best of video games and books; the storyline of a book and the ability to influence the plot of a video game. Reading such a story, students will feel like they have something to contribute to the story, and thus feel more excited about reading it. This was, I as have mentioned earlier, very true in my experience. As a kid, I used to read these kinds of books dozens of times in order to see all of the possible outcomes, and I would always beg my mom to buy me more of these books. Some have also written adaptations of classic novels such as Sherlock Holmes or Frankenstein. This could be a great way to make classics fun to read for high school kids, especially for ESL students who most likely do not have a sufficient level of English to read the original work. I also think writing an interactive story could be a welcome change for students who will surely feel more excited about doing their writing assignment. Moreover, a skilled teacher A great project to do with students could be to have them adapt a story to make it interactive.This would be a great project to do in an ESL classroom because it would easily allow the teacher to check for comprehension; if a student has read and understood the key elements of the story he has to make interactive, he/she will not be able to complete the task.

Another feature which is great about Inklewriter, is that one can make his/her story as simple or complex as they wish, thus allowing for a lot of creative liberty. More importantly, the story can be as long or as short as you wish, which can allow teachers to use the website with different grades

The online reviews written by teachers that I have read (Joseph Humfrey and Jon Ingold, and Nigel Lane ) all point to the importance of planning the outline of the story before starting to write it, so as to avoid students getting lost in their own stories. I totally agree with their opinion, since, when writing my own story, I was starting to get lost.

Finally, I would recommend Inklewriter for any teacher who is looking for a great way to make writing and reading stories exciting for school kids. I would like to spend a little more time working with the tool myself in order to feel comfortable answering questions they may have about it. If in three years when I finally get to be a real English teacher, the website is still up and running (God knows the Internet changes so fast) I will surely be using this great tool with my students

bookPress

“From cookbooks to story books, photo books to yearbooks, bookPress allows you to write and design any type of book you want !”

What is bookPress

The bookPress app is a tool that lets users create high quality books from an Ipad. In fact, It lets you build any type of book, with multiple creation possibilities. This App is available on the Apple App store and is entirely free. The App was developed by bookemon, a company that works on developing other Apps for creating books. On the developer’s website, more information on the App is available, like a video presentation.

How it works

Using bookPress is fairly simple. In fact, after signing up, you can start creating your book. You first start by choosing from a variety of pre-made templates or create from scratch you very own unique realisation. Then, you can add personal pictures, text, and different backgrounds, while using their multiple tools for editing. Once the book is created, bookPress lets you share your creation through multiple channels; email, Dropbox, Flickr and other different social media outlets. It also offers the possibility to the writer to order and receive their book in hard or soft cover.

My experience

When trying the app, the first thing I realized when signing up is that they offer a platform for educators, from which you can get benefits and create an edCenter. The edCenter offers educators the possibility to create a private group for their class, have access to their students’ accounts, gives access to management tools and offers accessibility on mobile devices.

FullSizeRender

The next thing I realized is that there are loads of templates to choose from. In fact, it is what I found was the best part of this app. Indeed, when choosing to create a new book, the App first lets you choose from a variety of themes (yearbooks, cookbooks, storybooks, and more). Then, you can select what type of style you want your book to have and download the appropriate template. It also lets you choose a blank template which is easy to change and add information to. Unfortunately, downloading the pre-made template you like takes a lot of time. In fact, it took more than 5 minutes for the template I choose to download onto my iPad, which is pretty long and I would imagine it to be a waste of precious time in class when building books as an in class project.

IMG_0037

Furthermore, I realized is that, at first, the functions are hard to find and use. After using the App, I find that the functions are the biggest downfall of bookPress; they aren’t intuitive to use and more complex than one might be used to. On the other hand, the App does offer a link to bookemon, the developer’s website. Once on the website, tutorials and other tips are available to get more knowledge on how the App works and how to use the multiple functions offered. I feel that after listening to the tutorials and testing out the App I bit more I would get more used to the functions and would be able to use them with more ability. When you are done creating your book it is very easy to export and share, which I find is also very convenient. Overall, I found the App a bit hard to use but it did offer lots of creative possibilities.

Educational functions

Overall, this App seems to please all of its users, even teachers. In fact, a sixth grade teacher blogged that after looking for a book creating App to use with students, “This app fit my needs perfectly – free, no size limits, and appropriate for use by older kids.” While searching for a good book creating app, this teacher found a lot of problems with the other Apps already on the market and she found that their biggest downfall was the fact that they all seemed too childish. This is something I also realized; most book creating Apps are very simple, which means they are fit for younger children and this can also make them seem childish. Being simple could be an advantage if you work with lower grades, but this teacher stated that this App was able to challenge her students and have them make more age appropriate books. Even though while testing the App, I found the functions hard to use at first, I do believe that once you look at the tutorials and learn more about how to use it, bookPress does in fact offer lots of possibilities for creating a book. Another website, TeachersFirst, also reviewed the App as being great for more advanced students. Indeed, they stated, “This is one of the best creative tools for gifted students to go above and beyond regular curriculum. Don’t let the “juvenile” appearance fool you.” As a future ESL teacher I agree with this these opinions; having students create more age appropriate project can be more motivating for them. Some other Apps can be more adequate for younger students, finding one that is better suited for your students’ abilities will certainly be more pleasing for them.

On edshelf, a website dedicated to finding new educational tools, reviewed bookPress as great App for student engagement and pedagogical effectiveness. Edshelf also stated that it is great for educators since it offers to create an edCenter. As mentioned when trying out the App the edCenter offers a lot of possibility for educators. As a future ESL teacher I find the option of creating a type of online classroom a great oiption since you can help and monitor your students. The edCenter also offers a great platform for students to share their work, which as a future teacher I believe can be fun for students to share their book and see other students work. An edshelf user, Christa Fairman, also commented on the bookPress review that it is also interesting to give students the opportunity to share their project to a world audience. This aspect is also interesting, because students can then compare what they did to others around the world. This could be a very interesting aspect for students learning English as a second language, since they can see books written in English from people around the world and be exposed to the English language in a whole new way.

All in all, I would recommend this App to high school teachers with technology savvy students.


Dominique Falardeau

Future ESL teacher

StoryJumper: How to Become a Writer

What is StoryJumper?

StoryJumper is an online tool that helps you create your own books and publish them online for free. You can also decide to print the books you created yourself or to order a hard or soft cover version of your book at some extra charge.

storyjumper

According to Bobby Travis, “Storyjumper is an awesome way to encourage reading and imagination. “

In her review of the online tool, Polly Conway says that StoryJumper is a tool that helps kids create their own story from A to Z. She also states that it is really engaging and pedagogic, but also that it is easy for students to have some help during the creation process if ever they need it.

How does StoryJumper work?

StoryJumper is a well-designed website that provides you with tutorials and really helps you during the whole creation process. When you sign up, you can choose the option “I’m a teacher” and enter your school’s ZIP code in order to get student logins. This way, your students can have access to book creation on StoryJumper without having to register (which is awesome if you are working with students under the age of 13). Then, once your account is created, the website directs you to a tutorial that shows you the basics you need to know in order to easily create a book using this web tool.

On your “Home” page, you can see the books you created, suggested books that were created using StoryJumper, a book from a recently published author as well as the books that you like. This is mostly the place where you can find all what you are looking for. I you entered a school upon registration, you also have access to your dashboard and to the Write-a-thon Fundraiser. On the “Library” page, you can look at all the different books that were created and published with this website. Then, you have the “Help” page which directs you to the “Author’s Guide”. Finally, you have the “Prices” page where you can see the different options when it comes to printing your books

When you start creating your book, you can choose to either have a blank book or an animal book that provides you with animal pictures that are already put in the book for you. The creation process is really easy thanks to StoryJumper! You basically have an empty book that you can fill in with scenes or photos. Then you can add you text boxes, text bubbles or props. A lot of photos are already at your disposal on the website, put you can also decide to download your own photos.

book creation

Once your created and saved your book, you can see it on the website. A neat option is that you can have your book translated in more than 40 languages. I tried the translation option and what I wrote was well translated, if ever it is not, you even have the option of improving the translation.

StoryJumper in the ESL classroom

There are multiple ways to use StoryJumper in an ESL class. You can have your students write a short story individually and then put it in a book format with pictures using the online tool. You can also collect the poems your students did in a Poem Anthology that you will be able to print and distribute to your students. You can also have students work on different kinds of poems by creating their own book with various types of poems as well as poems analysis and you can also have them include some figurative language that they used at the end of the book.

“My students wrote historical fictions that took place during the colonial times. My students researched the time period and wrote many drafts to perfect their stories. Being able to publish their work into REAL books through StoryJumper was very exciting. My students were very proud of their work and they were thrilled to share their books with their peers and their families. The Write-a-thon was a great way to raise the money needed to purchase the books. Thank you StoryJumper!” Amy Barnard

StoryJumper can also be used in an ESL class as a fun visual support that can help you teach new notions (see this example on Poetry Lesson). You can of course create your own little story or try to find one that has already been made in the library section. Another fun way of using StoryJumper is to introduce a new theme (see this example on sports).You can include new vocabulary in a story or put different new concepts in you book to introduce the theme to your students. If you have younger students, you can also use this web tool to tell stories as a whole group. If you have a SMART Board, you can put the book big enough on the screen for everyone to see it and you can read them a story you made or one you found in the library.

As you can see, there are various ways of using this web tool in your classroom to get students’ interest in your projects or in your lessons. I think that if students have to write a story while knowing that they will have to create their own online book and that they will later have it hard or soft covered, that it will be a REAL book, they will be motivated and will try to do their best. Finally, by using the teacher dashboard, it is easy for teachers to review their students’ work and even send it to parents if they wish to.

publishing options

Another important aspect of StoryJumper is that you can choose to pay if you want to have a hard or soft covered version of your book. However, it is not every parent that can afford the 15$ or 25$ to get their child’s book. StoryJumper created a nice fundraiser, the Write-a-thon Fundraiser, in order to help students collect money to buy a printed version of their book. Basically, students need to find people to sponsor their book. Each sponsor also receives a digital version of the student’s book. I think that this fundraiser is an efficient and easy way for students to get their books printed for  nothing or almost nothing, depending on how much money they collected with the help of their sponsors.

My opinion

I think that StoryJumper is a well-designed website that enables you, as a teacher, to create interesting projects. It sure is more motivating for students to write a story and to create a book using this online tool instead of only writing the story itself on paper. Moreover, the book creation process with StoryJumper is clearly faster than doing a book with paper and colouring pencils. I think that there are so many interesting ways to include StoryJumper in an ESL classroom. As a future ESL teacher, I would surely use this tool with one or more project when I’ll get the chance to do so. Finally, one thing I would recommend before using StoryJumper is that students should plan what their story will be and what text will be on which page before getting to the creation process with the online tool. If students already know what their story is, the only thing that they will have to do is to choose the different pictures, scenes and props to add to their book. This will make the creation process a lot easier and faster once they will have the computer in front of them.

Christine Poulin, future ESL teacher

Express YOUR Ideas with StoryJumper

What is StoryJumper?

John Yen and Peter Weck are the founders of StoryJumper in 2009. They believe

“StoryJumper is a leading education tech platform that makes it easy to publish your own children’s story book.”

StoryJumper is a website that allows children, students or teachers the possibility to create, illustrate, and publish online stories. Moreover, StoryJumper is one of the top-rated websites for story creation because it is easy to use. This platform is student friendly, since they have the chance to manage and edit their own work.

What does it offer?

StoryJumper offers various tools for story creation by all ages. It provides a simple interface that anyone could use, which makes it even more fun. There is no specific need to go on another internet page to browse for pictures because on the webpage itself, you could simply search with the graphic tools already offered. For instance, I wanted a picture of a castle; therefore, I typed it in the picture section and approximately 100 pictures of castles showed up in less than 30 seconds. It is a quick and understandable educational platform.Screen Shot 2016-04-04 at 7.40.08 PM

StoryJumper is a free website, where all the necessary tools are provided for any students or even yourself to create and to publish an amazing story. Everyone is able to print a small size copy for free. However, some publishing options are offered, for your story to be more like a real book. You can create a hardcover book for $24.95, to create a paper pack it is $12.95, and $1.95 for unlimited digital downloads of a book.

My Experience

First, when I visited the website, I created an account as a new user, but I was offered to sign-in as a normal user or as a teacher. I chose to sign up as a teacher to look at all the tools offered for a teacher. However, I was asked to enter my school zip code and my school’s name.Screen Shot 2016-04-04 at 7.33.00 PM

Afterwards, I had to create a password for my students to have access to my classroom. The virtual class remains open for 90minutes, but I can re-open a class whenever I want, since I am the host for my students’ page.

Screen Shot 2016-04-04 at 7.33.38 PM

Second, a tutorial video is offered. I took the time to watch it, since I had no knowledge about this webpage. It showed step-by-step how to create a short story with many tools. Then I tried doing one myself, by adding pictures and texts. All your story pages are shown at the bottom of your work and it is available for you to move them around.Screen Shot 2016-04-04 at 9.20.08 PM

I found it really practical because, like in Google Drive, it has an auto save option. Therefore, every time I edited and changed something, it auto save, which is awesome for young students because they do not have to worry about saving their work. However, there is also a “save and close” option on the top right corner of the webpage. Once you are done and happy about your creation, you can simply print it out, save it online, and even share it via social media.

Application in ESL teaching

StoryJumper is a well-organized webpage and easy to use for teachers, as well as for students. Here is a guide for teachers to get an overview of how the platform works. It is detailed enough to follow the procedures step-by-step. To help teachers get a head start with Story Jumper, there is a worksheet that helps students plan out their writing process by staying on task. It is also easy for teachers to go back and look at their students’ work, since they have to accept it before publishing it online. It is safe because students’ work is supervised and must be approved by their teacher before posting it online.

StoryJumper is a good and practical webpage for ESL teachers because they can look at their students’ stories and observe their mistakes. Afterwards, teachers could cover some focus grammar points, on the students’ most frequent errors. With this story-writing platform, students can enrich and develop their writing skills more efficiently. Furthermore, it is useful for ESL teachers to demonstrate new subjects related to writing and language.

Personally, as an ESL teacher, I would use StoryJumper because students develop more  language skills when they practice. Also, learning comes with doing, therefore, involving technology into students’ learning only increases their knowledge.

For example, Cody Huseby uses Story Jumper with his 3rd grade. Young students as in third grade can easily create fictional narrative stories, so imagine what 6 graders can do. This tool helps students promote their strengths and ideas into writing.

“My students wrote their fictional narratives using Story Jumper. They loved the illustration feature and the fact that they could include themselves in the story. We synced it up with Google Drive and many of the students completed their own illustrations or had their classmates take pictures of them to use in their story. The parent feedback was very positive. My students loved their Story Jumper books as keepsakes and got to show it off to the rest of their family.”

Nevertheless, younger students might need more help and guidance throughout the book creating process. In addition, StoryJumper only has a webpage, so students must create an account to be able to use it. Also, having younger students create an account can be more difficult and can end up by taking a lot of time.

I would recommend StoryJumper in ESL teaching because students can have fun creating their own stories while practicing their writing and language skills. For instance, my cooperating teacher in my first practicum used StoryJumper with her sixth grade intensive English. They spend a whole afternoon creating stories to practice their understanding of the language. Students really enjoyed the activity and did such a good job that my teacher chose a few stories and had them published in hardcovers. Elementary students adore this webpage.

-Jessica Kempf, TESL student

Blurb’s BookWright: Publish Your Own Book!

Blurb’s BookWright is a self-publishing platform used for creating books, magazines, ebooks and photo books. It is accessible to all levels, no matter your experience (or lack of) with such tools, and it allows users to print their book or save it as a PDF file once it is completed. Furthermore, using the platform is free of charge – fees only apply once you are done and wish to print your book. BookWright can be used offline and as an app.

How It Works:

First, you must go onto the Blurb website, create an account on BookWright and download the software onto your computer. Once you have opened the software, you have the option of clicking on “create” to start a new blank book or of building-on one of the templates already integrated in the platform.

create book
Welcome to BookWright!

Next, you must choose your desired page format (size).

book format
Selecting a page format.

You can then begin working on your book! Choose the layouts you want for each page and insert pictures and text as you wish. If you are online, pictures can be imported from Facebook or Instagram. They can also be uploaded directly from your computer.

With this same file, when you are done working on your layouts, have finalized your corrections and are satisfied with the final resul, you will have the possibility of printing the book (hard or soft cover), of creating a PDF file (which you can then print out by your own means) or of creating an ebook.

Layouts
Creating a Photo Book.

You simply upload the book and it will automatically be saved in your Blurb account. You will be redirected to blurb.ca, where you will have the possibility of buying and selling your book in the chosen format.

My experience with BookWright:

I enjoyed my experience with BookWright. I found the platform very simple to use and when I needed help for the creation of my book, a lot of support was available (e.g. online tutorials, forums, instructions, user guides, etc). I have started creating a photo book for one of my past trips and I have no difficulty working with the different layouts and integrating text and pictures to my pages.

Blurb doesn’t provide the editorial services you’ll find at other publishing platforms, but it offers unmatched layout tools and support. – Denise Olsen

Like Denise Olsen mentions, Blurb does not offer editorial services like other self-publishing platforms such as lulu.com for example. If you choose to work with BookWright, make sure to pay close attention to spelling mistakes and to proofread your text several times before getting the final copy printed out. On the other hand, I found BookWrighter to be a lot more user-friendly than other platforms like lulu.com.

I cannot say what the final result will look like, but from the comments I have read, the quality of the pictures and of the final product are rather good.

I’m pretty impressed with the quality of the printing, I had shots from a variety of sources, that all came out OK, with some being better than expected and some a bit worse, but the full double page spreads […] looked great, so I know that it’s up to the task if the image starts out at a good resolution. – Ben Pascoe, Professional photographer

BookWright and ESL Teaching:

With a little money to spare, many interesting ESL projects can be built using BookWright.

One idea is to create a book with a collection of short stories written in English by the students. This would be a great idea for a writing activity. Each student would write a short fiction story and read it to the class in order to get some feedback. Next, they would correct and proofread their own texts and their classmates’. Once all the correcting is done, they could draw or find some pictures to go along with their stories. Depending on the grade level, and with the teacher’s help and clear instructions, each student could be reponsible for putting together their story on the platform and intergrating their text and pictures to the book. Once all the stories are put together, the book could be published and presented in the school library for example. This project could be carried-out with different classes and grade levels all at once and when all the books are published, a school activity could be organized in order to present each book to the other classes. After that, there could even be reading activities related to the students’ books.

A second idea for an ESL activity could be to have students do a research on a certain subject, in English, and create a magazine with all their articles. For example, the theme of the magazine could be “Cultures Around the World” and each student could find information and write an article about a specific culture. Just like in the previous activity, before the magazine is published, there would be a lot of auto-correction, peer review and proofreading.

There are many ways in which BookWright can be interesting for ESL teaching, particularly for writing activities, but also for reading. Of course the activities have to be planned in the school budget, because, though not very expensiv, there is a cost for all publications made with Blurb. The prices vary depending on the selected format and the quality of the paper, but they start at around 15$, which is affordable for a class project. Also, the students could order a copy for themseles if they wish to do so.

I would definitely consider using BookWright with my ESL classes because these types of projects would without a doubt arouse the students’ interest and motivation to participate. It would be a great way to get them to practice their reading, researching and writing skills.


My Story: Both Fun and Educational

What is My Story?

icon175x175.png

Many years ago, technology was not used to educate children and to  keep them entertained and amused. Today, however, many apps and websites are available to make children develop, learn, create, and have fun! For example, the application called My Story – Book Creator for Kids is a free iPhone and iPad app that lets children create their very own storybooks. Indeed, this application was created by the American company Bright Bot. This company was created in 2013 by Azin Mehrnoosh, Mohammed El-Serougi, and Brian Vanaski. Bright Bot aims at creating tools that expand children’s imagination in the classroom. As brightbot.com states, the app My Story more particularly aims at helping children discover their voice, encouraging fine motor skill development, helping boost test scores, allowing confidence building, developing storytelling skills as well as enhancing articulation, storytelling, and vocabulary. Perhaps this is why this app has been downloaded more that 850,000 times in over 119 countries all around the world. There is a My Story – Book Creator School Edition also available on the Apple Store, which sells for $5.49 and is specifically made for schooling purposes. However, the My Story – Book Maker for Kids app is a free version that is used mostly for leisure and amusement in school or at home. As a matter of fact, My story is a great and fun way for children to create and learn.

What can My Story do?

My Story – Book Maker for Kids is an extraordinarily easy to use book creator and book sharing app. It encourages kids and adults to create books using photos, typed content, voice recordings, and drawings directly on the app. The very first thing you need to do is to create a Story Book Account. After creating an account, the app will bring you to the gallery where you will keep all of your storybooks. This is where you can add, delete, move, or change the titles of your storybooks. The gallery is also where you can buy addition features, like more stickers or filters. However, in order to access these features and make these changes, a grown up check is required. Indeed, a grown up check is a simple verification that an adult is in charge of the iPhone or iPad at that exact moment. The grown up check typically involves swiping in a particular direction with two fingers .IMG_1311.PNG
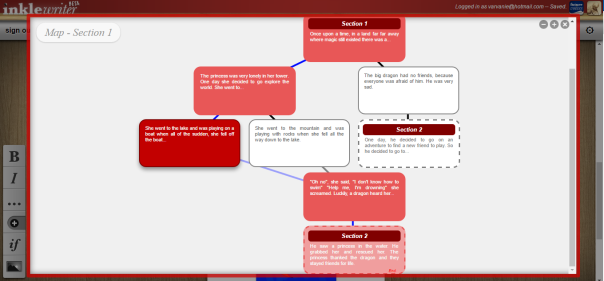
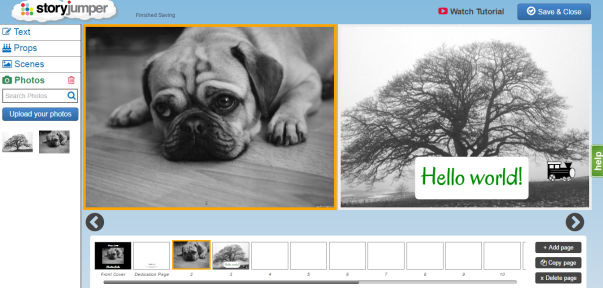
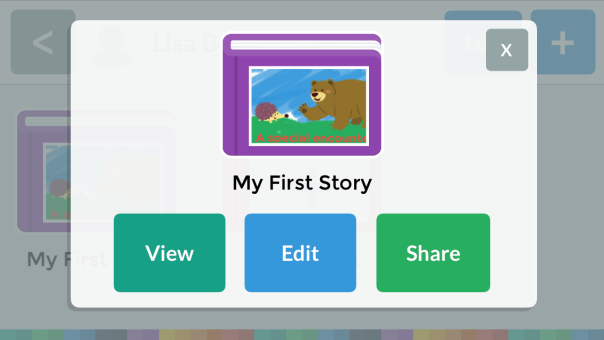
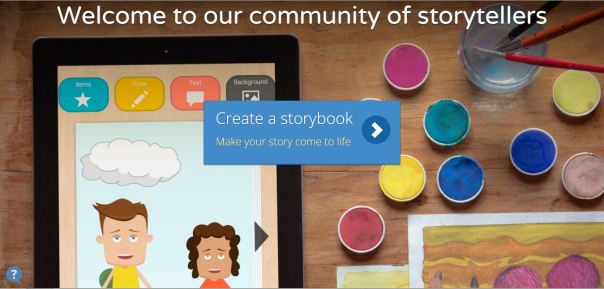
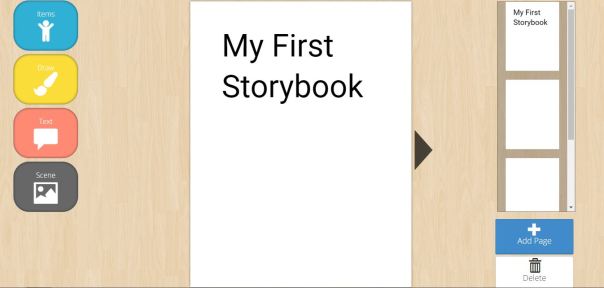
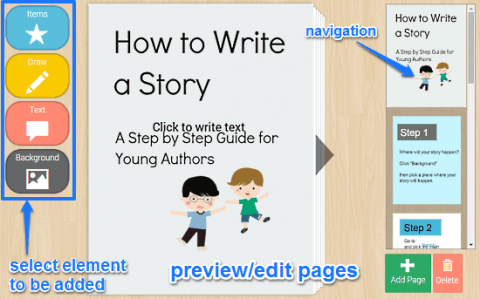
Next, it is then possible to create a book. You simply need to tap with your finger on “Add a book” to start editing your new storybook. After having tapped on edit, children and adults can start creating! Indeed, there are four different options available. The first option is where you can record your voice or music. To record, you simply need to tap the red button on the top right corner of the screen.image1.PNG
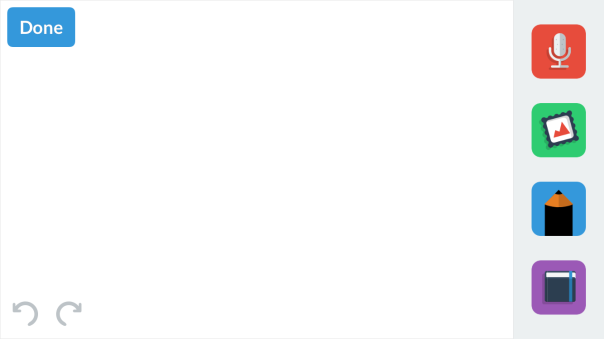
The second option is where you can add stickers, pictures from your photo library, or text by tapping the green button with your finger. Only a limited amount of stickers come with the free version of the app. As mentioned above, additional stickers can be purchased afterwards.image2.PNG
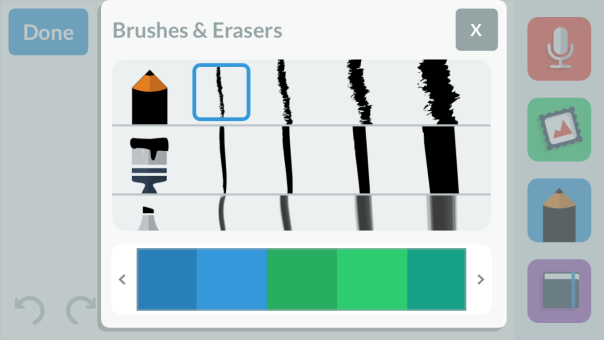
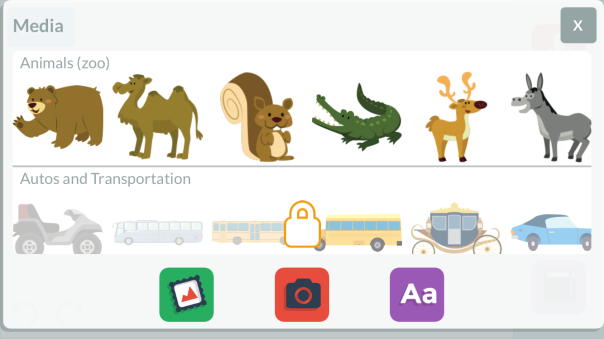
The third option of My Story is where you can draw by tapping on the blue button. Indeed, this option comes with three great brushes and more than 20 colors to choose from. The brushes also come in different widths in order to make your storybook as beautiful as possible.image3.PNG
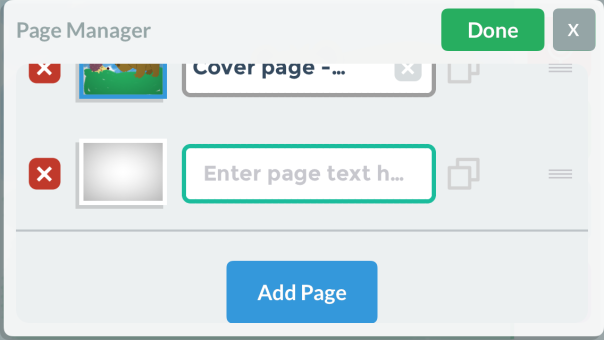
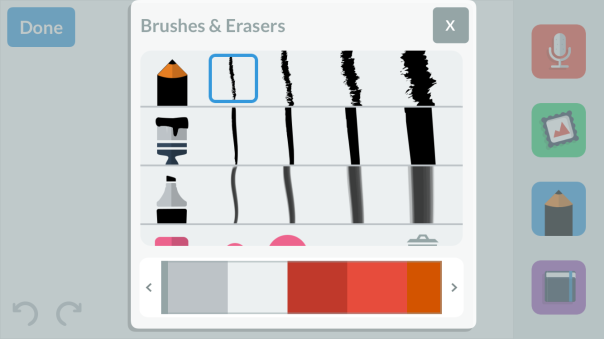
The fourth option is where you can manage your storybook pages by tapping on the purple button. In fact, you can title, duplicate, add, delete, and rename all of the pages in your storybook. This option makes sure that your storybook is well organized and that the final product is the best that it can possibly be!image4.PNG

My experiences with My Story?

I personally have had a wonderful experience using My Story. In fact, I have greatly enjoyed reviewing and exploring this simple and amusing app. One thing that I have noticed about this application is that it can be used by people of all ages. As commonsensemedia.org expresses, “Whether your young kid wants to create a fictional story with her own drawings using lots of color, your teen loves making digital photo books to share with friends, or you’d like to make a presentation-style book with text, photos, and voice recording, this app can empower anyone to make books of all kinds.” Indeed, this app can please individuals of all ages and all cultures. Another interesting feature that I noticed was its mix of different medias. As a matter of fact, this app encourages children to use multiple medias, such as drawings, pictures, written texts, recordings, and so on. This is great compared to other apps that only focus on one specific media. These are only a few reasons why I have personally enjoyed using My Story and will probably use it when I have kids.

Why My Story is great in ESL classrooms?

English second language students could greatly benefit from using My Story. It would indeed be great in ESL classrooms for many different reasons. First, its easy to use technology makes it very simple for students to understand and create. After one simple example on the iPad, students can easily explore and create on their own. After that, the possibilities are endless! ESL teachers can use it for students’ fiction stories, non-fiction reports, field trip photo journals, and so much more. In addition, as graphite.org says, “Stories remain stored on the iPad (unless the app is deleted) so kids can return to work on the same story for numerous writing sessions.” This makes it even more great, since students and teachers can use it to work on long-term projects. After a storybook is finished, children can easily email it or publish it to iBooks. This permits them to practice writing, drawing, photography, and/or speaking skills, which is crucial in an ESL classrooms. Lastly, My Story could be great in ESL classrooms due to the fact that shy students can record themselves instead of speaking in front of the class. Teachers can thus evaluate them while they are stress-free and enjoying themselves. For all of these different reasons, My Story is great for ESL classrooms!


My Storybook story

What is it?

my-storybook-logo1My storybook is a website in which mostly teachers and students can create a storybook.  In fact, My Storybook is a web platform which allows people to create, illustrate and share a short story online.  This platform was created in 2014 as a free educational tool.  Even though the tool his free and that infinite number of the story can be made a $5 charge for high-quality printable PDFs of a storybook is require. Nevertheless, after paying the charge the book can still be revise and reprint as many as the person wish.  In addition, My Storybook encourage teachers to complete a survey in order to improve their platform so that it better suits the need of the educators.

How to use it?

mystorybook-480x299
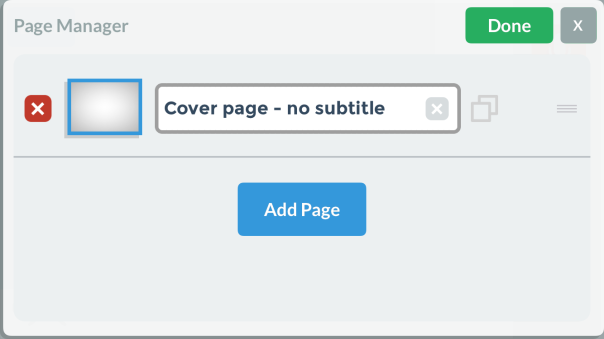
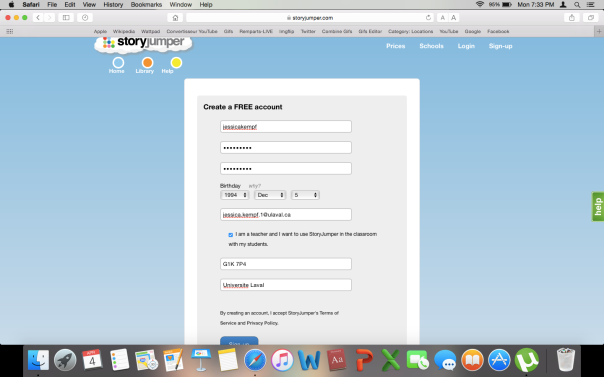
My Storybook is an easy tool to use especially after watching the tutorial. Indeed, the first step is to create an account which works with an e-mail address. Students can also log in with a single address for multiple computers which can ease the processes, especially if not all students have an e-mail address. After logging in there is the possibility for students and teachers to watch the tutorial and start their book.

Personal exploration of the tool and personal thought

The platform was really easy to use. Indeed, after watching the tutorial making a book was a cakewalk. Texts are easy to put in and so are images. Moreover, the pictures can be drawn, taken from your personal collection or taken from My Storybook gallery.  Unfortunately, the pictures that are in the gallery are not the best. They look like basic drawings which were not the most beautiful things ever seen. On the other hand, a lot of pictures from different theme are available which compensate for their lack of beauty.  Indeed, My Storybook offers a wide variety of images that can suits every theme students want to work on. It is also possible to put more than one picture on the same page, in other words, to make some sort of collage with the picture which is another positive point if this website. Furthermore, My Storybook really care about teachers using this site and want to improve their platform in order to better fit the needs of teachers. In order to save the document, a change in the page is the only thing that is needed.  Students can also work in collaboration to make a book or a review list of all the different things that they have seen throughout the year.  Unfortunately, they cannot do so at the same time. They have to do it one after the other, otherwise, the changes will not be changed. Even though the tool was easy to use,  the  tutorial, which was not a necessity, can help students and teachers to simply get acquainted with the site and the things they can do using this site.

Implication for ESL classroom

This website is designed for teachers and should be used by them, but especially by ESL teacher. Indeed, My Storybook can be a great alternative for traditional  writing task  and visual support for oral presentation. Moreover, students can be asked to make a book about their favorite summer vacation instead of just making them write it on a piece of paper. This tool can change traditional writing assignment for the best. 7599383_origAccording to Mrs. Wood a 5th grade teacher: “it allows students the opportunity to create something that they may be reluctant to create using simple pencil and paper”.  On the other hand, it takes more time to ensemble the entire book but the possibilities are infinite compared to traditional writing task and presentation.  In addition, it is also quite easy to share the document with the teacher once it is published. In fact, only the link of the story is needed in order for the teacher to have it which makes it easy for the teacher to correct it and have a proof that the student did it.  Furthermore, collaboration can be made on a project. In order to do both students have to log  in to the same account and they have to work on the project at a different time. In other words, students cannot work on it from 2 separate computers at the same time. They need to alternate their use. Even if they cannot work on it simultaneously they group project can be made with this platform which is a positive side. The fact that students can work together is also a benefit for classroom and ESL classroom. This platform can be used in ESL classroom for multiple reasons such as replacing traditional writing assignment  this platform can also be u sed as a revision tool. Indeed, new words and theory can all be placed in the book and each student can have their own section in which they can put what they find more challenging. By doing so the book can actually become not only some sort of storybook in which the theory can be explained but also a revision book in which each student can work on their weakness. Teachers can also use this tool as a reading exercise and they can either share stories from other students or write stories that interest students and in which they can introduce some language or writing notion.  As mentioned by multiple teachers, My Storybook helps “Developing literacy skills”      through a “fun, clever and easy site” . Moreover, this website is recommend using by teachers not only with kids  use but also for librarian and parents use. Indeed, books written by students and for students can be print out and put in the library or distribute to parents.  To sum up, this site can be really useful for multiple reasons and has no limit regarding what kind of story teachers and students can make. To quote an ESL teacher “My Storybook has been on The Best Places Where Students Can Write Online“.

Final thought

My Storybook is a great website that can be used by multiple teachers and not just ESL ones. Indeed, with his focus on accommodating every teacher and their diverse use  make it  a great tool for teachers. The survey that can be filled in by the teacher and the desire for them to evolve in order to better suits the need of teachers prove that this website is educational driven.  They also have a blog section that contains the best reading of the week and strategies for teaching narrative or other things related to writing and storybook. All in all this site offers great resources to helps students and teachers creating storybook but also to help educators teaching strategies and theories related to book and English writing in general.

Vanessa Crete

Blurb!

What is Blurb? blurb_newlogo

According to Eileen, the creator, Blurb is :

Blurb, the world’s first platform for creating, printing, and publishing independent books. The democratization of illustrated publishing had arrived. But these weren’t just any books. They were beautiful, bookstore-quality books on premium paper stock with archival-quality binding. And anyone could make one. Literally, just one. Or two. Or ten thousand. Blurb was one of those amazing big-picture ideas made real: A mash-up of creative freedom with print-on-demand technology.

Indeed, this online tool can be used to create, photo books, magazines, book covers, images books, trade books or ebooks. Also, the tool is interesting for its atypical sizing options.

For instance, the portrait book is 10 x 8 inches instead of the standard 11 x 8.5 inches. On the other hand, the cover options are standard and limited. There are no lay-flat, leather or fabric cover options. Instead, you can choose from a soft cover, a hard cover with a dust jacket or an image wrapped around a cover. –Jessica Stone

What can you do with it?

To start off your project, you need to download the Bookwright application. With this app, you are now able to create your book. On the other hand, if you are not at ease with the Internet or you feel you do not have the time to create a book, you can hire an expert to create your book. When you have this application on your computer, you no longer need to use the Internet to work on your project. However, you could also use Blurb Bookify online to create your books. Capture d’écran 2016-04-04 à 12.49.26

If you decide to use the online website, you will have access to fewer tools. In fact, it’s not possible to add text directly to the pictures. The Internet tool seems better to create photo books because it’s easy to upload pictures from social networks but also from your computer.  By using the online tool, you could create books and on the same order of idea as the application, set them to sell your final projects on Amazon.

By using the application, you have access to many options to modify tour book. You can start from an empty book or from a template. Those templates include text spaces and pictures spaces. However, you can also add other text zones and pictures to your templates. When you use an empty book, you can add as many text and pictures as you would like to. Capture d’écran 2016-04-01 à 15.26.50I love this tool! It is really easy to use. It took me the time of an application download to understand how it worked. What is also great is that your work is auto-saving. However, you need to do a final saving before quitting the application.

If you don’t want to create a proper book but a magazine or a book cover, you have access to 90 seconds videos to show you how to create your book.This can be great because it allows you to visualize what you will be creating. You can find these videos directly on the application.

I decided to test the tool by creating a book myself. My book is about a trip to Spain and Portugal. However, if you take a look at it, you can see that it includes text about the country and what I did. I found out that it was much simpler that what I thought. According to the Top 10 Reviews, as a photo book editor, Blurb is scoring 8.70/10 and is ranked 8/10.

PROS / Blurb gives you the option to design the book yourself or have a professional online editor do it for you.

CONS / The service only offers standard hard and softcover books. – Jessica Stone

When you are done with your book, you can decide to order it. Books done with this site are really affordable, even for low budgets. You need to choose the type of book and the type of cover you want to get but the steps are really easy to go through.  A book is around 24.99$. However, if you add pages you need to pay for your extra sheets or even if you change the paper type. Also, fast shipping is available but a normal shipping without any additional fee is around three days.

This slideshow requires JavaScript.

When the whole book project is over, you can decide to sell your book on the Internet. You can sell it throughout Blurb itself, on Amazon or also on the Apple store. An Ebook available on the Apple store is worth 9.99$.

Finally, directly on the website, you can shop for books that were done by Blurb users. What is really great is that authors do not have to pay for an editor and authors receive profits for all the books they are selling!

How is it used by teachers?

Teachers can use Blurb to create a class book. As we saw in our Pedagogy class, creating a class book make the students’ sense of belonging to the class increase. This is really important for teachers to create in the class. Also, it could be used to create a collection of stories created by students. ESL teachers should use blurb to make their students create books that will be used in the class as lectures. Indeed, after creating a book, teachers could use the selling part of Blurb to encourage parents to buy the class’ book or the collection to read to their children at night. This way, teachers could use the profits made with the sold books to buy board games or materials for their classes.

Also, using this tool, teachers could give their students the love of writing. In fact, this is a major goal of an ESL teacher since it is not easy to get texts in the students’ second language. With Blurb, students could start writing stories or little texts in English out of the school.

However, because the book could be expensive for parents to buy each book done by their children, they should look on the Internet to find some discounts codes for the books. They are really easy to find and are worth the time spent to find them.

Capture d’écran 2016-04-04 à 22.28.09

As an ESL teacher, I would use Blurb to create a story book for my student to read in the class. Because I believe that reading is the cornerstone of learning a new language, I would like to have my older students to write stories and to image them in order to get a collection of stories. Then, I would read these stories to my younger students in their 15 minutes of reading at the beginning of each class.

Also, because Blurb is easy to use and normally not used in most of the classrooms, students would not see the tool as an evaluation tool. This way, they are less stressed out while doing their tasks and will enjoy more their project. When associated with emotions like joy, projects are better remembered by students and their parents. In fact, parents are really proud to see their children project at home. I believe it could be a really nice way to include ICT’s in the class and make the evaluation interesting.

The pictures download on the application and the dragging option with the pictures makes it easy to use for children of all ages. In fact, students are more used to the use of Ipads nowadays. The interface makes the tool look like an Ipad screen. It makes the tools more tangible. Because you just have to drag what you want on the page, on the page, visual children will feel less deprived than with some other tools.

Blurb is a really great tool that should be more known!

Marie-Christine Laflamme, TESL


StoryJumper

What Is It? 

Being an ESL teacher can sometimes be challenging when it comes to creating new classes. A teacher always has to innovate and find out new ways of presenting different subjects. Fortunately, software tools like StoryJumper exist to help the teachers with their classes. Indeed, it can make them more interesting and more adapted to students’ interests and needs. StoryJumper is a site on which kids can create, illustrate and read books and stories. 

Capture d’écran 2016-03-29 à 14.47.11

How Does It Work?

When I first signed up to StoryJumper, I was asked to sign up either as a normal user or as a teacher. I chose to sign up as a teacher to see what advantages it provided. Then, I had to create a password for my students to sign up for my virtual class.Capture d’écran 2016-03-25 à 16.08.47 

First, when you arrive on the website, you can create a book without being involved in a classroom. On this easy-to-use site, you can add text boxes in which you can write the title of your work. Whenever you write in StoryJumper, you can change the font, the sizing and the color of your text. Also, in the research button, you can write “characters” or “photos” and add creative tools to your story. You can create your own character by choosing a body, a head, a face and other fun accessories. When you add a picture, you can either download one directly from the browser or from your personal uploads. Plus, you can size and shape the pictures the way you desire. One can add a fun and colorful background pages to the book. At the bottom, when you are creating a book, there is always a bar on which each page are. Indeed, you can drag and drop or copy and paste items from one page to another.

Second, the teachers can give handouts to their students to provide directions. This handout shows them how to work with StoryJumper at school and at home. For this reason, the teachers do not have to explain in details the process to create a storybook. They can save time as well. If the teachers want their learners to use StoryJumper at home, the parents have to sign a consent form that can be sent at home by e-mail. 

Finally, you can always save your work in your own online library. You can share it with people on other social media platforms and you can even print out your book. With StoryJumper, you can allow the others to remix your work by clicking on the “allow” button. By doing so, anybody on the StoryJumper community can have access to your book and they can modify it as they want. If you want to print your book, you can print a plain small version of it for free. For 1,95$, you can do the same but with high-quality colors. Also, for 12,95$ and 24,95$, you can have a paperback or a hardcover book. 

My Opinion

I believe that StoryJumper is a very easy-to-use and well-organized website. I would not be afraid to use it with grades 6 of elementary schools and with high-school students because of its simplicity.Capture d’écran 2016-04-02 à 16.00.53 
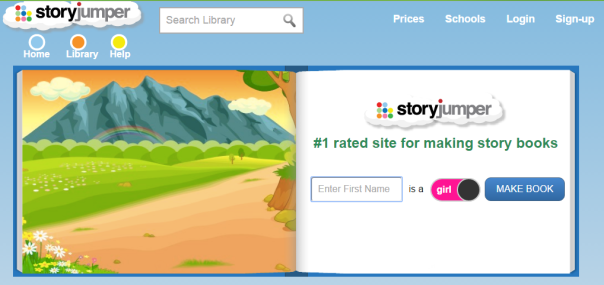
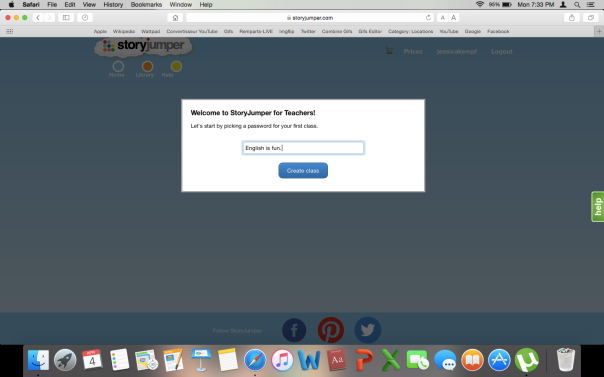
On this website, I like that, as teachers, we are not obligated to only create books with our students. We can also use StoryJumper to read pedagogical books that fit right in an ESL classroom context. As you can see on the picture, when StoryJumper is used in a classroom context, it does not provide  violence images, it provides a good use of language and its even avoids certain subjects, such as drugs and alcohol. 

I think that one of the drawbacks of StoryJumper would be that every tool is not free. It would make it more accessible to work in class if everything was free. Also, there is no app for this site. It would make it much easier for classes that work with IPads, for example.

ESL Teacher Point of View

“My students wrote children’s books for our composition class. Each student was asked to write a book with a “life lesson” that was important for younger generations to learn. […] Night, where students presented digital copies of their books to parents and community members. […]  StoryJumper was perfect for my alternative education students. It was easy to use and students liked the option of uploading their own pictures. We absolutely love the quality of the books.” https://www.storyjumper.com/library/my

This is indeed a good example of activity that can be done in class with StoryJumper. This teacher could have made the students create this story with a moral at the end. The learners could have explained a certain issue and told why it was important for them as a conclusion. Plus, they could have created characters that were related to this conclusion. These characters could either be happy or sad.

Another example would be to make the students “Create A Conclusion” using StoryJumper. I would give them the beginning of a story about a certain topic, and with the help of this website they could have to create the conclusion. The learners would have  new words to include in their conclusion and they would have to be as creative as possible. The pupils would learn new vocabulary as well.

With StoryJumper, the students can work on their language skills. Indeed, they can perfect their writing and their reading. When the learners have to create a new story, it makes them work their creativity and critical thinking. They have to add matching pictures to their text. Plus, there is a  help center to answer any kinds of questions that on might have. 

Pedagogical Tool

The tool “StoryStarter – Tell a story in 7 steps” is very helpful for the teachers and the students. The teachers can base their correction grid upon it and the students can download the worksheet , learn the basics of storytelling and follow the simple guidelines. To complete a small story, the students have to be proficient and creative. Plus, this website can help the learners to master two of the three competencies of the MELS curriculum: Reinvest understanding of texts and writing texts. ESL teachers can use StoryJumper to develop and evaluate students’ English writing competency by asking the students to create stories on a regular basis. The teachers would have the possibility to evaluate and observe their students’ writing skills development through time. TeachersFirst website’s review thought that Storyjumper could be very helpful for ESL students and that it is also very easy to use:

“ESL and ELL students will be able to use the site easily, and will learn appropriate sentence structure and add to their vocabulary by selecting new items to put into the graphic. Older students can also create “little buddy” books for younger students to read and share.” http://www.teachersfirst.com/single.cfm?id=10885

The teachers could notice syntax , vocabulary, and other grammatical errors. Moreover, ESL teachers can evaluate and develop students’ English reading skills by asking students to read other students’ books. They could also read those that are published in the website’s library. Furthermore, the teachers can use StoryJumper to present new subjects, topics and even the course plan in an innovative and creative way. Polly Conway is a teacher and a journalist and she believed that this website could be used with everybody:

“StoryJumper works for a wide age range; little kids will love just playing around with the graphics, and older kids can construct a more advanced story using the advice provided in the StoryStarter section of the site.” https://www.graphite.org/website/storyjumper#more

One of the drawbacks of StoryJumper is that the website does not allow the students to use their oral English. The website could add a voice recorder where the learners could record themselves reading some passages to improve their English oral competency. In my opinion, it would make the website more complete. Also, the website is only presented in this English. It would be interesting for other second language (L2) teachers to have access to other languages, such a French and Spanish.

In conclusion, as a future ESL teacher, I would definitely use StoryJumper with my students. I would make them read online stories and create their own. Overall, I recommend this application for other ESL teachers because it encourages students to develop their English reading and writing skills.